本篇文章给大家带来了关于javascript的相关知识,其中主要介绍了关于操作dom元素添加动画效果的相关问题,下面一起来看一下,希望对大家有帮助。
【相关推荐:javascript视频教程、web前端】
<div></div>
    var box = document.getElementById("box");
    var t = null;
    t = setInterval(function(){

})t = setInterval(function(){终止条件})
    // 元素的属性值 === 目标点
    if(dom.attr === target){
        clearInterval(t);
}起始点
一个运动的起始点其实就是当前元素的位置,我们通过API获取当前元素的位置,让这个位置作为运动的起始。
目标
速度
封装的主要作用就是让元素可以在短时间间隔内不断改变属性实现动画效果
单属性运动框架:
<button>开始运动</button>
<div></div>
<div></div>
<script>
    var  box = document.getElementById("box");
    var  btn = document.getElementById("btn");
    var  target = 500;
    // 速度可以根据 起始点和目标点进行判断,从而决定正负;
    var speed  = 17;
    // - 方向;
    btn.onclick = function(){
        // 1. 获取元素初始位置;
        var _left = box.offsetLeft;
        speed  = target - _left >= 0 ? speed : -speed ;
        var interval = setInterval( function(){
            // 4. 判定运动的终止条件;
            if(Math.abs(target - _left) <= Math.abs(speed) ){
                // 因为终止时有可能没有到达目标点,因此我们把元素赋值到目标点位置;
                box.style.left = target + "px";
                clearInterval( interval );
            }else{
                // 2. 元素根据初始位置进行改变;
                _left += speed;
                // 3. DOM操作,根据已有数据让元素属性发生改变;
                box.style.left = _left + "px";
            }
        } , 30)
    }
</script><script>// - 提取属性名作为参数; btn.onclick = function(){
animate( "left", 500 )}function animate( attr , target , speed = 10 ){
// 1. 获取元素初始样式
var _style = getComputedStyle( box );
// 2. 根据属性要求取出当前的属性的属性值;
var _css_style = parseInt(_style[attr]);
speed = target - _css_style >= 0 ? speed : -speed ;
var interval = setInterval( function(){
// 4. 判定运动的终止条件;
if(Math.abs(target - _css_style) <= Math.abs(speed) ){
// 因为终止时有可能没有到达目标点,因此我们把元素赋值到目标点位置;
box.style[attr] = target + "px";
clearInterval( interval );
}else{
// 2. 元素根据初始位置进行改变;
_css_style += speed;
// 3. DOM操作,根据已有数据让元素属性发生改变;
box.style[attr] = _css_style + "px";
}
} , 30)}</script><script>function animate( dom , attr , target , speed = 10 ){
// 1. 获取元素初始样式
var _style = getComputedStyle( dom );
// 2. 根据属性要求取出当前的属性的属性值;
if( attr === "opacity"){
var _css_style = parseInt(_style[attr] * 100 );
target *= 100;
}else{
var _css_style = parseInt(_style[attr]);
}
speed = target - _css_style >= 0 ? speed : -speed ;
var interval = setInterval( function(){
// 4. 判定运动的终止条件;
if(Math.abs(target - _css_style) <= Math.abs(speed) ){
// 因为终止时有可能没有到达目标点,因此我们把元素赋值到目标点位置;
if( attr === "opacity"){
dom.style[attr] = target / 100;
}else{
dom.style[attr] = target + "px";
}
clearInterval( interval );
}else{
// 2. 元素根据初始位置进行改变;
_css_style += speed;
// 3. DOM操作,根据已有数据让元素属性发生改变;
if( attr === "opacity"){
dom.style[attr] = _css_style / 100 ;
}else{
dom.style[attr] = _css_style + "px";
}
}
} , 30)}</script><button>开始运动</button>
<div></div>
<script>
var box = document.getElementById("box");
var btn = document.getElementById("btn");
btn.onclick = function(){
animate( box , "left" , 500 )
}
function animate( dom , attr , target , transition = "buffer", speed = 10 ){
var _style = getComputedStyle( dom );
if( attr === "opacity"){
var _css_style = parseInt(_style[attr] * 100 );
target *= 100;
}else{
var _css_style = parseInt(_style[attr]);
}
if( transition === "liner"){
speed = target - _css_style >= 0 ? speed : -speed ;
}
var interval = setInterval( function(){
if( transition === "buffer"){
// 计算速度;
speed = (target - _css_style) / 10;
//速度不取整在小数部分会做很多无意义的计算;
speed = speed > 0 ? Math.ceil(speed) :Math.floor( speed )
}
if(Math.abs(target - _css_style) <= Math.abs(speed) ){
// 因为终止时有可能没有到达目标点,因此我们把元素赋值到目标点位置;
if( attr === "opacity"){
dom.style[attr] = target / 100;
}else{
dom.style[attr] = target + "px";
}
clearInterval( interval );
}else{
// 2. 元素根据初始位置进行改变;
_css_style += speed;
// 3. DOM操作,根据已有数据让元素属性发生改变;
if( attr === "opacity"){
dom.style[attr] = _css_style / 100 ;
}else{
dom.style[attr] = _css_style + "px";
}
}
} , 30)
}
</script>
//只需要改变里面transition的值就可以调整运动模式
//buffer为缓冲运动
//liner为匀速运动<script>// 在一个定时器之中,用for循环同时执行多次dom样式操作; // 1. 需要优化的部分:参数,要把样式部分的参数优化成一个对象; function animate( dom , attrs , transition = "buffer", speed = 10 ){
var _style = getComputedStyle( dom );
// 获取元素当前的属性 :
for(var attr in attrs ){
// attr ? 要过渡的css属性名;
// attrs[attr] ? 要过渡的当前属性;
attrs[attr] = {
target : attrs[attr],
// 元素当前的属性放入到这个对象之中;
now : parseInt(_style[attr])
}
}
// 因为直接关闭interval是没有作用的,此时的inteval是一个局部变量,每次animate被调用的时候都会直接重置;
// 我们应该吧定时器的id放在当前正在执行过渡效果的dom对象上;
clearInterval(dom.interval);
dom.interval = setInterval( function(){
for(var attr in attrs){
// 取出 attrs 之中的目标点和当前值;
speed = (attrs[attr].target - attrs[attr].now) / 10 ;
// 根据速度正负,进行速度取整;
speed = speed > 0 ? Math.ceil( speed ) : Math.floor( speed );
// 判定终止条件;
if( attrs[attr].target === attrs[attr].now){
// 删除已经到达目标点的属性;
delete attrs[attr]
// 判定attrs里面已经没有属性了;
for(var a in attrs){
return false;
}
clearInterval(dom.interval);
}else{
attrs[attr].now += speed;
dom.style[ attr ] = attrs[attr].now + "px";
}
}
} , 30)}// 优化参数之后,key值是等待运动的css属性,value值是元素的目标; btn.onclick = function(){
animate( box , { width : 500 , height : 400 } )}</script> <style>
*{
margin: 0;
padding: 0;
}
.container{
width: 1130px;
height: 286px;
margin: 0 auto;
position: relative;
overflow: hidden;
}
.wrapper{
width: 6780px;
position: absolute;
left: 0;
}
.slide{
float: left;
}
.slide , .slide img{
width: 1130px;
height: 286px;
}
.button-prev{
left: 0;
background-position: 30px center;
background-image: url(https://static.zcool.cn/git_z/z/widget/slider/images/svg/left_arrow.svg?v=2);
top: 0;
width: 13px;
height: 100%;
padding: 0 80px;
border-radius: 2px;
position: absolute;
background-repeat: no-repeat;
}
.button-prev:hover{
background-image: url(https://static.zcool.cn/git_z/z/widget/slider/images/svg/left_arrowhover.svg?v=2);
}
.button-next{
right: 0;
background-position: 91px center;
background-image: url(https://static.zcool.cn/git_z/z/widget/slider/images/svg/right_arrow.svg?v=2);
top: 0;
width: 13px;
height: 100%;
padding: 0 80px;
border-radius: 2px;
position: absolute;
background-repeat: no-repeat;
}
.button-next:hover{
background-image: url(https://static.zcool.cn/git_z/z/widget/slider/images/svg/right_arrowhover.svg?v=2);
}
.pagination{
position: absolute;
bottom: 10%;
width: 100%;
height: 10px;
left: 30px;
}
.pagination span{
display: inline-block;
width: 10px;
height: 10px;
margin-left: 10px;
border-radius: 50%;
background-color: cornflowerblue;
border: 2px solid transparent;
background-clip: content-box;
}
.pagination span.active{
border: 2px solid skyblue;
box-shadow: 0 0 5px skyblue;
background-color: #fff;
}
</style><script></script><script> // 轮播图的核心就是左右切换按钮,实现显示元素下标的改变; var index = 0 ; var prev = 0; var next_btn = document.querySelector(".button-next"); var prev_btn = document.querySelector(".button-prev"); var slides = document.querySelectorAll(".slide"); var wrapper = document.querySelector(".wrapper"); // 自动播放的阻止功能是在鼠标移入container容器之中就触发的; var container = document.querySelector(".container"); var bullets = document.querySelectorAll(".pagination span"); // 绑定事件 // - 轮播图改变下标功能必须设置边界; function bindEvent(){ next_btn.onclick = function(){ add(); bannerAnimate(); } prev_btn.onclick = function(){ reduce() bannerAnimate(); } container.onmouseover = function(){ stop(); } container.onmouseout = function(){ autoPlay(); } bullets.forEach( function( ele , i ){ ele.onmouseover = function(){ prev = index; // 防止穿帮逻辑; // - 如果在假的第0张图片上(在最后一张图片上) // - 我们先让真假图片呼喊然后在进行元素的动画效果; if( index === 5 ){ wrapper.style.left = 0; } index = i; bannerAnimate(); } }) } // 下标增加; function add(){ prev = index; if( index === slides.length - 1 ){ // 这个逻辑会在最后一张图片进行切换时进入; // 我们让wrapper直接位移到开头,改变元素位置的同时让用户无法感知; wrapper.style.left = 0; // 我们需要从第0个图片切换到第一个图片; // -因为我们最后一张图片的显示和开头图片的显示是一样的 index = 1; }else{ index ++; } } // 下标减少; function reduce(){ prev = index; if( index === 0 ){ wrapper.style.left = -(slides.length - 1) * 1130 + "px"; index = slides.length - 2; }else{ index --; } } // 根据我们的算法去实现动画效果; function bannerAnimate(){ animate( wrapper , { left : - index * 1130 }); // 给对应的分页器按钮添加active; // 先去清空所有的类名; bullets.forEach( function( ele ){ ele.classList.remove("active") }) // 下标需要进行特殊处理,在显示最后一张图片的时候,给第0个按钮添加active; bullets[ index === 5 ? 0 : index ].classList.add("active"); } bindEvent(); var interval = null; function autoPlay(){ // 间隔3s,让js点击一下下一页按钮; interval = setInterval( function(){ // 虚拟点击 : next_btn.dispatchEvent( new Event("click")); } , 3000 ) } function stop(){ clearInterval( interval ) } autoPlay(); </script><div></div> <div></div>![实例详解之操作单个dom元素添加动画]()
![实例详解之操作单个dom元素添加动画]()
![实例详解之操作单个dom元素添加动画]()
![实例详解之操作单个dom元素添加动画]()
![实例详解之操作单个dom元素添加动画]()
![实例详解之操作单个dom元素添加动画]()
示例如下
项目背景:uniapp h5应用,为了提示用户下载,这里有个 提示下载的dom, 本想来想在 每个 tabbar 中添加(一共添加四个);但是想 尝试换种玩法 如下: 效果如下:
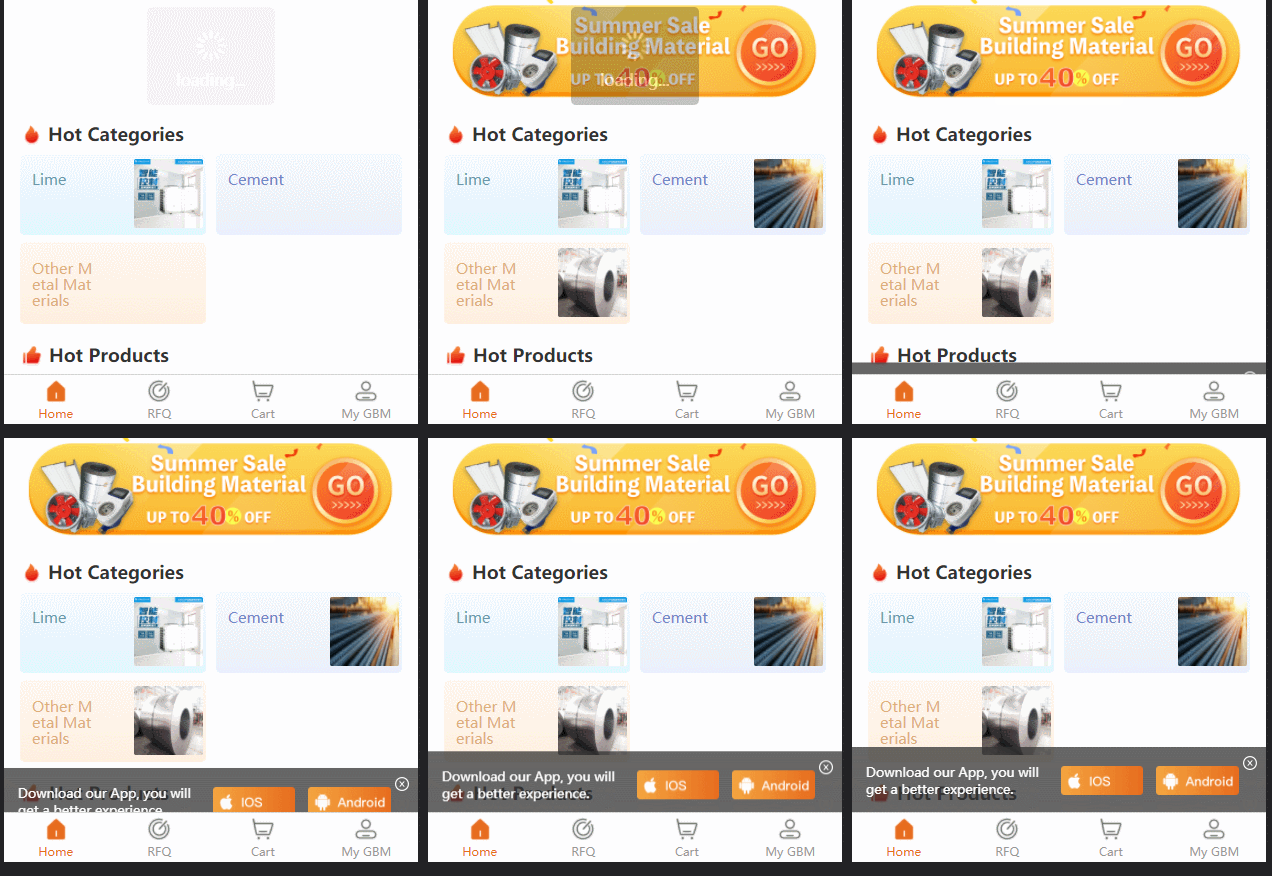
直接上代码:
function showDownloadTisp() {
  console.log('--------------------------->showDownloadTisp')
  // #ifdef H5
  const parent = document.querySelector('.uni-tabbar')
  console.log('parent:', parent)
  const tips = document.createElement('p')
  tips.id = 'downloadTisp'


  tips.setAttribute('style',
    'background: rgba(51,51,51,0.75);'
  )

  tips.setAttribute('style',
    `background: rgba(51,51,51,0.75); position: fixed;width: 100%;height: ${uni.upx2px(120)}px; bottom:${uni.upx2px(-140)}px;  display: flex;flex-direction: row;justify-content: space-between;align-items:center;transition:0.5s;`
  )

  const desParent = document.createElement('p')
  const des = document.createTextNode('Download our App, you will get a better experience.')
  desParent.appendChild(des)
  desParent.setAttribute('style',
    `padding: 0;color: #FFFFFF;font-size:${uni.upx2px(24)}px;margin-left: ${uni.upx2px(27)}px;padding-right: ${uni.upx2px(25)}px;`
  )

  const iosImage = document.createElement('img')
  iosImage.src = '../static/guide/download ios.png'
  iosImage.setAttribute('style',
    `width: ${uni.upx2px(154)}px;height: ${uni.upx2px(54)}px;margin-right: ${uni.upx2px(25)}px;`)

  const anroidImage = document.createElement('img')
  anroidImage.src = '../static/guide/download android.png'
  anroidImage.setAttribute('style',
    `width: ${uni.upx2px(154)}px;height: ${uni.upx2px(54)}px;margin-right: ${uni.upx2px(50)}px;`)

  const closedImage = document.createElement('img')
  closedImage.src = '../static/guide/download closd.png'
  closedImage.setAttribute('style',
    `width: ${uni.upx2px(30)}px;height: ${uni.upx2px(30)}px;position: absolute;right:${uni.upx2px(15)}px;top: ${uni.upx2px(15)}px;padding: ${uni.upx2px(5)};`
  )

  tips.appendChild(desParent)
  tips.appendChild(iosImage)
  tips.appendChild(anroidImage)
  tips.appendChild(closedImage)


  iosImage.onclick = () => {
    //console.log("iosImage.onclick")
    window.location.href = 'https://apps.apple.com/cn/app/gbm001/id1574324240'
    // window.open('https://www.baidu.com/')
  }

  anroidImage.onclick = () => {
    //console.log("anroidImage.onclick")
    window.location.href = 'https://play.google.com/store/apps/details?id=com.vandream.gbmpro'
    // window.open('https://www.sina.com.cn/')
  }

  closedImage.onclick = () => {
    console.log("closedImage.onclick")
    tips.remove()
  }


  parent.parentNode.appendChild(tips)
  //parent.appendChild(tips)


  setTimeout(() => {
    tips.style.transform = `translateY(${uni.upx2px(-140) - 50}px);`
    //console.log(" tips.style.transform done")
  }, 2500)

  // #endif
}通过代码创建节点 并且代码这是 style; 以及动画;在应用启动的时候 调用就可以了;
关于 js 设置变换动画;这边改成了 3D 的形式
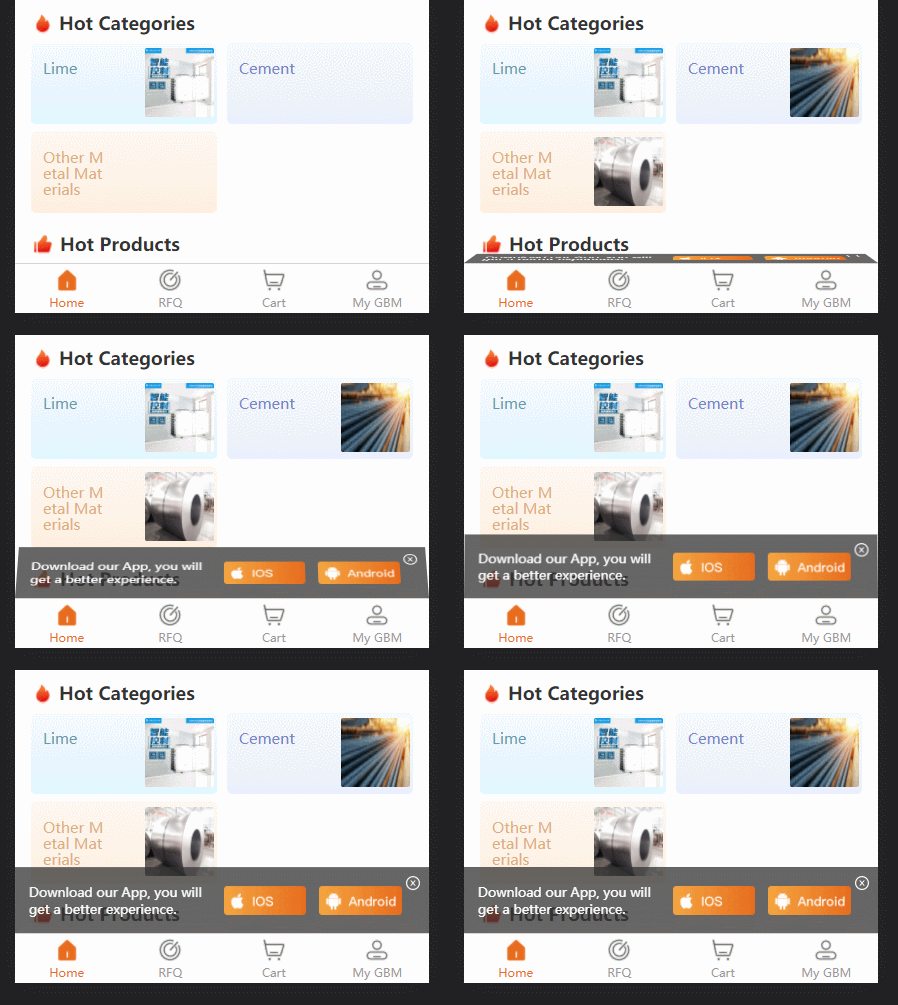
function showDownloadTisp() {
  // #ifdef H5
  const parent = document.querySelector('.uni-tabbar')
  // console.log('parent:', parent)
  const tips = document.createElement('p')
  tips.id = 'downloadTisp'

  // tips.setAttribute('style',
  //   'background: rgba(51,51,51,0.75);'
  // )

  // tips.setAttribute('style',
  //   `background: rgba(51,51,51,0.75); position: fixed;width: 100%;height: ${uni.upx2px(120)}px; bottom:${uni.upx2px(-140)}px;  display: flex;flex-direction: row;justify-content: space-between;align-items:center;transition:0.5s;`
  // )
  tips.setAttribute('style',
    `background: rgba(51,51,51,0.75); position: fixed;width: 100%;height: ${uni.upx2px(120)}px; bottom:50px;  display: flex;flex-direction: row;justify-content: space-between;align-items:center;transition:0.5s; transform-origin:center bottom; transform:perspective(900px) rotateX(90deg);`
  )

  const desParent = document.createElement('p')
  const des = document.createTextNode('Download our App, you will get a better experience.')
  desParent.appendChild(des)
  desParent.setAttribute('style',
    `padding: 0;color: #FFFFFF;font-size:${uni.upx2px(24)}px;margin-left: ${uni.upx2px(27)}px;padding-right: ${uni.upx2px(10)}px;`
  )

  const iosImage = document.createElement('img')
  // iosImage.src = '../static/guide/download ios.png'
  iosImage.src = 'https://img.vandream.com/54/0330f6211506cc.png'
  iosImage.setAttribute('style',
    `width: ${uni.upx2px(154)}px;height: ${uni.upx2px(54)}px;margin-right: ${uni.upx2px(25)}px;`)

  const anroidImage = document.createElement('img')
  // anroidImage.src = '../static/guide/download android.png'
  anroidImage.src = 'https://img.vandream.com/53/0330f45097465d.png'
  anroidImage.setAttribute('style',
    `width: ${uni.upx2px(154)}px;height: ${uni.upx2px(54)}px;margin-right: ${uni.upx2px(50)}px;`)

  const closedImage = document.createElement('img')
  // closedImage.src = '../static/guide/download closd.png'
  closedImage.src = 'https://img.vandream.com/52/0330f523d7709d.png'
  closedImage.setAttribute('style',
    `width: ${uni.upx2px(30)}px;height: ${uni.upx2px(30)}px;position: absolute;right:${uni.upx2px(15)}px;top: ${uni.upx2px(15)}px;padding: ${uni.upx2px(5)};`
  )

  tips.appendChild(desParent)
  tips.appendChild(iosImage)
  tips.appendChild(anroidImage)
  tips.appendChild(closedImage)

  iosImage.onclick = () => {
    console.log('iosImage.onclick')
    window.location.href = 'https://apps.apple.com/cn/app/gbm001/id1574324240'
    // window.open('https://www.baidu.com/')
  }

  anroidImage.onclick = () => {
    console.log('anroidImage.onclick')
    window.location.href = 'https://play.google.com/store/apps/details?id=com.vandream.gbmpro'
    // window.open('https://www.sina.com.cn/')
  }

  closedImage.onclick = () => {
    console.log('closedImage.onclick')
    tips.remove()
  }

  parent.parentNode.appendChild(tips)
  // parent.appendChild(tips)

  setTimeout(() => {
    // tips.style.transform = `translateY(${uni.upx2px(-140) - 50}px);`
    tips.style.transform = 'rotateX(0deg)'
    // console.log(" tips.style.transform done"):rotateX(90deg);
  }, 2500)

  // #endif
}【相关推荐:javascript视频教程、web前端】
以上就是实例详解之操作单个dom元素添加动画的详细内容,更多请关注php中文网其它相关文章!



Copyright 2014-2024 https://www.php.cn/ All Rights Reserved | php.cn | 湘ICP备2023035733号