
本篇文章带大家了解下angular中的内容投影,介绍一下单插槽内容投影、多插槽内容投影、有条件的内容投影,希望对大家有所帮助!
【相关教程推荐:《angular教程》】
单插槽内容投影是指创建一个组件,你可以在其中投影一个组件。
zippy-basic.component.ts
import { Component } from '@angular/core';

@Component({
  selector: 'app-zippy-basic',
  template: `
  <h2>单插槽内容投影</h2>
  <ng-content></ng-content>
`
})
export class ZippyBasicComponent {}有了 ng-content 元素,该组件的用户现在可以将自己的消息投影到该组件中。例如:
app.component.html
<!-- 将 app-zippy-basic 元素包裹的全部内容投影到 zippy-basic 组件中去 -->
<app-zippy-basic>
  <p>单插槽内容投影:投影数据</p>
</app-zippy-basic>
效果如下: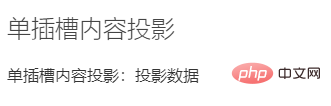
ng-content 元素是一个占位符,它不会创建真正的 DOM 元素。
ng-content的那些自定义属性将被忽略。
- 组件模板含有多个
ng-content标签。- 为了区分投影的内容可以投影到对应
ng-content标签,需要使用ng-content标签上的select属性作为识别。select属性支持标签名、属性、CSS 类和 :not 伪类的任意组合。- 不添加
select属性的ng-content标签将作为默认插槽。所有为匹配的投影内容都会投影在该ng-content的位置。
zippy-multislot.component.ts
import { Component } from '@angular/core';

@Component({
  selector: 'app-zippy-multislot',
  template: `
  <h2>多插槽内容投影</h2>
  <ng-content></ng-content>
  <ng-content select="[question]"></ng-content>
`
})
export class ZippyMultislotComponent {}app.component.html
<!-- 使用 question 属性的内容将投影到带有 `select=[question]` 属性的 ng-content 元素。 -->
<app-zippy-multislot>
  <p question style="color: hotpink;">
    带question属性的p元素
  </p>
  <p style="color: lightgreen">不带question属性的p元素-->匹配到不带select属性的ng-content</p>
  <p>不带question属性的p元素-->匹配到不带select属性的ng-content</p>
</app-zippy-multislot>效果如下: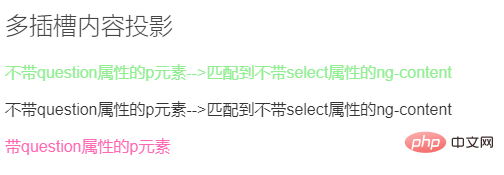
在前面的示例中,只有第二个 ng-content 元素定义了select 属性。结果,第一个 ng-content 元素就会接收投影到组件中的任何其他内容。
推荐使用
ng-container标签,因为该标签不需要渲染真实的 DOM 元素。
<ng-container *ngTemplateOutlet="templateRefExp; context: contextExp"></ng-container>
<!-- 等同 -->
<ng-container [ngTemplateOutlet]="templateRefExp" [ngTemplateOutletContext]="contextExp"></ng-container>
| 参数 | 类型 | 说明 |
|---|---|---|
| templateRefExp | TemplateRef | null | 一个字符串,用于定义模板引用以及模板的上下文对象 |
| contextExp | Object | null | 是一个对象,该对象的键名将可以在局部模板中使用 let 声明中进行绑定。在上下文对象中使用 $implicit 为键名时,将把它作为默认值。 |
ng-template 标签的#ID会匹配templateRefExp,将ng-template标签的内容嵌入到指定的ngTemplateOutlet中。
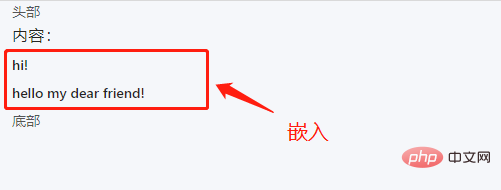
例一:
<header>头部</header>
<main>
	<h3>内容:</h3>
	<ng-container [ngTemplateOutlet]="greet"></ng-container>
</main>
<footer>底部</footer>

<ng-template #greet>
	<div>
		<h4>hi!</h4>
		<h4>hello my dear friend!</h4>
	</div>
</ng-template>
效果:
ContentChild:与内容子节点有关,操作投影进来的内容;ViewChild:与视图子节点有关,操作自身的视图内容;在上一部分,我们通过内容投影,让自定义的组件标签能够嵌入html标签或自定义组件标签,那么它如何操作投影进来的内容呢?
首先创建两个组件
/**** part-b.component.ts ****/
import { Component, OnInit,Output} from '@angular/core';

@Component({
	selector: 'app-content-part-b',
	templateUrl: './part-b.component.html',
	styleUrls: ['./part-b.component.scss']
})

export class PartBComponent implements OnInit {
	constructor() { }
	ngOnInit() { }

	public func():void{
		console.log("PartB");
	}
}/**** part-a.component.ts ****/
import { Component, OnInit, ContentChild } from '@angular/core';
// 1、引入 part-b 组件
import { PartBComponent } from '../part-b/part-b.component';
@Component({
selector: 'app-content-part-a',
templateUrl: './part-a.component.html',
styleUrls: ['./part-a.component.scss']
})
export class PartAComponent implements OnInit {
// 2、获取投影
@ContentChild(PartBComponent) PartB:PartBComponent
constructor() { }
ngOnInit() {}
ngAfterContentInit(): void {
// 3、调用 part-b 组件的 func() 方法
this.PartB.func();
}
public func() {
console.log('PartA')
}
}将part-b组件的内容投影到part-a组件中
 <!-- content.component.html -->
<div>
	<div>Content</div>
	<div>
		<app-content-part-a>
		<!-- 投影在part-a组件中的内容 -->
			<h1>PartA--start</h1>
			<app-content-part-b></app-content-part-b>
			<span>PartA--end</span>
		</app-content-part-a>
	</div>
</div>
在组件的生命周期里面,有一个钩子
ngAfterContentInit()是与投影内容初始化有关,所以我们有关投影的内容操作尽量放在它初始化完成之后进行
上一部分的ContentChild操作的时投影进来的内容,而ViewChild操作的是自身的视图内容
给上一部分的content.component.html修改如下:
 <!-- content.component.html -->
<div>
	<div>Content</div>
	<div>
	<!-- 在此处引用模板变量 #partA -->
		<app-content-part-a #partA>
			<h1>PartA--start</h1>
				<app-content-part-b></app-content-part-b>
			<span>PartA--end</span>
		</app-content-part-a>
	</div>
</div>
/**** content.component.ts ****/
import { Component, OnInit, ViewChild } from '@angular/core';

@Component({
	selector: 'app-content',
	templateUrl: './content.component.html',
	styleUrls: ['./content.component.scss']
})

export class ContentComponent implements OnInit {
	// 2、获取视图 partA
	@ViewChild('partA') partA: any;
	constructor() { }
	ngOnInit() {}
	ngAfterViewInit(): void {
		// 3、调用 part-a 组件的 func() 方法
		this.partA.func();
	}
}
ngAfterContentInit()对应的是ngAfterViewInit()(视图节点初始化是在投影内容初始化之后)
ContentChild和ViewChild还存在复数的形式,即ContentChildren和ViewChildren,它们取到的是节点的一个集合,其他的没有什么区别
写法如下:
import { Component, OnInit, ContentChild,ContentChildren ,QueryList } from '@angular/core';
import { PartBComponent } from '../part-b/part-b.component';

@Component({
	selector: 'app-content-part-a',
	templateUrl: './part-a.component.html',
	styleUrls: ['./part-a.component.scss']
})
export class PartAComponent implements OnInit {

	@ContentChildren(PartBComponent) PartBs: QueryList<PartBComponent>;

	constructor() { }
	ngOnInit() {}
}更多编程相关知识,请访问:编程入门!!
以上就是一文了解angular中的3种内容投影(单插槽、多插槽、有条件)的详细内容,更多请关注php中文网其它相关文章!


Copyright 2014-2024 https://www.php.cn/ All Rights Reserved | php.cn | 湘ICP备2023035733号


 0
0 18
18


![ThinkPHP5实战之[教学管理系统]](https://img.php.cn/upload/course/000/000/068/6253d87459486427.png)


