这篇文章主要介绍了jquery实现email邮箱地址自动补全功能代码,涉及jquery鼠标事件及字符操作的相关技巧,具有一定参考借鉴价值,需要的朋友可以参考下,具体如下:
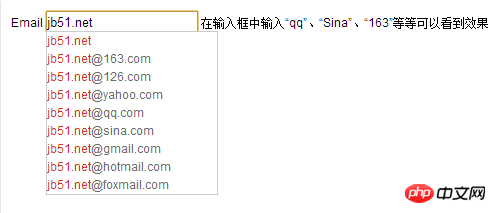
jQuery Email邮箱地址自动补全代码,输入Email时,会自动加入@符号,在输入框中输入“qq”、“Sina”、“163”等等可以看到效果;鼠标经过提示Email时,高亮该条Email,鼠标点击Email时,文本框内容替换成该条Email,并删除提示层.
运行效果截图如下:
在线演示地址如下:
http://demo.jb51.net/js/2015/jquery-email-auto-comp-codes/
具体代码如下:
<!DOCTYPE html PUBLIC "-//W3C//DTD XHTML 1.0 Transitional//EN"
"http://www.w3.org/TR/xhtml1/DTD/xhtml1-transitional.dtd">
<html xmlns="http://www.w3.org/1999/xhtml">
<head>
<title>输入Email相关字符自动提示Email地址</title>
<script src="jquery-1.6.2.min.js" type="text/javascript"></script>
<style type="text/css">
body
{
margin:0px;
padding:0px;
font-family:Arial;
font-size:12px;
padding:10px;
}
#myemail, .newemail, .newemailtitle{
cursor:default;
line-height:18px;
}
</style>
</head>
<body>
Email <input id="me" type="text" value="" style="width:150px; height:18px; line-height:18px; border:1px solid #999;">
<script type="text/javascript">
var nowid;
var totalid;
var can1press = false;
var emailafter;
var emailbefor;
$(document).ready(function(){
$("#me").focus(function(){ //文本框获得焦点,插入Email提示层
$("#myemail").remove();
$(this).after("<p id='myemail' style='width:170px; height:auto; background:#fff; color:#6B6B6B; position:absolute; left:"+$(this).get(0).offsetLeft+"px; top:"+($(this).get(0).offsetTop+$(this).height()+2)+"px; border:1px solid #ccc;z-index:5px; '></p>");
if($("#myemail").html()){
$("#myemail").css("display","block");
$(".newemail").css("width",$("#myemail").width());
can1press = true;
} else {
$("#myemail").css("display","none");
can1press = false;
}
}).keyup(function(){ //文本框输入文字时,显示Email提示层和常用Email
var press = $("#me").val();
if (press!="" || press!=null){
var emailtxt = "";
var emailvar = new Array("@163.com","@126.com","@yahoo.com","@qq.com","@sina.com","@gmail.com","@hotmail.com","@foxmail.com");
totalid = emailvar.length;
var emailmy = "<p class='newemail' style='width:170px; color:#6B6B6B; overflow:hidden;'><font color='#D33022'>" + press + "</font></p>";
if(!(isEmail(press))){
for(var i=0; i<emailvar.length; i++) {
emailtxt = emailtxt + "<p class='newemail' style='width:170px; color:#6B6B6B; overflow:hidden;'><font color='#D33022'>" + press + "</font>" + emailvar[i] + "</p>"
}
} else {
emailbefor = press.split("@")[0];
emailafter = "@" + press.split("@")[1];
for(var i=0; i<emailvar.length; i++) {
var theemail = emailvar[i];
if(theemail.indexOf(emailafter) == 0)
{
emailtxt = emailtxt + "<p class='newemail' style='width:170px; color:#6B6B6B; overflow:hidden;'><font color='#D33022'>" + emailbefor + "</font>" + emailvar[i] + "</p>"
}
}
}
$("#myemail").html(emailmy+emailtxt);
if($("#myemail").html()){
$("#myemail").css("display","block");
$(".newemail").css("width",$("#myemail").width());
can1press = true;
} else {
$("#myemail").css("display","none");
can1press = false;
}
beforepress = press;
}
if (press=="" || press==null){
$("#myemail").html("");
$("#myemail").css("display","none");
}
})
$(document).click(function(){ //文本框失焦时删除层
if(can1press){
$("#myemail").remove();
can1press = false;
if($("#me").focus()){
can1press = false;
}
}
})
$(".newemail").live("mouseover",function(){ //鼠标经过提示Email时,高亮该条Email
$(".newemail").css("background","#FFF");
$(this).css("background","#CACACA");
$(this).focus();
nowid = $(this).index();
}).live("click",function(){ //鼠标点击Email时,文本框内容替换成该条Email,并删除提示层
var newhtml = $(this).html();
newhtml = newhtml.replace(/<.*?>/g,"");
$("#me").val(newhtml);
$("#myemail").remove();
})
$(document).bind("keydown",function(e)
{
if(can1press){
switch(e.which)
{
case 38:
if (nowid > 0){
$(".newemail").css("background","#FFF");
$(".newemail").eq(nowid).prev().css("background","#CACACA").focus();
nowid = nowid-1;
}
if(!nowid){
nowid = 0;
$(".newemail").css("background","#FFF");
$(".newemail").eq(nowid).css("background","#CACACA");
$(".newemail").eq(nowid).focus();
}
break;
case 40:
if (nowid < totalid){
$(".newemail").css("background","#FFF");
$(".newemail").eq(nowid).next().css("background","#CACACA").focus();
nowid = nowid+1;
}
if(!nowid){
nowid = 0;
$(".newemail").css("background","#FFF");
$(".newemail").eq(nowid).css("background","#CACACA");
$(".newemail").eq(nowid).focus();
}
break;
case 13:
var newhtml = $(".newemail").eq(nowid).html();
newhtml = newhtml.replace(/<.*?>/g,"");
$("#me").val(newhtml);
$("#myemail").remove();
}
}
})
})
//检查email邮箱
function isEmail(str){
if(str.indexOf("@") > 0)
{
return true;
} else {
return false;
}
}
</script>
在输入框中输入“qq”、“Sina”、“163”等等可以看到效果
</body>
</html>以上就是本章的全部内容,更多相关教程请访问jQuery视频教程!


Copyright 2014-2024 https://www.php.cn/ All Rights Reserved | php.cn | 湘ICP备2023035733号


 0
0 17
17


![ThinkPHP5实战之[教学管理系统]](https://img.php.cn/upload/course/000/000/068/6253d87459486427.png)