

Autogenのコードエグゼキューターを使用して複雑なタスクを達成します

AI agents are designed to act autonomously, solving problems and executing tasks in dynamic environments. A key feature in Autogen, enabling their adaptability is AutoGen’s code executors. This feature along with LLMs enables AI agents to generate, evaluate, and execute code in real-time. This capability bridges the gap between static AI models and actionable intelligence. By automating workflows, performing data analysis, and debugging complex systems, it transforms agents from mere thinkers into effective doers. In this article, we will learn more about code executors in AutoGen and how to implement them.
Table of Contents
- Types of Code Executors in AutoGen
- How to Build AI Agents with Code Executors in AutoGen?
- Pre-requisites
- Building an AI Agent Using Command Line Executor
- Building an ML Model Using Jupyter Code Executor
- Building an AI Agent Using Custom Executor
- Conclusion
- Frequently Asked Questions
Types of Code Executors in AutoGen
AutoGen has three kinds of code executors that can be used for different purposes.
- Command Line Executor: It allows AI agents to run the code in the command line. It will save each code block to a separate file and execute that file. This executor is ideal for automating tasks like file management, script execution, or handling external tools. It provides flexibility and low-level control in a workflow.
- Jupyter Code Executor: It enables agents to execute Python code within a Jupyter-like environment. Here, you can define variables in one code block and reuse them in subsequent blocks. One advantage of this setup is that when an error occurs, only the specific block of code with the error needs to be re-executed, rather than the entire script.
- Custom Code Executor: It gives developers the ability to create specialized code execution logic. For example, the custom code executor can access variables defined in the environment without explicitly providing them to the LLM.
These Code Executors can be run on both the host machine (local) as well as the Docker containers.
Also Read: 4 Steps to Build Multi-Agent Nested Chats with AutoGen
How to Build AI Agents with Code Executors in AutoGen?
Now let’s learn how you can use these different code executors in AutoGen:
Pre-requisites
Before building AI agents, ensure you have the necessary API keys for the required LLMs.
Load the .env file with the API keys needed.
from dotenv import load_dotenv

load_dotenv(./env)
Key Libraries Required
autogen-agentchat – 0.2.38
jupyter_kernel_gateway-3.0.1
Building an AI Agent Using Command Line Executor
Let’s build an AI agent to know the offers and discounts available on an e-commerce website using the command line executor. Here are the steps to follow.
1. Import the necessary libraries.
from autogen import ConversableAgent, AssistantAgent, UserProxyAgent
from autogen.coding import LocalCommandLineCodeExecutor, DockerCommandLineCodeExecutor
2. Define the agents.
user_proxy = UserProxyAgent(
	name="User",
	llm_config=False,
	is_termination_msg=lambda msg: msg.get("content") is not None and "TERMINATE" in msg["content"],
	human_input_mode="TERMINATE",
	code_execution_config=False
)
code_writer_agent = ConversableAgent(
	name="CodeWriter",
	system_message="""You are a Python developer.
	You use your coding skill to solve problems.
	Once the task is done, returns 'TERMINATE'.""",
	llm_config={"config_list": [{"model": "gpt-4o-mini"}]},
)

local_executor = LocalCommandLineCodeExecutor(
	timeout=15,
	work_dir='./code files')

local_executor_agent = ConversableAgent(
	"local_executor_agent",
	llm_config=False,
	code_execution_config={"executor": local_executor},
	human_input_mode="ALWAYS",
)
We are using the ‘local_executor’ in the code_execution_config of the local_executor_agent.
3. Define the messages which are used to initialize the chat.
messages = ["""To check whether there are any offers or discounts available on a given e-commerce website -
            	https://www.flipkart.com/
            	Follow these steps,
            	1. download the html page of the given URL
            	2. we only need html content, so remove any CSS, JavaScript, and Image tags content
            	3. save the remaining html content.
           	""" ,
      	"read the text and list all the offers and discounts available"]

# Intialize the chat
chat_result = local_executor_agent.initiate_chat(
	code_writer_agent,
	message=messages[0],
)
It will ask for human input after each message from the codeWriter agent. You just need to press the ‘Enter’ key to execute the code written by the agent. We can also any further instructions if there is any problem with the code.
Here are the questions we have asked and the output at the end.
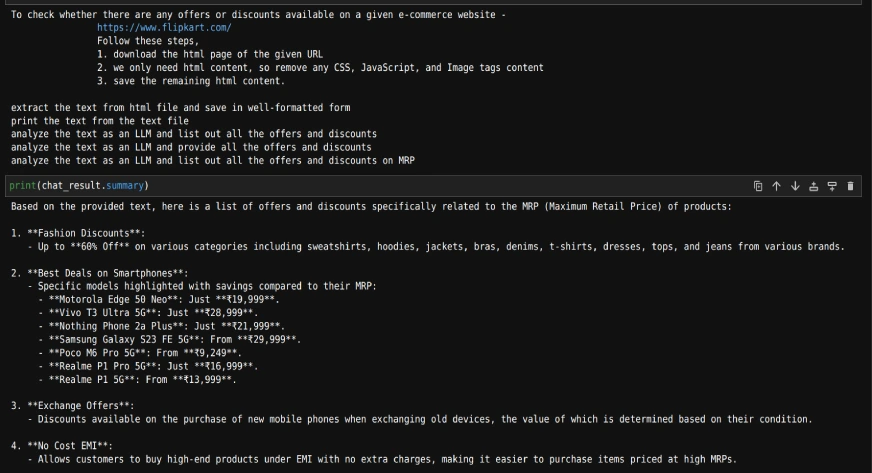
As we can see, with the mentioned questions, we can get a list of offers and discounts from an e-commerce website.
Also Read: Hands-on Guide to Building Multi-Agent Chatbots with AutoGen
Building an ML Model Using Jupyter Code Executor
By using this, we can access the variables defined in one code block from another code block, unlike the command line executor.
Now, let’s try to build an ML model using this.
1. Import the additional methods.
from autogen.coding.jupyter import LocalJupyterServer, DockerJupyterServer, JupyterCodeExecutor
from pathlib import Path
2. Initialize the jupyter server and output directory.
server = LocalJupyterServer()
output_dir = Path("coding")
output_dir.mkdir()Note that LocalJupyterServer may not function on Windows due to a bug. In this case, you can use the DockerJupyterServer instead or use the EmbeddedIPythonCodeExecutor.
3. Define the executor agent and writer agent with a custom system message.
jupyter_executor_agent = ConversableAgent(
	name="jupyter_executor_agent",
	llm_config=False,
	code_execution_config={
    	"executor": JupyterCodeExecutor(server, output_dir=output_dir),
	},
	human_input_mode="ALWAYS",
)
code_writer_system_message = """
You have been given coding capability to solve tasks using Python code in a stateful IPython kernel.
You are responsible for writing the code, and the user is responsible for executing the code.

When you write Python code, put the code in a markdown code block with the language set to Python.
For example:
```python
x = 3
```
You can use the variable `x` in subsequent code blocks.
```python
print(x)
```
Always use print statements for the output of the code.
Write code incrementally and leverage the statefulness of the kernel to avoid repeating code.
Import libraries in a separate code block.
Define a function or a class in a separate code block.
Run code that produces output in a separate code block.
Run code that involves expensive operations like download, upload, and call external APIs in a separate code block.

When your code produces an output, the output will be returned to you.
Because you have limited conversation memory, if your code creates an image,
the output will be a path to the image instead of the image itself."""

code_writer_agent = ConversableAgent(
	"code_writer",
	system_message=code_writer_system_message,
	llm_config={"config_list": [{"model": "gpt-4o"}]},
	human_input_mode="TERMINATE",
)
4. Define the initial message and initialize the chat
message = "read the datasets/user_behavior_dataset.csv and print what the data is about"

chat_result = jupyter_executor_agent.initiate_chat(
	code_writer_agent,
	message=message,
)

# Once the chat is completed we can stop the server.
server.stop()
5. Once the chat is completed we can stop the server.
We can print the messages as follows
for chat in chat_result.chat_history[:]:
    if chat['name'] == 'code_writer' and 'TERMINATE' not in chat['content']:
        print("--------agent-----------")
        print(chat['content'])
    if chat['name'] == 'jupyter_executor_agent' and 'exitcode' not in chat['content']:
        print("--------user------------")
print(chat['content'])Here’s the sample
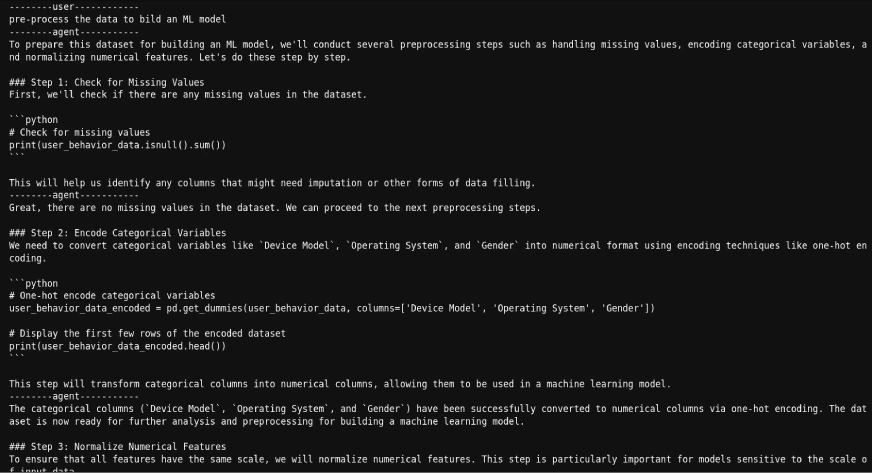
As we can see, we can get the code generated by the agent and also the results after executing the code.
Also Read: Building Agentic Chatbots Using AutoGen
Building an AI Agent Using Custom Executor
Now, let’s try to create a custom executor that can run the code in the same jupyter notebook where we are creating this executor. So, we can read a CSV file, and then ask an agent to build an ML model on the already imported file.
Here’s how we’ll do it.
1. Import the necessary libraries.
import pandas as pd
from typing import List
from IPython import get_ipython
from autogen.coding import CodeBlock, CodeExecutor, CodeExtractor, CodeResult, MarkdownCodeExtractor
2. Define the executor that can extract and run the code from jupyter cells.
class NotebookExecutor(CodeExecutor):
    @property
    def code_extractor(self) -> CodeExtractor:
        # Extact code from markdown blocks.
        return MarkdownCodeExtractor()

    def __init__(self) -> None:
        # Get the current IPython instance running in this notebook.
        self._ipython = get_ipython()

    def execute_code_blocks(self, code_blocks: List[CodeBlock]) -> CodeResult:
        log = ""
        for code_block in code_blocks:
            result = self._ipython.run_cell("%%capture --no-display cap\n" + code_block.code)
            log += self._ipython.ev("cap.stdout")
            log += self._ipython.ev("cap.stderr")
            if result.result is not None:
                log += str(result.result)
            exitcode = 0 if result.success else 1
            if result.error_before_exec is not None:
                log += f"\n{result.error_before_exec}"
                exitcode = 1
            if result.error_in_exec is not None:
                log += f"\n{result.error_in_exec}"
                exitcode = 1
            if exitcode != 0:
                break
return CodeResult(exit_code=exitcode, output=log)3. Define the agents.
code_writer_agent = ConversableAgent(
    name="CodeWriter",
    system_message="You are a helpful AI assistant.\n"
    "You use your coding skill to solve problems.\n"
    "You have access to a IPython kernel to execute Python code.\n"
    "You can suggest Python code in Markdown blocks, each block is a cell.\n"
    "The code blocks will be executed in the IPython kernel in the order you suggest them.\n"
    "All necessary libraries have already been installed.\n"
    "Add return or print statements to the code to get the output\n"
    "Once the task is done, returns 'TERMINATE'.",
    llm_config={"config_list": [{"model": "gpt-4o-mini"}]},
)
code_executor_agent = ConversableAgent(
	name="CodeExecutor",
	llm_config=False,
	code_execution_config={"executor": NotebookExecutor()},
	is_termination_msg=lambda msg: "TERMINATE" in msg.get("content", "").strip().upper(),
	human_input_mode="ALWAYS"
)
4. Read the file and initiate the chat with the file.
df = pd.read_csv('datasets/mountains_vs_beaches_preferences.csv')

chat_result = code_executor_agent.initiate_chat(
	code_writer_agent,
	message="What are the column names in the dataframe defined above as df?",
)
5. We can print the chat history as follows:
for chat in chat_result.chat_history[:]:
    if chat['name'] == 'CodeWriter' and 'TERMINATE' not in chat['content']:
        print("--------agent-----------")
        print(chat['content'])
    if chat['name'] == 'CodeExecutor' and 'exitcode' not in chat['content']:
        print("--------user------------")
print(chat['content'])As we can see again, we can get the code generated by the agent and also the results after executing the code.
Conclusion
AutoGen’s code executors provide flexibility and functionality for AI agents to perform real-world tasks. The command line executor enables script execution, while the Jupyter code executor supports iterative development. Custom executors, on the other hand, allow developers to create tailored workflows.
These tools empower AI agents to transition from problem solvers to solution implementers. Developers can use these features to build intelligent systems that deliver actionable insights and automate complex processes.
Frequently Asked Questions
Q1. What is the primary purpose of Code Executors in AutoGen?A. Code Executors in AutoGen allow AI agents to generate, execute, and evaluate code in real time. This enables agents to automate tasks, perform data analysis, debug systems, and implement dynamic workflows.
Q2. What are the differences between Command Line and Jupyter Code Executors?A. The Command Line Executor saves and executes code as separate files, ideal for tasks like file management and script execution. The Jupyter Code Executor operates in a stateful environment, allowing reuse of variables and selective re-execution of code blocks, making it more suitable for iterative coding tasks like building ML models.
Q3. Can Code Executors be used with Docker containers?A. Yes, both the Command Line Executor and Jupyter Code Executor can be configured to run on Docker containers, providing a flexible environment for execution.
Q4. What is the advantage of using a Custom Code Executor?A. Custom Code Executors allow developers to define specialized execution logic, such as running code within the same Jupyter notebook. This is useful for tasks requiring a high level of integration or customization.
Q5. What are the prerequisites for using Code Executors in AutoGen?A. Before using Code Executors, ensure you have the necessary API keys for your preferred LLMs. You should also have the required libraries, such as `autogen-agentchat` and `jupyter_kernel_gateway`, installed in your environment.
以上がAutogenのコードエグゼキューターを使用して複雑なタスクを達成しますの詳細内容です。詳細については、PHP 中国語 Web サイトの他の関連記事を参照してください。

ホットAIツール

Undresser.AI Undress
リアルなヌード写真を作成する AI 搭載アプリ

AI Clothes Remover
写真から衣服を削除するオンライン AI ツール。

Undress AI Tool
脱衣画像を無料で

Clothoff.io
AI衣類リムーバー

Video Face Swap
完全無料の AI 顔交換ツールを使用して、あらゆるビデオの顔を簡単に交換できます。

人気の記事
ホットツール

メモ帳++7.3.1
使いやすく無料のコードエディター

SublimeText3 中国語版
中国語版、とても使いやすい

ゼンドスタジオ 13.0.1
強力な PHP 統合開発環境

ドリームウィーバー CS6
ビジュアル Web 開発ツール

SublimeText3 Mac版
神レベルのコード編集ソフト(SublimeText3)
ホットトピック
 1669
1669
 14
1428
52
1329
25
1273
29
1256
24
14
1428
52
1329
25
1273
29
1256
24

 AGNOフレームワークを使用してマルチモーダルAIエージェントを構築する方法は?
Apr 23, 2025 am 11:30 AM
AGNOフレームワークを使用してマルチモーダルAIエージェントを構築する方法は?
Apr 23, 2025 am 11:30 AM
エージェントAIに取り組んでいる間、開発者は速度、柔軟性、リソース効率の間のトレードオフをナビゲートすることがよくあります。私はエージェントAIフレームワークを探索していて、Agnoに出会いました(以前はPhi-でした。
 SQLに列を追加する方法は? - 分析Vidhya
Apr 17, 2025 am 11:43 AM
SQLに列を追加する方法は? - 分析Vidhya
Apr 17, 2025 am 11:43 AM
SQLの変更テーブルステートメント:データベースに列を動的に追加する データ管理では、SQLの適応性が重要です。 その場でデータベース構造を調整する必要がありますか? Alter Tableステートメントはあなたの解決策です。このガイドの詳細は、コルを追加します
 ラマドラマを超えて:大規模な言語モデル用の4つの新しいベンチマーク
Apr 14, 2025 am 11:09 AM
ラマドラマを超えて:大規模な言語モデル用の4つの新しいベンチマーク
Apr 14, 2025 am 11:09 AM
問題のあるベンチマーク:ラマのケーススタディ 2025年4月上旬、MetaはLlama 4スイートのモデルを発表し、GPT-4oやClaude 3.5 Sonnetなどの競合他社に対して好意的に位置付けた印象的なパフォーマンスメトリックを誇っています。ラウンクの中心
 OpenaiはGPT-4.1でフォーカスをシフトし、コーディングとコスト効率を優先します
Apr 16, 2025 am 11:37 AM
OpenaiはGPT-4.1でフォーカスをシフトし、コーディングとコスト効率を優先します
Apr 16, 2025 am 11:37 AM
このリリースには、GPT-4.1、GPT-4.1 MINI、およびGPT-4.1 NANOの3つの異なるモデルが含まれており、大規模な言語モデルのランドスケープ内のタスク固有の最適化への動きを示しています。これらのモデルは、ようなユーザー向けインターフェイスをすぐに置き換えません
 ADHDゲーム、ヘルスツール、AIチャットボットがグローバルヘルスを変える方法
Apr 14, 2025 am 11:27 AM
ADHDゲーム、ヘルスツール、AIチャットボットがグローバルヘルスを変える方法
Apr 14, 2025 am 11:27 AM
ビデオゲームは不安を緩和したり、ADHDの子供を焦点を合わせたり、サポートしたりできますか? ヘルスケアの課題が世界的に急増しているため、特に若者の間では、イノベーターはありそうもないツールであるビデオゲームに目を向けています。現在、世界最大のエンターテイメントインダスの1つです
 Andrew Ngによる埋め込みモデルに関する新しいショートコース
Apr 15, 2025 am 11:32 AM
Andrew Ngによる埋め込みモデルに関する新しいショートコース
Apr 15, 2025 am 11:32 AM
埋め込みモデルのパワーのロックを解除する:Andrew Ngの新しいコースに深く飛び込む マシンがあなたの質問を完全に正確に理解し、応答する未来を想像してください。 これはサイエンスフィクションではありません。 AIの進歩のおかげで、それはRになりつつあります
 Rocketpyを使用したロケットの起動シミュレーションと分析-AnalyticsVidhya
Apr 19, 2025 am 11:12 AM
Rocketpyを使用したロケットの起動シミュレーションと分析-AnalyticsVidhya
Apr 19, 2025 am 11:12 AM
Rocketpy:A包括的なガイドでロケット発売をシミュレートします この記事では、強力なPythonライブラリであるRocketpyを使用して、高出力ロケット発売をシミュレートすることをガイドします。 ロケットコンポーネントの定義からシミュラの分析まで、すべてをカバーします
 Googleは、次の2025年にクラウドで最も包括的なエージェント戦略を発表します
Apr 15, 2025 am 11:14 AM
Googleは、次の2025年にクラウドで最も包括的なエージェント戦略を発表します
Apr 15, 2025 am 11:14 AM
GoogleのAI戦略の基礎としてのGemini Geminiは、GoogleのAIエージェント戦略の基礎であり、高度なマルチモーダル機能を活用して、テキスト、画像、オーディオ、ビデオ、コード全体で応答を処理および生成します。 DeepMによって開発されました
