MLOPを使用したビットコイン価格予測
ビットコインやその価格の変動についてあまり知らないが、利益を上げるために投資決定を下したいですか?この機械学習モデルには背中があります。占星術師よりも価格がはるかに優れていることを予測できます。この記事では、ZENMLとMLFLOWを使用して、ビットコイン価格を予測および予測するためのMLモデルを構築します。それでは、誰もがMLおよびMLOPSツールを使用して将来を予測する方法を理解するための旅を始めましょう。
学習目標- APIを効率的に使用してライブデータを取得することを学びます
- ZenMLとは何か、MLFLOWを使用する理由、ZenMLと統合する方法を理解してください。 アイデアから生産まで、機械学習モデルの展開プロセスを探索してください。
- インタラクティブな機械学習モデルの予測用にユーザーフレンドリーな流線アプリを作成する方法を発見してください。
- この記事は、
データサイエンスブログの一部として公開されました。 目次問題声明
プロジェクト実装ステップ1:APIへのアクセスステップ2:MongoDB
- ステップ3を使用してデータベースへの接続5:データのクリーニング
- ステップ6:フィーチャーエンジニアリング
- ステップ7:データの分割
- ステップ8:モデルトレーニング
- ステップ9:モデル評価
- ステップ10:モデルの展開
- ステップ 問題声明
- ビットコインの価格は非常に不安定であり、予測を行うことは不可能です。私たちのプロジェクトでは、Mlopsのベストプラクティックを使用してLSTMモデルを構築して、ビットコインプリスとトレンドを予測しています。
- プロジェクトを実装する前に、プロジェクトアーキテクチャを見てみましょう。
- プロジェクトの実装
- APIにアクセスすることから始めましょう。
- なぜ私たちはこれをしているのですか?さまざまなデータセットから履歴ビットコインの価格データを取得できますが、APIを使用すると、ライブ市場データにアクセスできます。 ステップ1:APIへのアクセス
- apiアクセスにサインアップ:
theccdata apiページにサインアップしたら。このpagehttps://developers.cryptocompare.com/documentation/data-api/index_cc_v1_historical_days
ビットコインの価格データを取得:
以下のコードを使用すると、CCDATA APIからビットコイン価格データを取得し、パンダのデータフレームに変換できます。また、APIキーを.ENVファイルに保持します。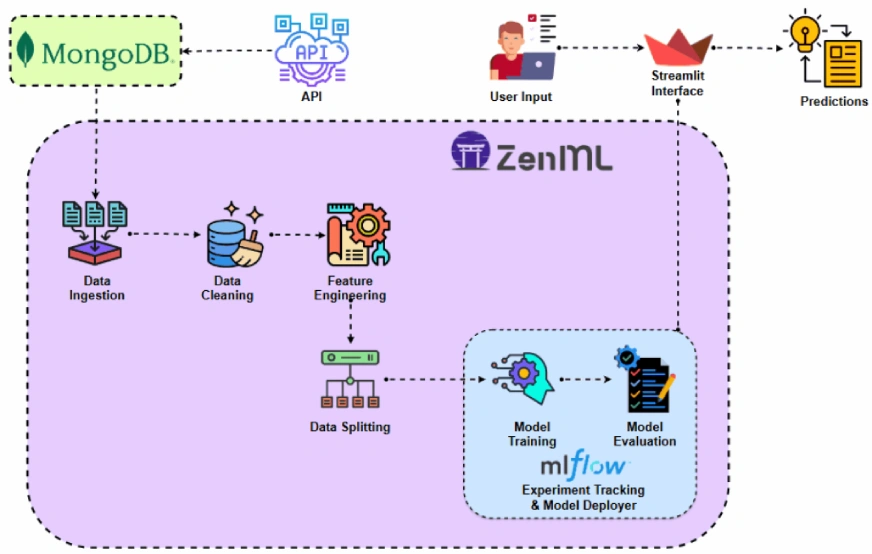
ステップ2:mongodb
を使用してデータベースに接続します
mongodbは、その適応性、拡張性、および非構造化データをJSONのような形式で保存する能力で知られているNOSQLデータベースです。import requests
import pandas as pd
from dotenv import load_dotenv
import os
# Load the .env file
load_dotenv()
def fetch_crypto_data(api_uri):
response = requests.get(
api_uri,
params={
"market": "cadli",
"instrument": "BTC-USD",
"limit": 5000,
"aggregate": 1,
"fill": "true",
"apply_mapping": "true",
"response_format": "JSON"
},
headers={"Content-type": "application/json; charset=UTF-8"}
)
if response.status_code == 200:
print('API Connection Successful! \nFetching the data...')
data = response.json()
data_list = data.get('Data', [])
df = pd.DataFrame(data_list)
df['DATE'] = pd.to_datetime(df['TIMESTAMP'], unit='s')
return df # Return the DataFrame
else:
raise Exception(f"API Error: {response.status_code} - {response.text}")このコードはMongoDBに接続し、APIを介してビットコイン価格データを取得し、最新のログ日付の後にすべての新しいエントリでデータベースを更新します。
Zenmlの紹介
Zenmlis機械学習操作に合わせたオープンソースプラットフォームで、柔軟で生産対応のパイプラインの作成をサポートしています。さらに、ZenMLは複数の機械学習ツールとyikemlflow、Bentomlなどと統合して、シームレスなMLパイプラインを作成します。⚠️あなたがWindowsユーザーの場合は、システムにWSLをインストールしてみてください。 ZenmlはWindowsをサポートしていません このプロジェクトでは、ZenMLを使用する従来のパイプラインを実装し、実験追跡のためにMLFLOWをZenMLと統合します。
前提条件と基本的なZENMLコマンド
python 3.12以降:ここから入手できます:https://www.python.org/downloads/
仮想環境をアクティブにします:- zenmlコマンド:
import os
from pymongo import MongoClient
from dotenv import load_dotenv
from data.management.api import fetch_crypto_data # Import the API function
import pandas as pd
load_dotenv()
MONGO_URI = os.getenv("MONGO_URI")
API_URI = os.getenv("API_URI")
client = MongoClient(MONGO_URI, ssl=True, ssl_certfile=None, ssl_ca_certs=None)
db = client['crypto_data']
collection = db['historical_data']
try:
latest_entry = collection.find_one(sort=[("DATE", -1)]) # Find the latest date
if latest_entry:
last_date = pd.to_datetime(latest_entry['DATE']).strftime('%Y-%m-%d')
else:
last_date = '2011-03-27' # Default start date if MongoDB is empty
print(f"Fetching data starting from {last_date}...")
new_data_df = fetch_crypto_data(API_URI)
if latest_entry:
new_data_df = new_data_df[new_data_df['DATE'] > last_date]
if not new_data_df.empty:
data_to_insert = new_data_df.to_dict(orient='records')
result = collection.insert_many(data_to_insert)
print(f"Inserted {len(result.inserted_ids)} new records into MongoDB.")
else:
print("No new data to insert.")
except Exception as e:
print(f"An error occurred: {e}")- ステップ3:mlflowとZenMl の統合 実験追跡にMLFLOWを使用して、モデル、アーティファクト、メトリック、およびハイパーパラメーター値を追跡しています。ここでは、実験追跡とモデルの展開のためにMLFLOWを登録しています。
#create a virtual environment python3 -m venv venv #Activate your virtual environmnent in your project folder source venv/bin/activate
プロジェクト構造
ここでは、プロジェクトのレイアウトを見ることができます。それでは、詳細に1つずつ議論しましょう。
#Install zenml pip install zenml #To Launch zenml server and dashboard locally pip install "zenml[server]" #To check the zenml Version: zenml version #To initiate a new repository zenml init #To run the dashboard locally: zenml login --local #To know the status of our zenml Pipelines zenml show #To shutdown the zenml server zenml clean
ステップ4:データ摂取
 最初にAPIからMongoDBにデータを摂取し、Pandas DataFrameに変換します。
このステップでは、摂取されたデータをクリーニングするためのさまざまな戦略を作成します。データ内の不要な列と欠損値をドロップします。 このステップは、以前のdata_cleaningステップからクリーンデータを取得します。単純な移動平均(SMA)、指数移動平均(EMA)、遅れてローリング統計などの新しい機能を作成して、傾向をキャプチャし、騒音を減らし、時系列データからより信頼性の高い予測を行います。さらに、Minmaxスケーリングを使用して、機能とターゲット変数をスケーリングします。
ステップ9:モデルの評価
これは回帰の問題であるため、平均四角誤差(MSE)、ルート平均二乗誤差(MSE)、平均絶対誤差(MAE)、R-cquaredなどの評価メトリックを使用しています。
@pipeline
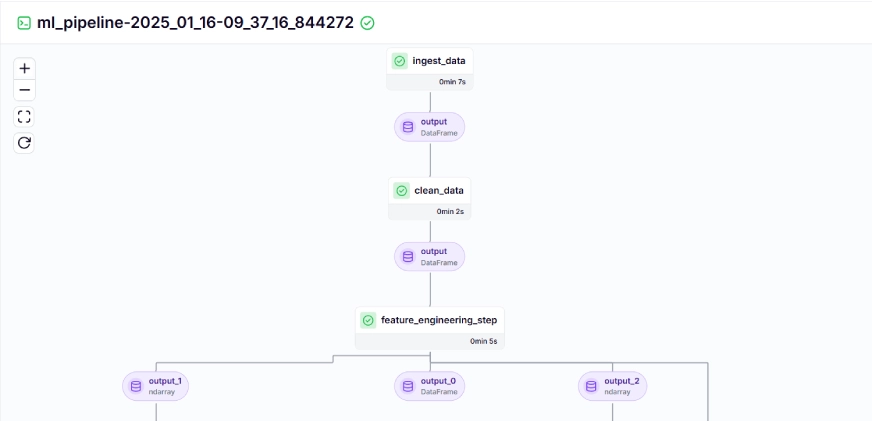
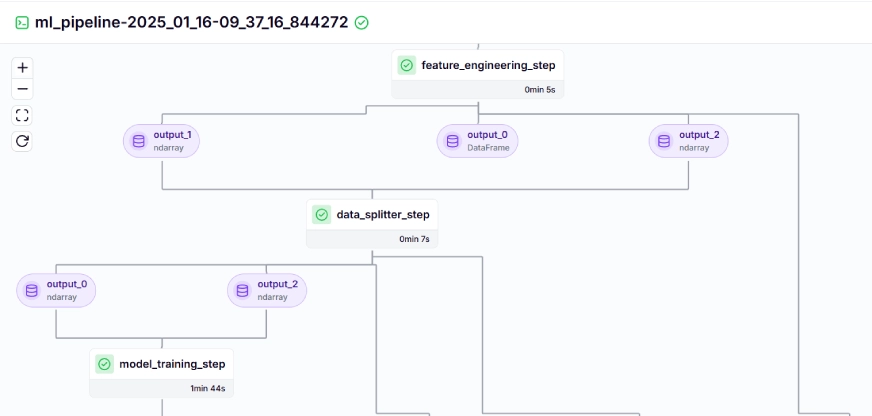
上記のコマンドを実行した後、トラッキングダッシュボードURLを返します。これは次のようになります。
今まで、モデルとパイプラインを構築しています。それでは、ユーザーが予測できるパイプラインを制作に押し込みましょう。
を 推論パイプライン
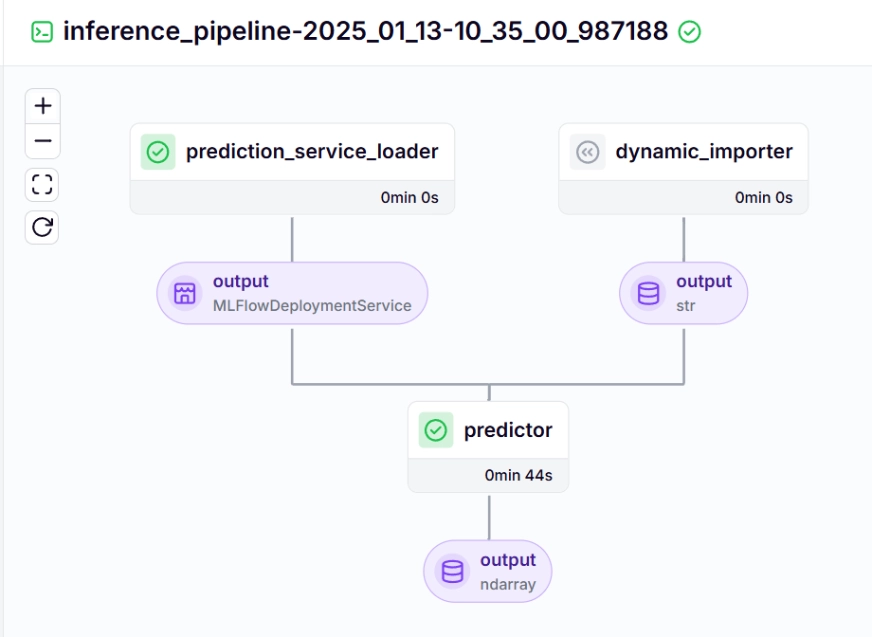
展開モデルを使用して、推論パイプラインを使用して新しいデータを予測します。このプロジェクトでこのパイプラインをどのように実装したかを見てみましょう。
dynamic_importer()
この関数は、 で装飾されています。展開サービスw.r.tは、pipeline_nameとstep_nameに基づいて展開モデルをロードします。展開モデルは、新しいデータの予測クエリを処理する準備ができています。
lineexpstion_services = mlflow_model_deployer_component.find_model_server()
predictor()
継続的な展開と推論パイプラインを視覚化するには、deployment and Prowictionの構成が定義されるrun_deployment.pyスクリプトを実行する必要があります。 (以下のgithubでrun_deployment.pyコードを確認してください)
推論パイプライン - 出力
Streamlitは、インタラクティブなUIの作成に使用される驚くべきオープンソースのPythonベースのフレームワークです。バックエンドやフロントエンド開発を知らずに、Riremlitを使用してWebアプリをすばやく構築できます。まず、システムにRiremlitをインストールする必要があります
これがあなたのより良い理解のためのプロジェクトのgithubコードとビデオの説明です。 キーテイクアウト#Integrating mlflow with ZenML
zenml integration install mlflow -y
#Register the experiment tracker
zenml experiment-tracker register mlflow_tracker --flavor=mlflow
#Registering the model deployer
zenml model-deployer register mlflow --flavor=mlflow
#Registering the stack
zenml stack register local-mlflow-stack-new -a default -o default -d mlflow -e mlflow_tracker --set
#To view the stack list
zenml stack --list
gest_data()
関数の装飾器として追加して、トレーニングパイプラインのステップとして宣言します。同様に、プロジェクトアーキテクチャの各ステップのコードを作成し、パイプラインを作成します。
bitcoin_price_prediction_mlops/ # Project directory
├── data/
│ └── management/
│ ├── api_to_mongodb.py # Code to fetch data and save it to MongoDB
│ └── api.py # API-related utility functions
│
├── pipelines/
│ ├── deployment_pipeline.py # Deployment pipeline
│ └── training_pipeline.py # Training pipeline
│
├── saved_models/ # Directory for storing trained models
├── saved_scalers/ # Directory for storing scalers used in data preprocessing
│
├── src/ # Source code
│ ├── data_cleaning.py # Data cleaning and preprocessing
│ ├── data_ingestion.py # Data ingestion
│ ├── data_splitter.py # Data splitting
│ ├── feature_engineering.py # Feature engineering
│ ├── model_evaluation.py # Model evaluation
│ └── model_training.py # Model training
│
├── steps/ # ZenML steps
│ ├── clean_data.py # ZenML step for cleaning data
│ ├── data_splitter.py # ZenML step for data splitting
│ ├── dynamic_importer.py # ZenML step for importing dynamic data
│ ├── feature_engineering.py # ZenML step for feature engineering
│ ├── ingest_data.py # ZenML step for data ingestion
│ ├── model_evaluation.py # ZenML step for model evaluation
│ ├── model_training.py # ZenML step for training the model
│ ├── prediction_service_loader.py # ZenML step for loading prediction services
│ ├── predictor.py # ZenML step for prediction
│ └── utils.py # Utility functions for steps
│
├── .env # Environment variables file
├── .gitignore # Git ignore file
│
├── app.py # Streamlit user interface app
│
├── README.md # Project documentation
├── requirements.txt # List of required packages
├── run_deployment.py # Code for running deployment and prediction pipeline
├── run_pipeline.py # Code for running training pipeline
└── .zen/ # ZenML directory (created automatically after ZenML initialization)
import requests
import pandas as pd
from dotenv import load_dotenv
import os

# Load the .env file
load_dotenv()

def fetch_crypto_data(api_uri):
    response = requests.get(
        api_uri,
        params={
            "market": "cadli",
            "instrument": "BTC-USD",
            "limit": 5000,
            "aggregate": 1,
            "fill": "true",
            "apply_mapping": "true",
            "response_format": "JSON"
        },
        headers={"Content-type": "application/json; charset=UTF-8"}
    )

    if response.status_code == 200:
        print('API Connection Successful! \nFetching the data...')

        data = response.json()
        data_list = data.get('Data', [])

        df = pd.DataFrame(data_list)

        df['DATE'] = pd.to_datetime(df['TIMESTAMP'], unit='s')

        return df  # Return the DataFrame
    else:
raise Exception(f"API Error: {response.status_code} - {response.text}")ステップ6:機能エンジニアリング
import os
from pymongo import MongoClient
from dotenv import load_dotenv
from data.management.api import fetch_crypto_data  # Import the API function
import pandas as pd

load_dotenv()

MONGO_URI = os.getenv("MONGO_URI")
API_URI = os.getenv("API_URI")

client = MongoClient(MONGO_URI, ssl=True, ssl_certfile=None, ssl_ca_certs=None)
db = client['crypto_data']
collection = db['historical_data']

try:
    latest_entry = collection.find_one(sort=[("DATE", -1)])  # Find the latest date
    if latest_entry:
        last_date = pd.to_datetime(latest_entry['DATE']).strftime('%Y-%m-%d')
    else:
        last_date = '2011-03-27'  # Default start date if MongoDB is empty

    print(f"Fetching data starting from {last_date}...")
    new_data_df = fetch_crypto_data(API_URI)

    if latest_entry:
        new_data_df = new_data_df[new_data_df['DATE'] > last_date]

    if not new_data_df.empty:
        data_to_insert = new_data_df.to_dict(orient='records')
        result = collection.insert_many(data_to_insert)
        print(f"Inserted {len(result.inserted_ids)} new records into MongoDB.")
    else:
        print("No new data to insert.")
except Exception as e:
    print(f"An error occurred: {e}")
次に、処理されたデータを80:20の比率でトレーニングとテストデータセットに分割します。
#create a virtual environment
python3 -m venv venv

#Activate your virtual environmnent in your project folder
source venv/bin/activate
LSTM_MODEL.KERAS
。
#Install zenml
pip install zenml

#To Launch zenml server and dashboard locally
pip install "zenml[server]"

#To check the zenml Version:
zenml version

#To initiate a new repository
zenml init

#To run the dashboard locally:
zenml login --local

#To know the status of our zenml Pipelines
zenml show

#To shutdown the zenml server
zenml clean
ここで、#Integrating mlflow with ZenML
zenml integration install mlflow -y
#Register the experiment tracker
zenml experiment-tracker register mlflow_tracker --flavor=mlflow
#Registering the model deployer
zenml model-deployer register mlflow --flavor=mlflow
#Registering the stack
zenml stack register local-mlflow-stack-new -a default -o default -d mlflow -e mlflow_tracker --set
#To view the stack list
zenml stack --list
bitcoin_price_prediction_mlops/ # Project directory
├── data/
│ └── management/
│ ├── api_to_mongodb.py # Code to fetch data and save it to MongoDB
│ └── api.py # API-related utility functions
│
├── pipelines/
│ ├── deployment_pipeline.py # Deployment pipeline
│ └── training_pipeline.py # Training pipeline
│
├── saved_models/ # Directory for storing trained models
├── saved_scalers/ # Directory for storing scalers used in data preprocessing
│
├── src/ # Source code
│ ├── data_cleaning.py # Data cleaning and preprocessing
│ ├── data_ingestion.py # Data ingestion
│ ├── data_splitter.py # Data splitting
│ ├── feature_engineering.py # Feature engineering
│ ├── model_evaluation.py # Model evaluation
│ └── model_training.py # Model training
│
├── steps/ # ZenML steps
│ ├── clean_data.py # ZenML step for cleaning data
│ ├── data_splitter.py # ZenML step for data splitting
│ ├── dynamic_importer.py # ZenML step for importing dynamic data
│ ├── feature_engineering.py # ZenML step for feature engineering
│ ├── ingest_data.py # ZenML step for data ingestion
│ ├── model_evaluation.py # ZenML step for model evaluation
│ ├── model_training.py # ZenML step for training the model
│ ├── prediction_service_loader.py # ZenML step for loading prediction services
│ ├── predictor.py # ZenML step for prediction
│ └── utils.py # Utility functions for steps
│
├── .env # Environment variables file
├── .gitignore # Git ignore file
│
├── app.py # Streamlit user interface app
│
├── README.md # Project documentation
├── requirements.txt # List of required packages
├── run_deployment.py # Code for running deployment and prediction pipeline
├── run_pipeline.py # Code for running training pipeline
└── .zen/ # ZenML directory (created automatically after ZenML initialization)
import os
import logging
from pymongo import MongoClient
from dotenv import load_dotenv
from zenml import step
import pandas as pd
# Load the .env file
load_dotenv()
# Get MongoDB URI from environment variables
MONGO_URI = os.getenv("MONGO_URI")
def fetch_data_from_mongodb(collection_name:str, database_name:str):
"""
Fetches data from MongoDB and converts it into a pandas DataFrame.
collection_name:
Name of the MongoDB collection to fetch data.
database_name:
Name of the MongoDB database.
return:
A pandas DataFrame containing the data
"""
# Connect to the MongoDB client
client = MongoClient(MONGO_URI)
db = client[database_name] # Select the database
collection = db[collection_name] # Select the collection
# Fetch all documents from the collection
try:
logging.info(f"Fetching data from MongoDB collection: {collection_name}...")
data = list(collection.find()) # Convert cursor to a list of dictionaries
if not data:
logging.info("No data found in the MongoDB collection.")
# Convert the list of dictionaries into a pandas DataFrame
df = pd.DataFrame(data)
# Drop the MongoDB ObjectId field if it exists (optional)
if '_id' in df.columns:
df = df.drop(columns=['_id'])
logging.info("Data successfully fetched and converted to a DataFrame!")
return df
except Exception as e:
logging.error(f"An error occurred while fetching data: {e}")
raise e
@step(enable_cache=False)
def ingest_data(collection_name: str = "historical_data", database_name: str = "crypto_data") -> pd.DataFrame:
logging.info("Started data ingestion process from MongoDB.")
try:
# Use the fetch_data_from_mongodb function to fetch data
df = fetch_data_from_mongodb(collection_name=collection_name, database_name=database_name)
if df.empty:
logging.warning("No data was loaded. Check the collection name or the database content.")
else:
logging.info(f"Data ingestion completed. Number of records loaded: {len(df)}.")
return df
except Exception as e:
logging.error(f"Error while reading data from {collection_name} in {database_name}: {e}")
raise e class DataPreprocessor:
def __init__(self, data: pd.DataFrame):
self.data = data
logging.info("DataPreprocessor initialized with data of shape: %s", data.shape)
def clean_data(self) -> pd.DataFrame:
"""
Performs data cleaning by removing unnecessary columns, dropping columns with missing values,
and returning the cleaned DataFrame.
Returns:
pd.DataFrame: The cleaned DataFrame with unnecessary and missing-value columns removed.
"""
logging.info("Starting data cleaning process.")
# Drop unnecessary columns, including '_id' if it exists
columns_to_drop = [
'UNIT', 'TYPE', 'MARKET', 'INSTRUMENT',
'FIRST_MESSAGE_TIMESTAMP', 'LAST_MESSAGE_TIMESTAMP',
'FIRST_MESSAGE_VALUE', 'HIGH_MESSAGE_VALUE', 'HIGH_MESSAGE_TIMESTAMP',
'LOW_MESSAGE_VALUE', 'LOW_MESSAGE_TIMESTAMP', 'LAST_MESSAGE_VALUE',
'TOTAL_INDEX_UPDATES', 'VOLUME_TOP_TIER', 'QUOTE_VOLUME_TOP_TIER',
'VOLUME_DIRECT', 'QUOTE_VOLUME_DIRECT', 'VOLUME_TOP_TIER_DIRECT',
'QUOTE_VOLUME_TOP_TIER_DIRECT', '_id' # Adding '_id' to the list
]
logging.info("Dropping columns: %s")
self.data = self.drop_columns(self.data, columns_to_drop)
# Drop columns where the number of missing values is greater than 0
logging.info("Dropping columns with missing values.")
self.data = self.drop_columns_with_missing_values(self.data)
logging.info("Data cleaning completed. Data shape after cleaning: %s", self.data.shape)
return self.data
def drop_columns(self, data: pd.DataFrame, columns: list) -> pd.DataFrame:
"""
Drops specified columns from the DataFrame.
Returns:
pd.DataFrame: The DataFrame with the specified columns removed.
"""
logging.info("Dropping columns: %s", columns)
return data.drop(columns=columns, errors='ignore')
def drop_columns_with_missing_values(self, data: pd.DataFrame) -> pd.DataFrame:
"""
Drops columns with any missing values from the DataFrame.
Parameters:
data: pd.DataFrame
The DataFrame from which columns with missing values will be removed.
Returns:
pd.DataFrame: The DataFrame with columns containing missing values removed.
"""
missing_columns = data.columns[data.isnull().sum() > 0]
if not missing_columns.empty:
logging.info("Columns with missing values: %s", missing_columns.tolist())
else:
logging.info("No columns with missing values found.")
return data.loc[:, data.isnull().sum() == 0]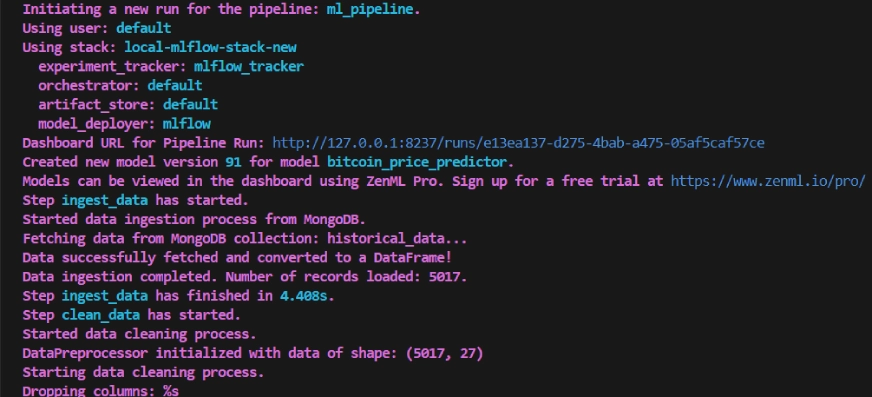
 ステップ10:モデルの展開
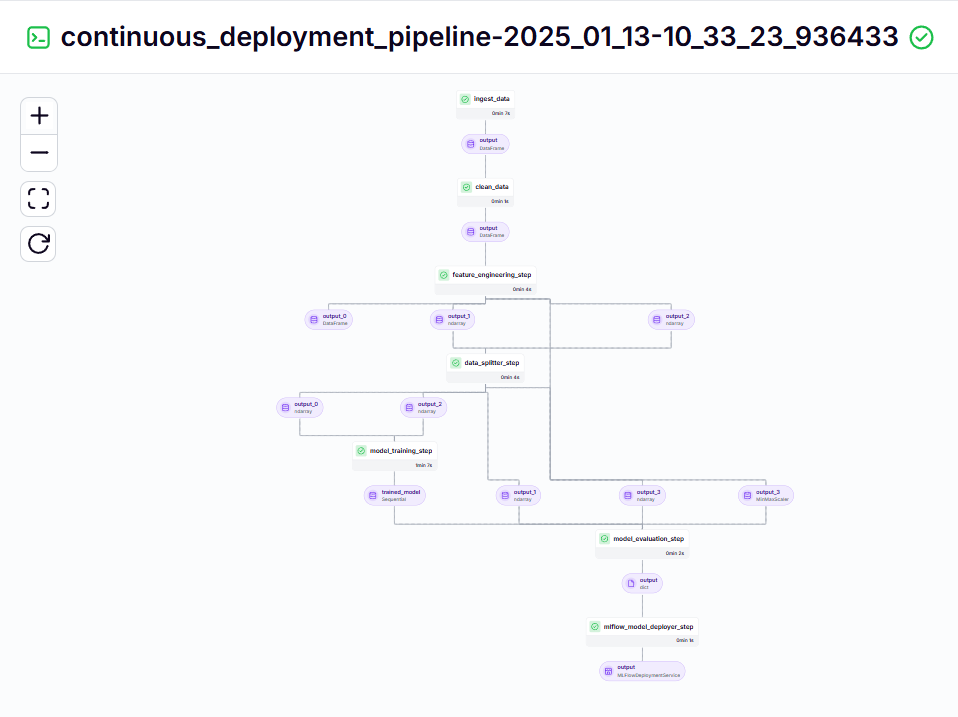
 継続的な展開パイプライン
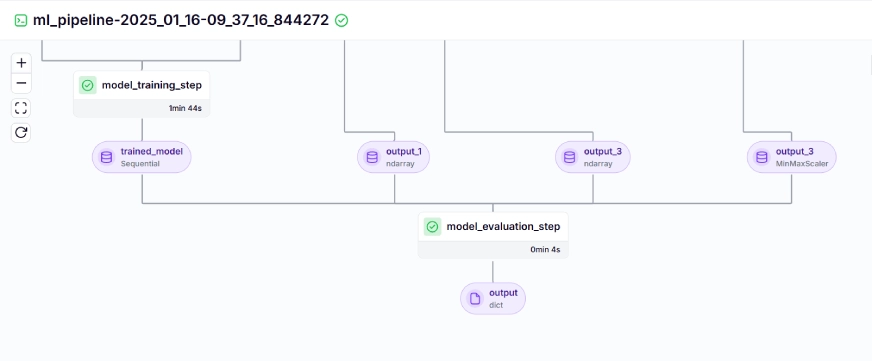 このパイプラインは、訓練されたモデルを継続的に展開する責任があります。最初に
を使用して、
continuous_deployment_pipeline()import requests
import pandas as pd
from dotenv import load_dotenv
import os
# Load the .env file
load_dotenv()
def fetch_crypto_data(api_uri):
response = requests.get(
api_uri,
params={
"market": "cadli",
"instrument": "BTC-USD",
"limit": 5000,
"aggregate": 1,
"fill": "true",
"apply_mapping": "true",
"response_format": "JSON"
},
headers={"Content-type": "application/json; charset=UTF-8"}
)
if response.status_code == 200:
print('API Connection Successful! \nFetching the data...')
data = response.json()
data_list = data.get('Data', [])
df = pd.DataFrame(data_list)
df['DATE'] = pd.to_datetime(df['TIMESTAMP'], unit='s')
return df # Return the DataFrame
else:
raise Exception(f"API Error: {response.status_code} - {response.text}")import os
from pymongo import MongoClient
from dotenv import load_dotenv
from data.management.api import fetch_crypto_data # Import the API function
import pandas as pd
load_dotenv()
MONGO_URI = os.getenv("MONGO_URI")
API_URI = os.getenv("API_URI")
client = MongoClient(MONGO_URI, ssl=True, ssl_certfile=None, ssl_ca_certs=None)
db = client['crypto_data']
collection = db['historical_data']
try:
latest_entry = collection.find_one(sort=[("DATE", -1)]) # Find the latest date
if latest_entry:
last_date = pd.to_datetime(latest_entry['DATE']).strftime('%Y-%m-%d')
else:
last_date = '2011-03-27' # Default start date if MongoDB is empty
print(f"Fetching data starting from {last_date}...")
new_data_df = fetch_crypto_data(API_URI)
if latest_entry:
new_data_df = new_data_df[new_data_df['DATE'] > last_date]
if not new_data_df.empty:
data_to_insert = new_data_df.to_dict(orient='records')
result = collection.insert_many(data_to_insert)
print(f"Inserted {len(result.inserted_ids)} new records into MongoDB.")
else:
print("No new data to insert.")
except Exception as e:
print(f"An error occurred: {e}")#create a virtual environment
python3 -m venv venv
#Activate your virtual environmnent in your project folder
source venv/bin/activate
#Install zenml
pip install zenml
#To Launch zenml server and dashboard locally
pip install "zenml[server]"
#To check the zenml Version:
zenml version
#To initiate a new repository
zenml init
#To run the dashboard locally:
zenml login --local
#To know the status of our zenml Pipelines
zenml show
#To shutdown the zenml server
zenml clean
#Integrating mlflow with ZenML
zenml integration install mlflow -y

#Register the experiment tracker
zenml experiment-tracker register mlflow_tracker --flavor=mlflow

#Registering the model deployer
zenml model-deployer register mlflow --flavor=mlflow

#Registering the stack
zenml stack register local-mlflow-stack-new -a default -o default -d mlflow -e mlflow_tracker --set

#To view the stack list
zenml stack --list
bitcoin_price_prediction_mlops/        # Project directory
├── data/
│   └── management/
│       ├── api_to_mongodb.py          # Code to fetch data and save it to MongoDB
│       └── api.py                     # API-related utility functions
│
├── pipelines/
│   ├── deployment_pipeline.py         # Deployment pipeline
│   └── training_pipeline.py           # Training pipeline
│
├── saved_models/                      # Directory for storing trained models
├── saved_scalers/                     # Directory for storing scalers used in data preprocessing
│
├── src/                               # Source code
│   ├── data_cleaning.py               # Data cleaning and preprocessing
│   ├── data_ingestion.py              # Data ingestion
│   ├── data_splitter.py               # Data splitting
│   ├── feature_engineering.py         # Feature engineering
│   ├── model_evaluation.py            # Model evaluation
│   └── model_training.py              # Model training
│
├── steps/                             # ZenML steps
│   ├── clean_data.py                  # ZenML step for cleaning data
│   ├── data_splitter.py               # ZenML step for data splitting
│   ├── dynamic_importer.py            # ZenML step for importing dynamic data
│   ├── feature_engineering.py         # ZenML step for feature engineering
│   ├── ingest_data.py                 # ZenML step for data ingestion
│   ├── model_evaluation.py            # ZenML step for model evaluation
│   ├── model_training.py              # ZenML step for training the model
│   ├── prediction_service_loader.py   # ZenML step for loading prediction services
│   ├── predictor.py                   # ZenML step for prediction
│   └── utils.py                       # Utility functions for steps
│
├── .env                               # Environment variables file
├── .gitignore                         # Git ignore file
│
├── app.py                             # Streamlit user interface app
│
├── README.md                          # Project documentation
├── requirements.txt                   # List of required packages
├── run_deployment.py                  # Code for running deployment and prediction pipeline
├── run_pipeline.py                    # Code for running training pipeline
└── .zen/                              # ZenML directory (created automatically after ZenML initialization)
 ここで、コマンドラインの上記のMLFlow UIリンクをコピーして貼り付けて実行する必要があります。
 ステップ11:retrienlitアプリを構築します
import os
import logging
from pymongo import MongoClient
from dotenv import load_dotenv
from zenml import step
import pandas as pd

# Load the .env file
load_dotenv()

# Get MongoDB URI from environment variables
MONGO_URI = os.getenv("MONGO_URI")

def fetch_data_from_mongodb(collection_name:str, database_name:str):
    """
    Fetches data from MongoDB and converts it into a pandas DataFrame.

    collection_name:
        Name of the MongoDB collection to fetch data.
    database_name:
        Name of the MongoDB database.
    return:
        A pandas DataFrame containing the data
    """
    # Connect to the MongoDB client
    client = MongoClient(MONGO_URI)
    db = client[database_name]  # Select the database
    collection = db[collection_name]  # Select the collection

    # Fetch all documents from the collection
    try:
        logging.info(f"Fetching data from MongoDB collection: {collection_name}...")
        data = list(collection.find())  # Convert cursor to a list of dictionaries

        if not data:
            logging.info("No data found in the MongoDB collection.")


        # Convert the list of dictionaries into a pandas DataFrame
        df = pd.DataFrame(data)

        # Drop the MongoDB ObjectId field if it exists (optional)
        if '_id' in df.columns:
            df = df.drop(columns=['_id'])

        logging.info("Data successfully fetched and converted to a DataFrame!")
        return df

    except Exception as e:
        logging.error(f"An error occurred while fetching data: {e}")
        raise e


@step(enable_cache=False)
def ingest_data(collection_name: str = "historical_data", database_name: str = "crypto_data") -> pd.DataFrame:

    logging.info("Started data ingestion process from MongoDB.")

    try:
        # Use the fetch_data_from_mongodb function to fetch data
        df = fetch_data_from_mongodb(collection_name=collection_name, database_name=database_name)

        if df.empty:
            logging.warning("No data was loaded. Check the collection name or the database content.")
        else:
            logging.info(f"Data ingestion completed. Number of records loaded: {len(df)}.")

        return df

    except Exception as e:
        logging.error(f"Error while reading data from {collection_name} in {database_name}: {e}")
raise e 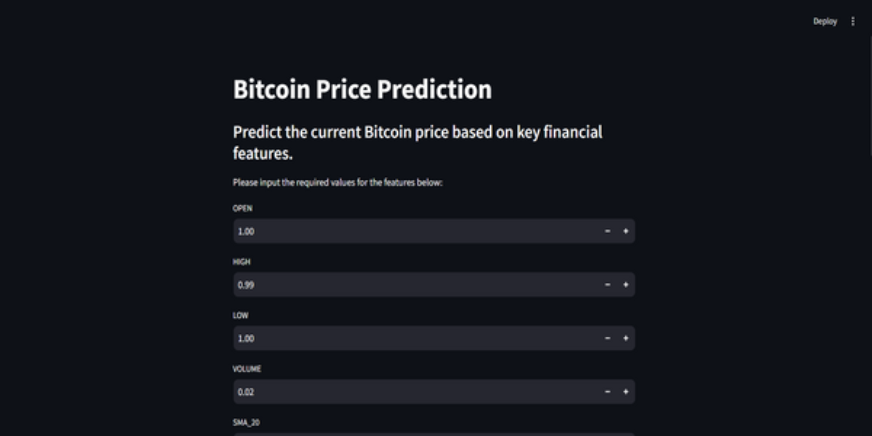
結論
この記事では、エンドツーエンドの生産対応のビットコイン価格予測MLOPSプロジェクトの構築に成功しました。データを取得してAPIを介してプリプロシスしてトレーニング、評価、展開をモデル化するために、プロジェクトをモデル化することから、開発と生産との接続におけるMLOPの重要な役割を強調しています。リアルタイムでビットコインの価格を予測する未来を形作ることに一歩近づいています。 APIは、CCDATA APIのビットコイン価格データなど、外部データへのスムーズなアクセスを提供し、既存のデータセットの必要性を排除します。
APIは、CCDATA APIのビットコイン価格データなど、外部データへのシームレスなアクセスを有効にして、既存のデータセットの必要性を排除します。
ZENMLおよびMLFLOWは、現実世界のアプリケーションでの機械学習モデルの開発、追跡、展開を促進する堅牢なツールです。
以上がMLOPを使用したビットコイン価格予測の詳細内容です。詳細については、PHP 中国語 Web サイトの他の関連記事を参照してください。

ホットAIツール

Undresser.AI Undress
リアルなヌード写真を作成する AI 搭載アプリ

AI Clothes Remover
写真から衣服を削除するオンライン AI ツール。

Undress AI Tool
脱衣画像を無料で

Clothoff.io
AI衣類リムーバー

Video Face Swap
完全無料の AI 顔交換ツールを使用して、あらゆるビデオの顔を簡単に交換できます。

人気の記事

ホットツール

メモ帳++7.3.1
使いやすく無料のコードエディター

SublimeText3 中国語版
中国語版、とても使いやすい

ゼンドスタジオ 13.0.1
強力な PHP 統合開発環境

ドリームウィーバー CS6
ビジュアル Web 開発ツール

SublimeText3 Mac版
神レベルのコード編集ソフト(SublimeText3)

ホットトピック
 7909
7909
 15
15
 1652
1652
 14
14
 1411
1411
 52
52
 1303
1303
 25
25
 1248
1248
 29
29
 クリエイティブプロジェクトのための最高のAIアートジェネレーター(無料&有料)
Apr 02, 2025 pm 06:10 PM
この記事では、トップAIアートジェネレーターをレビューし、その機能、創造的なプロジェクトへの適合性、価値について説明します。 Midjourneyを専門家にとって最高の価値として強調し、高品質でカスタマイズ可能なアートにDall-E 2を推奨しています。
 Meta Llama 3.2を始めましょう - 分析Vidhya
Apr 11, 2025 pm 12:04 PM
メタのラマ3.2:マルチモーダルとモバイルAIの前進 メタは最近、ラマ3.2を発表しました。これは、モバイルデバイス向けに最適化された強力なビジョン機能と軽量テキストモデルを特徴とするAIの大幅な進歩です。 成功に基づいてo
 ベストAIチャットボットが比較されました(chatgpt、gemini、claude& more)
Apr 02, 2025 pm 06:09 PM
この記事では、ChatGpt、Gemini、ClaudeなどのトップAIチャットボットを比較し、自然言語の処理と信頼性における独自の機能、カスタマイズオプション、パフォーマンスに焦点を当てています。
 10生成AIコーディング拡張機能とコードのコードを探る必要があります
Apr 13, 2025 am 01:14 AM
ねえ、忍者をコーディング!その日はどのようなコーディング関連のタスクを計画していますか?このブログにさらに飛び込む前に、コーディング関連のすべての問題について考えてほしいです。 終わり? - &#8217を見てみましょう
 トップAIライティングアシスタントは、コンテンツの作成を後押しします
Apr 02, 2025 pm 06:11 PM
この記事では、Grammarly、Jasper、Copy.ai、Writesonic、RytrなどのトップAIライティングアシスタントについて説明し、コンテンツ作成のためのユニークな機能に焦点を当てています。 JasperがSEOの最適化に優れているのに対し、AIツールはトーンの維持に役立つと主張します
 従業員へのAI戦略の販売:Shopify CEOのマニフェスト
Apr 10, 2025 am 11:19 AM
Shopify CEOのTobiLütkeの最近のメモは、AIの能力がすべての従業員にとって基本的な期待であると大胆に宣言し、会社内の重大な文化的変化を示しています。 これはつかの間の傾向ではありません。これは、pに統合された新しい運用パラダイムです
 AVバイト:Meta' s llama 3.2、GoogleのGemini 1.5など
Apr 11, 2025 pm 12:01 PM
今週のAIの風景:進歩、倫理的考慮、規制の議論の旋風。 Openai、Google、Meta、Microsoftのような主要なプレーヤーは、画期的な新しいモデルからLEの重要な変化まで、アップデートの急流を解き放ちました
 最高のAI音声ジェネレーターの選択:レビューされたトップオプション
Apr 02, 2025 pm 06:12 PM
この記事では、Google Cloud、Amazon Polly、Microsoft Azure、IBM Watson、DecriptなどのトップAI音声ジェネレーターをレビューし、機能、音声品質、さまざまなニーズへの適合性に焦点を当てています。


