

クラウド実行でのステートレス コンテナのデプロイ

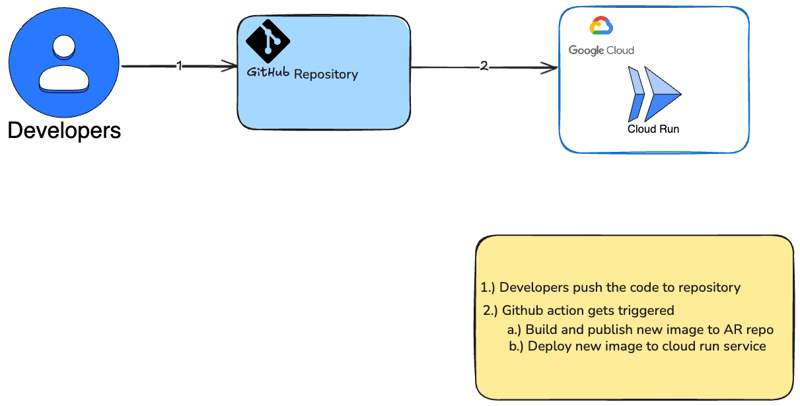
I will demonstrate how to deploy a simple container on cloud run.
Cloud Run is a fully managed platform that enables you to run your code directly on top of Google’s scalable infrastructure. Cloud Run is simple, automated, and designed to make you more productive.
- Create a simple hello world application using fastapi library (python)
- Containerize the application
- Configure the workflow with GCP
- Deploy the container onto cloud run service via github workflow
I followed official fastapi doc to spin up a hello world app
Create a requirements.txt file
fastapi[standard]
pydantic>=2.7.0,<3.0.0
- Create an app directory and enter it
- Create an empty file init.py
- Create a main.py file with:
from typing import Union

from fastapi import FastAPI

app = FastAPI()


@app.get("/")
def read_root():
    return {"Hello": "World"}


@app.get("/items/{item_id}")
def read_item(item_id: int, q: Union[str, None] = None):
    return {"item_id": item_id, "q": q}
Create a Dockerfile
FROM python:3.9

WORKDIR /code

COPY ./requirements.txt /code/requirements.txt

RUN pip install --no-cache-dir --upgrade -r /code/requirements.txt

COPY ./app /code/app

CMD ["fastapi", "run", "app/main.py", "--port", "80"]
GitHub Action
In order for the GitHub actions process to pick up the YAML file, there’s specific location for it to live. Each repository using actions requires a directory structure called /.github/workflows
*Configure this workflow with GCP more info *
# This workflow build and push a Docker container to Google Artifact Registry
# and deploy it on Cloud Run when a commit is pushed to the $default-branch
# branch.
#
# To configure this workflow:
#
# 1. Enable the following Google Cloud APIs:
#
#    - Artifact Registry (artifactregistry.googleapis.com)
#    - Cloud Run (run.googleapis.com)
#    - IAM Credentials API (iamcredentials.googleapis.com)
#
#    You can learn more about enabling APIs at
#    https://support.google.com/googleapi/answer/6158841.
#
# 2. Create and configure a Workload Identity Provider for GitHub:
#    https://github.com/google-github-actions/auth#preferred-direct-workload-identity-federation.
#
#    Depending on how you authenticate, you will need to grant an IAM principal
#    permissions on Google Cloud:
#
#    - Artifact Registry Administrator (roles/artifactregistry.admin)
#    - Cloud Run Developer (roles/run.developer)
#
#    You can learn more about setting IAM permissions at
#    https://cloud.google.com/iam/docs/manage-access-other-resources
#
# 3. Change the values in the "env" block to match your values.
Create a file google-cloudrun-docker.yml
name: 'Build and Deploy to Cloud Run'

on:
  push:
    branches:
      - '$default-branch'

env:
  PROJECT_ID: 'my-project' # TODO: update to your Google Cloud project ID
  REGION: 'us-central1' # TODO: update to your region
  SERVICE: 'my-service' # TODO: update to your service name
  WORKLOAD_IDENTITY_PROVIDER: 'projects/123456789/locations/global/workloadIdentityPools/my-pool/providers/my-provider' # TODO: update to your workload identity provider

jobs:
  deploy:
    runs-on: 'ubuntu-latest'

    permissions:
      contents: 'read'
      id-token: 'write'

    steps:
      - name: 'Checkout'
        uses: 'actions/checkout@692973e3d937129bcbf40652eb9f2f61becf3332' # actions/checkout@v4

      # Configure Workload Identity Federation and generate an access token.
      #
      # See https://github.com/google-github-actions/auth for more options,
      # including authenticating via a JSON credentials file.
      - id: 'auth'
        name: 'Authenticate to Google Cloud'
        uses: 'google-github-actions/auth@f112390a2df9932162083945e46d439060d66ec2' # google-github-actions/auth@v2
        with:
          workload_identity_provider: '${{ env.WORKLOAD_IDENTITY_PROVIDER }}'

      # BEGIN - Docker auth and build
      #
      # If you already have a container image, you can omit these steps.
      - name: 'Docker Auth'
        uses: 'docker/login-action@9780b0c442fbb1117ed29e0efdff1e18412f7567' # docker/login-action@v3
        with:
          username: 'oauth2accesstoken'
          password: '${{ steps.auth.outputs.auth_token }}'
          registry: '${{ env.REGION }}-docker.pkg.dev'

      - name: 'Build and Push Container'
        run: |-
          DOCKER_TAG="$${{ env.REGION }}-docker.pkg.dev/${{ env.PROJECT_ID }}/${{ env.SERVICE }}:${{ github.sha }}"
          docker build --tag "${DOCKER_TAG}" .
          docker push "${DOCKER_TAG}"
      - name: 'Deploy to Cloud Run'

        # END - Docker auth and build

        uses: 'google-github-actions/deploy-cloudrun@33553064113a37d688aa6937bacbdc481580be17' # google-github-actions/deploy-cloudrun@v2
        with:
          service: '${{ env.SERVICE }}'
          region: '${{ env.REGION }}'
          # NOTE: If using a pre-built image, update the image name below:

          image: '${{ env.REGION }}-docker.pkg.dev/${{ env.PROJECT_ID }}/${{ env.SERVICE }}:${{ github.sha }}'
      # If required, use the Cloud Run URL output in later steps
      - name: 'Show output'
        run: |2-

          echo ${{ steps.deploy.outputs.url }}
Directory Structure
You should now have a directory structure like:
├── app
│   ├── __init__.py
│   └── main.py
├── Dockerfile
└── requirements.txt
└── requirements.txt
├── .github
│   ├── workflows
         ├── google-cloudrun-docker.yml
> 1. Create a new repo in gitHUb
> 2. Push your exisisting code to new repository on default branch
以上がクラウド実行でのステートレス コンテナのデプロイの詳細内容です。詳細については、PHP 中国語 Web サイトの他の関連記事を参照してください。

ホットAIツール

Undresser.AI Undress
リアルなヌード写真を作成する AI 搭載アプリ

AI Clothes Remover
写真から衣服を削除するオンライン AI ツール。

Undress AI Tool
脱衣画像を無料で

Clothoff.io
AI衣類リムーバー

Video Face Swap
完全無料の AI 顔交換ツールを使用して、あらゆるビデオの顔を簡単に交換できます。

人気の記事
ホットツール

メモ帳++7.3.1
使いやすく無料のコードエディター

SublimeText3 中国語版
中国語版、とても使いやすい

ゼンドスタジオ 13.0.1
強力な PHP 統合開発環境

ドリームウィーバー CS6
ビジュアル Web 開発ツール

SublimeText3 Mac版
神レベルのコード編集ソフト(SublimeText3)
ホットトピック
 1675
1675
 14
1429
52
1333
25
1278
29
1257
24
14
1429
52
1333
25
1278
29
1257
24

 Python vs. C:曲線と使いやすさの学習
Apr 19, 2025 am 12:20 AM
Python vs. C:曲線と使いやすさの学習
Apr 19, 2025 am 12:20 AM
Pythonは学習と使用が簡単ですが、Cはより強力ですが複雑です。 1。Python構文は簡潔で初心者に適しています。動的なタイピングと自動メモリ管理により、使いやすくなりますが、ランタイムエラーを引き起こす可能性があります。 2.Cは、高性能アプリケーションに適した低レベルの制御と高度な機能を提供しますが、学習しきい値が高く、手動メモリとタイプの安全管理が必要です。
 Pythonの学習:2時間の毎日の研究で十分ですか?
Apr 18, 2025 am 12:22 AM
Pythonの学習:2時間の毎日の研究で十分ですか?
Apr 18, 2025 am 12:22 AM
Pythonを1日2時間学ぶだけで十分ですか?それはあなたの目標と学習方法に依存します。 1)明確な学習計画を策定し、2)適切な学習リソースと方法を選択します。3)実践的な実践とレビューとレビューと統合を練習および統合し、統合すると、この期間中にPythonの基本的な知識と高度な機能を徐々に習得できます。
 Python vs. C:パフォーマンスと効率の探索
Apr 18, 2025 am 12:20 AM
Python vs. C:パフォーマンスと効率の探索
Apr 18, 2025 am 12:20 AM
Pythonは開発効率でCよりも優れていますが、Cは実行パフォーマンスが高くなっています。 1。Pythonの簡潔な構文とリッチライブラリは、開発効率を向上させます。 2.Cのコンピレーションタイプの特性とハードウェア制御により、実行パフォーマンスが向上します。選択を行うときは、プロジェクトのニーズに基づいて開発速度と実行効率を比較検討する必要があります。
 Python vs. C:重要な違いを理解します
Apr 21, 2025 am 12:18 AM
Python vs. C:重要な違いを理解します
Apr 21, 2025 am 12:18 AM
PythonとCにはそれぞれ独自の利点があり、選択はプロジェクトの要件に基づいている必要があります。 1)Pythonは、簡潔な構文と動的タイピングのため、迅速な開発とデータ処理に適しています。 2)Cは、静的なタイピングと手動メモリ管理により、高性能およびシステムプログラミングに適しています。
 Python Standard Libraryの一部はどれですか:リストまたは配列はどれですか?
Apr 27, 2025 am 12:03 AM
Python Standard Libraryの一部はどれですか:リストまたは配列はどれですか?
Apr 27, 2025 am 12:03 AM
PythonListSarePartOfThestAndardarenot.liestareBuilting-in、versatile、forStoringCollectionsのpythonlistarepart。
 Python:自動化、スクリプト、およびタスク管理
Apr 16, 2025 am 12:14 AM
Python:自動化、スクリプト、およびタスク管理
Apr 16, 2025 am 12:14 AM
Pythonは、自動化、スクリプト、およびタスク管理に優れています。 1)自動化:OSやShutilなどの標準ライブラリを介してファイルバックアップが実現されます。 2)スクリプトの書き込み:Psutilライブラリを使用してシステムリソースを監視します。 3)タスク管理:スケジュールライブラリを使用してタスクをスケジュールします。 Pythonの使いやすさと豊富なライブラリサポートにより、これらの分野で優先ツールになります。
 科学コンピューティングのためのPython:詳細な外観
Apr 19, 2025 am 12:15 AM
科学コンピューティングのためのPython:詳細な外観
Apr 19, 2025 am 12:15 AM
科学コンピューティングにおけるPythonのアプリケーションには、データ分析、機械学習、数値シミュレーション、視覚化が含まれます。 1.numpyは、効率的な多次元配列と数学的関数を提供します。 2。ScipyはNumpy機能を拡張し、最適化と線形代数ツールを提供します。 3. Pandasは、データ処理と分析に使用されます。 4.matplotlibは、さまざまなグラフと視覚的な結果を生成するために使用されます。
 Web開発用のPython:主要なアプリケーション
Apr 18, 2025 am 12:20 AM
Web開発用のPython:主要なアプリケーション
Apr 18, 2025 am 12:20 AM
Web開発におけるPythonの主要なアプリケーションには、DjangoおよびFlaskフレームワークの使用、API開発、データ分析と視覚化、機械学習とAI、およびパフォーマンスの最適化が含まれます。 1。DjangoandFlask Framework:Djangoは、複雑な用途の迅速な発展に適しており、Flaskは小規模または高度にカスタマイズされたプロジェクトに適しています。 2。API開発:フラスコまたはdjangorestFrameworkを使用して、Restfulapiを構築します。 3。データ分析と視覚化:Pythonを使用してデータを処理し、Webインターフェイスを介して表示します。 4。機械学習とAI:Pythonは、インテリジェントWebアプリケーションを構築するために使用されます。 5。パフォーマンスの最適化:非同期プログラミング、キャッシュ、コードを通じて最適化
