HP laptop sound effects not working on Windows 11
If your HP laptop is experiencing sound effects issues on Windows 11, you may be confused and annoyed. This situation may prevent you from enjoying watching videos or listening to music. Typically, this problem can be caused by outdated or corrupted audio drivers, audio enhancements, etc. The key to resolving this issue is to make sure your audio drivers are up to date and to check that the audio is functioning properly in your system settings. By following the correct troubleshooting steps, you'll likely be able to resolve the issue and restore sound functionality to your laptop so you can enjoy your multimedia content.

Fix HP laptop sound not working on Windows 11
If your HP laptop sound effects are not working on Windows 11, follow these suggestions to resolve the issue:
let us start.
1]Restart the computer
Your HP laptop may experience audio issues on Windows PC, which may be caused by a temporary glitch. Try to resolve the issue by restarting your computer and check if there is any improvement after restarting.
2]Run the Audio Troubleshooter
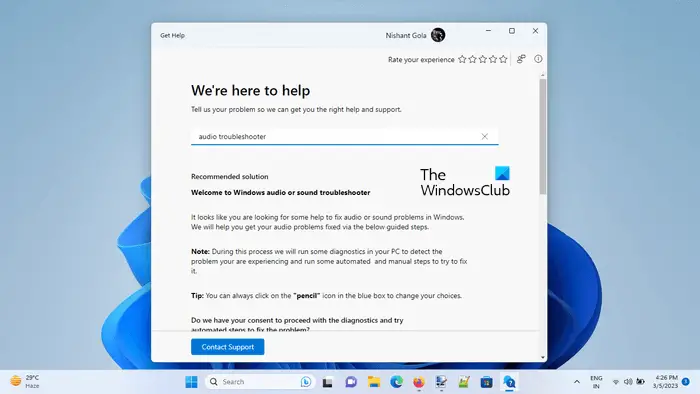
The built-in audio troubleshooter for Windows PCs is a handy tool that can help you solve some common audio problems. You can run this audio troubleshooter through the Get Help app. This automated program walks you through a series of questions so you can find and fix the problem. Once launched, you will be asked to answer some questions, please choose the appropriate answer based on the specific problem you are experiencing. This audio troubleshooter is designed to simplify the repair process and make it easier for you to resolve your audio-related woes.
3]Run audio check in HP Support Assistant
If the audio debugger does not resolve the issue, you can also run an audio check through HP Support Assistant. HP provides an application called HP Support Assistant that can be used to diagnose and fix audio and laptop problems. You just need to follow these steps:
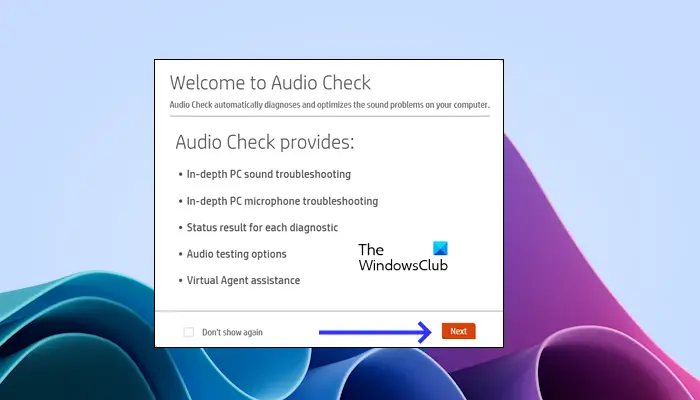
- In HP Windows Search, type HP Support Assistant and open it.
- Click the My Dashboard tab, then Repair & Diagnose.
- Fix audio issues with one click. Click Next and wait for the audio test to complete.
- View the test results in the Audio and Microphone Diagnostic Results section and click Test Audio.
- If you don't hear the sound correctly, click Can't hear audio and follow the on-screen instructions.
4]Update or reinstall the audio device driver
Sound problems can be caused by outdated or damaged drivers. To resolve this issue, make sure your audio device drivers are up to date. You can go to the manufacturer's official website to download the latest version of the driver. After installing the latest drivers, remember to restart your laptop and check if the issue has been resolved. This ensures that your audio equipment is functioning properly, allowing you to enjoy a high-quality sound experience.
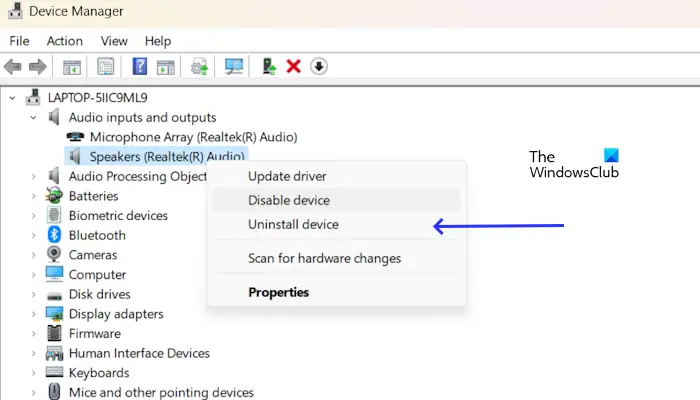
If updating the audio device driver does not resolve the issue. You can also try reinstalling the audio driver.
To do this, expand the Audio Input and Output node in Device Manager and right-click the audio device driver, depending on your manufacturer. Select Uninstall device. Restart the computer to reinstall the audio device driver.
5]Update or reinstall the sound controller driver
Corrupted sound card drivers may also cause audio problems. We recommend that you update or reinstall your sound controller driver. You can download the latest voice control driver from the manufacturer's website. After downloading, install the Sound controller driver and restart your device.
If updating the sound controller driver does not solve the problem. You can also try reinstalling the audio driver according to the manufacturer, such as the Realtek audio driver. To do this, use the following instructions:
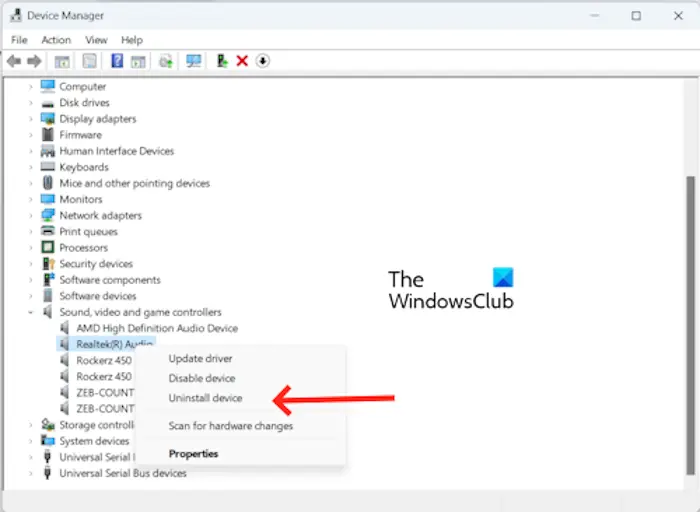
- Go to Device Manager.
- Expand Sound, Video and Game Controllers.
- Select your sound controller device and right-click the sound controller driver.
- Click to uninstall the device.
Restart the computer to reinstall the sound controller driver. Alternatively, you can scan for hardware changes by clicking the Actions tab.
6]Disable audio enhancement
It may be the audio enhancement feature that is causing the sound problem. In this case, we recommend that you disable audio enhancement. To confirm if this is the case for you, disable this feature. Use the following instructions to disable this feature:
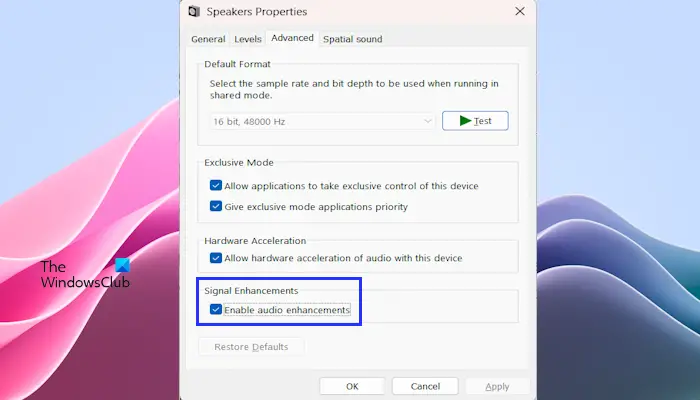
- Open the control panel.
- Type sounds in the Control Panel search bar and click Sounds.
- The Sound Properties window will appear – double-click on your speaker to open its properties.
- Click the Advanced tab and uncheck the Enable Audio Enhancement box.
- Click Apply and then OK.
Check if the problem still exists.
7]Update BIOS
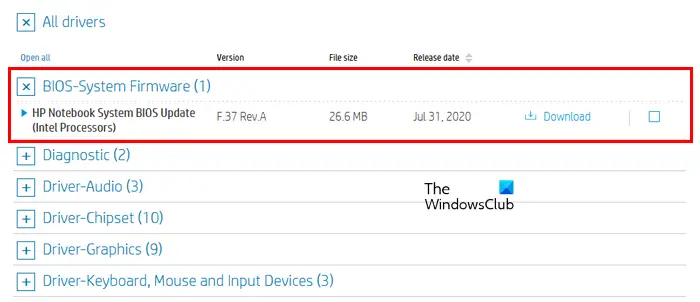
If your HP laptop sound effects are still not working on Windows, we recommend updating your BIOS (if you have one). However, before proceeding with BIOS update, you need to check the version of BIOS from System Information or Command Prompt. If an update is available, install it. You can download the latest BIOS update from your computer manufacturer's official website.
8]Contact HP Customer Support
If none of the solutions work for you, then we recommend that you contact their customer support team and tell them the problem. They will help you solve this problem.
Hope this helps.
The above is the detailed content of HP laptop sound effects not working on Windows 11. For more information, please follow other related articles on the PHP Chinese website!

Hot AI Tools

Undresser.AI Undress
AI-powered app for creating realistic nude photos

AI Clothes Remover
Online AI tool for removing clothes from photos.

Undress AI Tool
Undress images for free

Clothoff.io
AI clothes remover

Video Face Swap
Swap faces in any video effortlessly with our completely free AI face swap tool!

Hot Article

Hot Tools

Notepad++7.3.1
Easy-to-use and free code editor

SublimeText3 Chinese version
Chinese version, very easy to use

Zend Studio 13.0.1
Powerful PHP integrated development environment

Dreamweaver CS6
Visual web development tools

SublimeText3 Mac version
God-level code editing software (SublimeText3)

Hot Topics
 1670
1670
 14
14
 1428
1428
 52
52
 1329
1329
 25
25
 1274
1274
 29
29
 1256
1256
 24
24
 Can vs code run in Windows 8
Apr 15, 2025 pm 07:24 PM
VS Code can run on Windows 8, but the experience may not be great. First make sure the system has been updated to the latest patch, then download the VS Code installation package that matches the system architecture and install it as prompted. After installation, be aware that some extensions may be incompatible with Windows 8 and need to look for alternative extensions or use newer Windows systems in a virtual machine. Install the necessary extensions to check whether they work properly. Although VS Code is feasible on Windows 8, it is recommended to upgrade to a newer Windows system for a better development experience and security.
 Which operating systems are supported by Tigervnc in Debian
Apr 12, 2025 pm 10:15 PM
The open source VNC tool Tigervnc is compatible with a wide range of operating systems, including Windows, Linux, and macOS. This article will introduce in detail the application of Tigervnc on the Debian system. Tigervnc is integrated in the application system of Debian system: In the Debian system, Tigervnc is integrated into the system as a VNC server component. Users can start VNC services through command line tools such as vncserver and customize display settings such as resolution and color depth. Cross-platform connection: Tigervnc client supports Windows, Linux, and macOS, which means users can run this from any
 How to run sublime after writing the code
Apr 16, 2025 am 08:51 AM
There are six ways to run code in Sublime: through hotkeys, menus, build systems, command lines, set default build systems, and custom build commands, and run individual files/projects by right-clicking on projects/files. The build system availability depends on the installation of Sublime Text.
 Recommended system maintenance and optimization tools in Mac system
Apr 12, 2025 pm 04:45 PM
Mac system maintenance includes: disk management (use OmniDiskSweeper to clean disk space, use disk tools to check disk errors) memory management (use Activity Monitor to monitor memory usage, end over-occupying processes) startup item management (use Linc or LaunchControl to manage startup items, disable unnecessary startup items) system cache cleaning (use CleanMyMac X or manually clean system cache) software update (timely update system and applications) regular backup (use Time Machine to backup data regularly) good usage habits (not installing applications excessively, cleaning files regularly, and monitoring system logs)
 How to solve complex BelongsToThrough relationship problem in Laravel? Use Composer!
Apr 17, 2025 pm 09:54 PM
In Laravel development, dealing with complex model relationships has always been a challenge, especially when it comes to multi-level BelongsToThrough relationships. Recently, I encountered this problem in a project dealing with a multi-level model relationship, where traditional HasManyThrough relationships fail to meet the needs, resulting in data queries becoming complex and inefficient. After some exploration, I found the library staudenmeir/belongs-to-through, which easily installed and solved my troubles through Composer.
 laravel installation code
Apr 18, 2025 pm 12:30 PM
To install Laravel, follow these steps in sequence: Install Composer (for macOS/Linux and Windows) Install Laravel Installer Create a new project Start Service Access Application (URL: http://127.0.0.1:8000) Set up the database connection (if required)
 git software installation
Apr 17, 2025 am 11:57 AM
Installing Git software includes the following steps: Download the installation package and run the installation package to verify the installation configuration Git installation Git Bash (Windows only)
 vscode cannot install extension
Apr 15, 2025 pm 07:18 PM
The reasons for the installation of VS Code extensions may be: network instability, insufficient permissions, system compatibility issues, VS Code version is too old, antivirus software or firewall interference. By checking network connections, permissions, log files, updating VS Code, disabling security software, and restarting VS Code or computers, you can gradually troubleshoot and resolve issues.


