How to hide labels in css
How to hide tags in css: 1. Use the Opacity attribute to hide the tag from being visible; 2. Use the Display attribute to hide the element; 3. Hide the tag through the Visibility attribute; 4. Use the Clip-path attribute to hide it.
The operating environment of this article: Windows7 system, HTML5&&CSS3 version, Dell G3 computer.
There are many ways to hide page elements using CSS.
You can set opacity to 0, visibility to hidden, display to none or position to absolute and set the position to the invisible area.
But there are subtle differences between each method, and these differences determine which method to use in a specific situation. In this article of mine, I will explain to you the differences between them, so that you can choose the appropriate method according to the occasion.
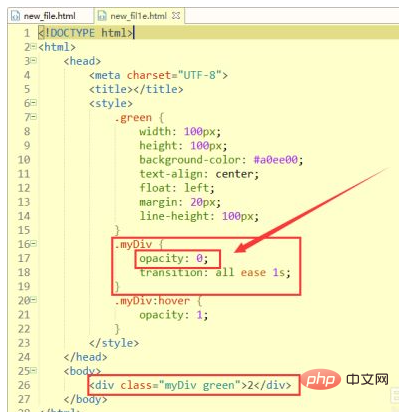
The first method is to use the Opacity attribute
The The meaning of the attribute is to retrieve or set the opacity of the object. When its transparency is 0, it disappears visually, but it still occupies that position and plays a role in the layout of the web page. It will also respond to user interaction. For elements with this attribute added, their background and element content will also change accordingly. We can use this feature to create some great animation effects. I made a simple small effect here, the code is as follows:
Note: This attribute is compatible with browsers IE9 and above. IE8 and earlier versions support alternative filter attributes, for example: filter:Alpha(opacity=50).
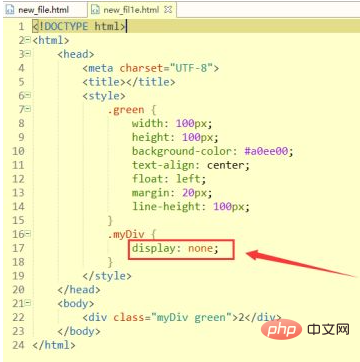
The second method is to use the Display attribute
This attribute is the real hidden element. When the display attribute of the element is none, the element will disappear from the vision. , and even the box model will not be generated. It will not occupy any position on the page. Not only that, even its child elements will disappear from the box model together. Any animation effects and interactions added to it and its child elements will have no effect. The show(), hide(), and toggle() methods in jq achieve changing effects by changing the value of display.
[Recommended learning: css video tutorial]
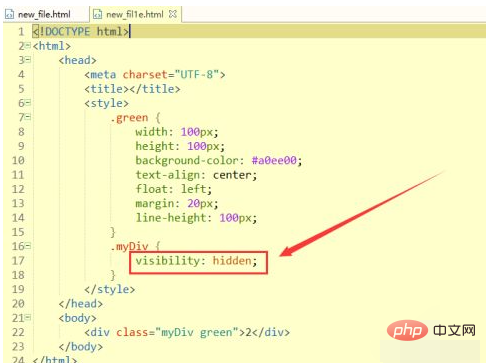
The third method is to use the Visibility attribute
The attribute is similar to the opacity attribute. When the attribute value is hidden, the element will be hidden, occupy its own position, and affect the layout of the web page. The only difference from opacity is that it will not respond to any user interaction. Additionally, elements will be hidden in screen reading software. This property can also be animated as long as its initial and end states are different. This ensures that the transition animation between visibility state switches can be time-smooth
Note: 1. Any version of Internet Explorer (including IE8) does not support "inherit" " and "collapse" attribute values.
2. If the visibility of an element is set to hidden, but you want to display its child elements, just add visibility: visible; to the child elements you want to display. Try hovering on the hidden element instead of hovering on the number in the p tag. You will find that your mouse cursor does not turn into a finger. At this time, when you click the mouse, your click event will not be triggered. The
tag inside the
The fourth method is to use the Clip-path attribute
This attribute is rare and is hidden through clipping. Hidden content still occupies that position, and surrounding elements behave as if it were visible. Remember that user interactions such as mouseovers or clicks will not take effect outside the clipping area. Additionally, this property enables the use of various transition animations to achieve different effects.
Note: The reason why clip-path is not very popular is because of its browser compatibility issues. It is not supported at all in IE, so it is recommended to add the kernel prefix when using it.
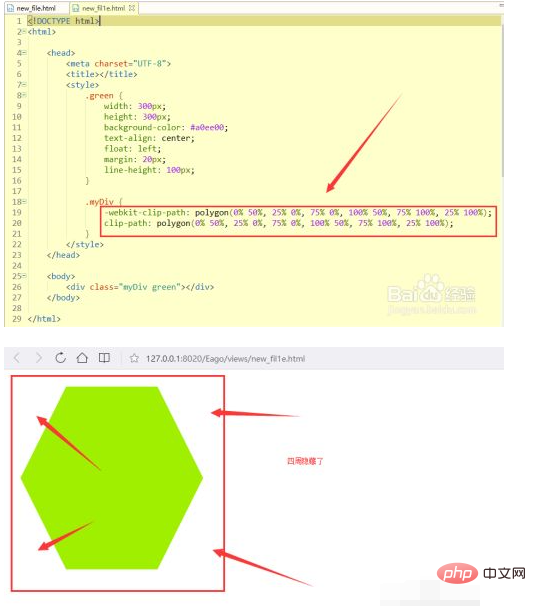
Note: The reason why clip-path is not very popular is because of its browser compatibility issues. It is not supported at all in IE, so it is recommended to add the kernel prefix when using it.
The fifth method is to use the Position attribute
The meaning of this attribute is to move the element out of the document flow and out of the visual area. Adding this attribute will not affect the layout, but also keep the element operable. After applying this attribute, you can mainly control the direction (top, left, right, bottom) to reach a certain value and leave the current page.
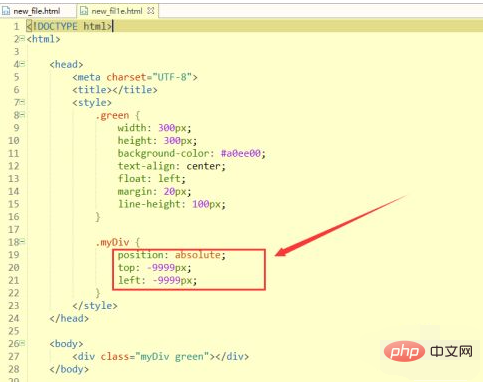
Note: You should avoid using this method to hide any focusable element, because doing so will result in an unavailable error when the user gives that element focus. Expected focus switch. This method is often used when creating custom checkboxes and radio buttons.
Conclusion:
Here are 5 methods. There are differences between each method. Which one to use depends on the situation.
The above is the detailed content of How to hide labels in css. For more information, please follow other related articles on the PHP Chinese website!

Hot AI Tools

Undresser.AI Undress
AI-powered app for creating realistic nude photos

AI Clothes Remover
Online AI tool for removing clothes from photos.

Undress AI Tool
Undress images for free

Clothoff.io
AI clothes remover

Video Face Swap
Swap faces in any video effortlessly with our completely free AI face swap tool!

Hot Article

Hot Tools

Notepad++7.3.1
Easy-to-use and free code editor

SublimeText3 Chinese version
Chinese version, very easy to use

Zend Studio 13.0.1
Powerful PHP integrated development environment

Dreamweaver CS6
Visual web development tools

SublimeText3 Mac version
God-level code editing software (SublimeText3)

Hot Topics
 1670
1670
 14
14
 1428
1428
 52
52
 1329
1329
 25
25
 1274
1274
 29
29
 1256
1256
 24
24
 How to use bootstrap in vue
Apr 07, 2025 pm 11:33 PM
Using Bootstrap in Vue.js is divided into five steps: Install Bootstrap. Import Bootstrap in main.js. Use the Bootstrap component directly in the template. Optional: Custom style. Optional: Use plug-ins.
 Understanding HTML, CSS, and JavaScript: A Beginner's Guide
Apr 12, 2025 am 12:02 AM
WebdevelopmentreliesonHTML,CSS,andJavaScript:1)HTMLstructurescontent,2)CSSstylesit,and3)JavaScriptaddsinteractivity,formingthebasisofmodernwebexperiences.
 The Roles of HTML, CSS, and JavaScript: Core Responsibilities
Apr 08, 2025 pm 07:05 PM
HTML defines the web structure, CSS is responsible for style and layout, and JavaScript gives dynamic interaction. The three perform their duties in web development and jointly build a colorful website.
 How to write split lines on bootstrap
Apr 07, 2025 pm 03:12 PM
There are two ways to create a Bootstrap split line: using the tag, which creates a horizontal split line. Use the CSS border property to create custom style split lines.
 How to insert pictures on bootstrap
Apr 07, 2025 pm 03:30 PM
There are several ways to insert images in Bootstrap: insert images directly, using the HTML img tag. With the Bootstrap image component, you can provide responsive images and more styles. Set the image size, use the img-fluid class to make the image adaptable. Set the border, using the img-bordered class. Set the rounded corners and use the img-rounded class. Set the shadow, use the shadow class. Resize and position the image, using CSS style. Using the background image, use the background-image CSS property.
 How to set up the framework for bootstrap
Apr 07, 2025 pm 03:27 PM
To set up the Bootstrap framework, you need to follow these steps: 1. Reference the Bootstrap file via CDN; 2. Download and host the file on your own server; 3. Include the Bootstrap file in HTML; 4. Compile Sass/Less as needed; 5. Import a custom file (optional). Once setup is complete, you can use Bootstrap's grid systems, components, and styles to create responsive websites and applications.
 How to resize bootstrap
Apr 07, 2025 pm 03:18 PM
To adjust the size of elements in Bootstrap, you can use the dimension class, which includes: adjusting width: .col-, .w-, .mw-adjust height: .h-, .min-h-, .max-h-
 How to use bootstrap button
Apr 07, 2025 pm 03:09 PM
How to use the Bootstrap button? Introduce Bootstrap CSS to create button elements and add Bootstrap button class to add button text


