How to use phpstuy to bind domain name

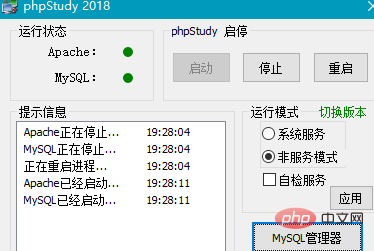
1. First, we select MYSQL Manager under 2 software and click to enter
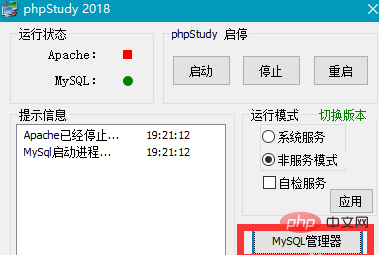
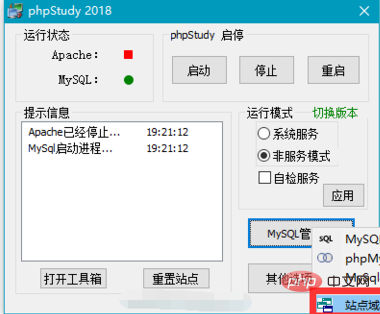
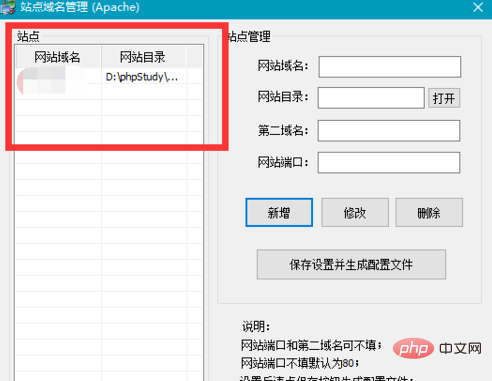
2. Next, a pop-up window appears In the drop-down menu, we click "Site Domain Name Management"
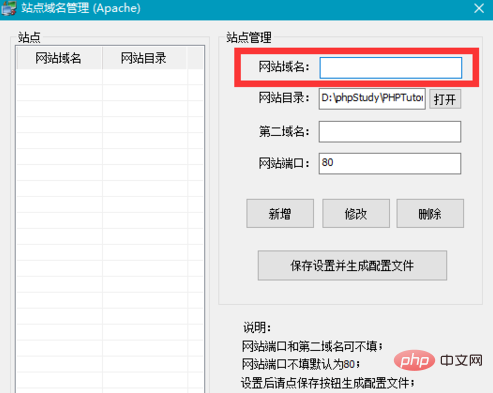
3. A menu will pop up. We select the website domain name in the menu. We enter the website domain name. Your own domain name
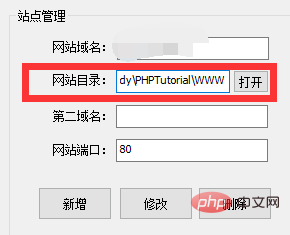
#4. Finally, we set the website directory to our own website path, choose to save and take effect, and that’s it. If we have several domain names, Then we choose to add, and the domain names will be saved in batches to the list on the left to facilitate our management
5. When we return to the initial interface of the software, select restart. When the restart is completed, you can complete the domain name binding
Recommended tutorial:phpstudy usage tutorial
The above is the detailed content of How to use phpstuy to bind domain name. For more information, please follow other related articles on the PHP Chinese website!

Hot AI Tools

Undresser.AI Undress
AI-powered app for creating realistic nude photos

AI Clothes Remover
Online AI tool for removing clothes from photos.

Undress AI Tool
Undress images for free

Clothoff.io
AI clothes remover

Video Face Swap
Swap faces in any video effortlessly with our completely free AI face swap tool!

Hot Article

Hot Tools

Notepad++7.3.1
Easy-to-use and free code editor

SublimeText3 Chinese version
Chinese version, very easy to use

Zend Studio 13.0.1
Powerful PHP integrated development environment

Dreamweaver CS6
Visual web development tools

SublimeText3 Mac version
God-level code editing software (SublimeText3)

Hot Topics
 1670
1670
 14
14
 1428
1428
 52
52
 1329
1329
 25
25
 1274
1274
 29
29
 1256
1256
 24
24
 What to do if phpstudy is garbled
Nov 14, 2022 am 09:53 AM
The reason why phpstudy is garbled is because the encoding and decoding methods are inconsistent. The solution: 1. Open the "Control Panel"; 2. Open "Clock, Language and Region"; 3. Click "Region"; 4. Click " Manage" icon; 5. Click "Change System Regional Settings", select "Specific Language", and then click "OK"; 6. Restart the computer.
 How to install phpstudy pro
Apr 02, 2024 pm 03:15 PM
PHPstudy Pro is a web development environment software package that enables rapid deployment and testing of web applications. The installation steps are as follows: Download the installation package from the official website. Run the installer and select the installation path and language. After the installation is complete, launch PHPstudy and configure PHP, MySQL, Apache settings. To verify the installation, enter "localhost" in your browser or run the command "php -v" to check the PHP version.
 How to change the port in phpstudy
Apr 02, 2024 pm 04:24 PM
In order to change the PHPSTUDY port, follow these steps: Open the Control Panel and navigate to the built-in Web server settings; modify the number in the port number field; save the changes and restart the server; enter the website URL and new port number to verify the changes.
 Why can't phpstudy be installed?
Apr 02, 2024 pm 03:42 PM
PHP Study installation failure may be due to the following reasons: 1. System compatibility issues; 2. Insufficient permissions; 3. File conflicts; 4. Abnormal network connection; 5. Anti-virus software interference; 6. Path problems; 7. System errors. If you encounter a problem that cannot be solved, you can seek support through the PHP Study forum, GitHub or the official website.
 How to read the database in phpstudy
Apr 02, 2024 pm 04:06 PM
Methods to view the database through PHPstudy include: Direct connection to MySQL Command line Use MySQL Workbench to configure the connection Select the database to view Select the database to view in the left menu through PHPMyAdmin
 Where is the phpstudy configuration file?
Apr 02, 2024 pm 04:00 PM
The phpStudy configuration file is located in the conf folder of the installation directory. Mainly includes web server, database, PHP and other settings. To access the configuration files, open the following files: ps.conf (main configuration file), config.ini (Web server settings), nginx.conf (Nginx settings), php.ini (PHP settings), and mysql.conf (MySQL settings) ). Modify configuration files with caution and make backup copies before editing.
 Teach you to create a virtual host and run php projects (phpstudy + wamp)
Aug 07, 2022 pm 03:17 PM
This article involves two PHP integrated environments, both of which contain mysql + apache + php. The function of phpstudy is more powerful than wamp, and it is very simple and easy to use.
 How to enable web service in phpstudy
Apr 02, 2024 pm 04:12 PM
To start a web service in PHP Study, select the web server and click the Start button. Check that the web server has started successfully and displays the welcome page or PHP information page by entering the localhost address (http://localhost or http://127.0.0.1) into the browser.


