
 Backend Development
Python Tutorial
Example tutorial on developing Python GUI programs in Windows using wxPython and py2exe
Backend Development
Python Tutorial
Example tutorial on developing Python GUI programs in Windows using wxPython and py2exe
Example tutorial on developing Python GUI programs in Windows using wxPython and py2exe

Python supports visual programming, that is, writing gui programs. You can use it to write your favorite desktop programs. Using wxPython to create an interface is very simple, but you cannot drag controls like C#, and you need to write code layout yourself. After completing the writing, since the direct py file cannot be run on a computer without Python installed, is there a tool that can be packaged to run on any computer? I searched online and found that py2exe can just complete this function. Both wxPython and py2exe are open source free software.
Environment configuration
wxPython: sourceforge project page https://sourceforge.net/projects/py2exe/files/py2exe/0.6.9/
After downloading, double-click to install. The installation program will automatically install to the corresponding pythonScripts.
py2exe: Official download homepage https://www.wxpython.org/download.php
You can also install it by double-clicking it. Pay attention to the Python version you want to download.
The following examples illustrate the simple use of wxPython and py2exe.
Basic example
File name: wxTest.py:
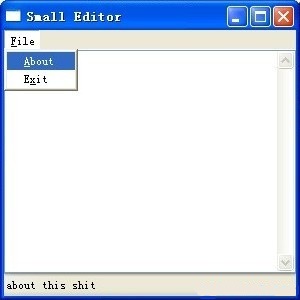
# -*- coding: cp936 -*-
'''MainWindow类完成最简单的编辑功能,添加一个主菜单,两个子菜单(about和exit)'''
import wx

class MainWindow(wx.Frame):
 '''定义一个窗口类'''
 def __init__(self, parent, title):
  wx.Frame.__init__(self, parent, title=title, size=(300, 300))
  self.control = wx.TextCtrl(self, style=wx.TE_MULTILINE)

  self.setupMenuBar()
  self.Show(True)

 def setupMenuBar(self):
  self.CreateStatusBar()

  menubar = wx.MenuBar()
  menufile = wx.Menu()

  mnuabout = menufile.Append(wx.ID_ABOUT, '&About', 'about this shit')
  mnuexit = menufile.Append(wx.ID_EXIT, 'E&xit', 'end program')

  menubar.Append(menufile, '&File')

  #事件绑定
  self.Bind(wx.EVT_MENU, self.onAbout, mnuabout)
  self.Bind(wx.EVT_MENU, self.onExit, mnuexit)

  self.SetMenuBar(menubar)

 def onAbout(self, evt):
   '''点击about的事件响应'''
   dlg = wx.MessageDialog(self, 'This app is a simple text editor', 'About my app', wx.OK)
   dlg.ShowModal()
   dlg.Destroy()

 def onExit(self, evt):
   '''点击退出'''
   self.Close(True)
app = wx.App(False)
frame = MainWindow(None, 'Small Editor')
app.MainLoop() #循环监听事件
After editing the modified file, use py2exe to compile the Python script into a Windows executable file, so that a Python interpreter is not needed. To use py2exe, you must first write a compilation script, and then run the compilation script through Python to compile other scripts into executable files. The following example is a script that will be compiled into an executable file. File name: setup.py
import distutils
import py2exe
distutils.core.setup(windows=['wxTest.py'])
In addition to importing the necessary modules, there is only one statement in setup.py:
distutils.core.setup(windows=['wxTest.py'])
The square brackets are the name of the script to be compiled, and the "windows" in front means that it will be compiled into a GUI program. If you want to compile an executable file for the command line interface, just change windows to console. If you need to compile the script into a Windows service, you can use the service option.
After editing everything, put wxTest.py and setup.py in the same path, enter the path with cmd, enter:
setup.py py2exe
error: MSVCP90.dll: No such file or directory
When packaging a PyQt project, the following error may be reported
ImportError: No module named sip
setup.py py2exe --includes sip
After running, two directories, dist and build, will be generated in the path. The dist directory contains the files generated by compilation. If you want to run the compiled program on other machines where Python is not installed, just copy the dist directory to other machines. Double-click to run wxTest.exe, as shown in the figure:
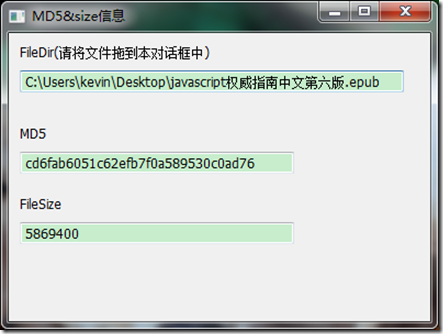
Use wxPython to build a GUI tool for calculating file md5
The gadget will finally look like this. Drag the file onto it and its md5 and size will be automatically calculated
The following is all the code
#coding:gbk
import wx
import optparse
import time,hashlib
import threading
import os

def checkMD5(pefile):
  try:
    f = open(pefile,'rb')
    data = f.read()
    m = hashlib.md5()
    m.update(data)
    f.close()
    return m.hexdigest()
  except:
    return 'error'

def getFileSize(filename):
  try:
    size = int(os.path.getsize(filename))
    return size
  except:
    return 'error'

#线程函数
class FuncThread(threading.Thread):
  def __init__(self, func, *params, **paramMap):
    threading.Thread.__init__(self)
    self.func = func
    self.params = params
    self.paramMap = paramMap
    self.rst = None
    self.finished = False

  def run(self):
    self.rst = self.func(*self.params, **self.paramMap)
    self.finished = True

  def getResult(self):
    return self.rst

  def isFinished(self):
    return self.finished

def doInThread(func, *params, **paramMap):
  t_setDaemon = None
  if 't_setDaemon' in paramMap:
    t_setDaemon = paramMap['t_setDaemon']
    del paramMap['t_setDaemon']
  ft = FuncThread(func, *params, **paramMap)
  if t_setDaemon != None:
    ft.setDaemon(t_setDaemon)
  ft.start()
  return ft

class FileDropTarget(wx.FileDropTarget):
  def __init__(self, filetext,md5tx,filesizetx):
    wx.FileDropTarget.__init__(self)
    self.filepath = filetext
    self.md5tx = md5tx
    self.filesizetx = filesizetx

  def OnDropFiles(self, x, y, fileNames):
    filename = fileNames[0].encode('gbk')
    print filename
    print type(filename)
    self.filepath.SetValue(filename)
    md5 = doInThread(checkMD5,filename)
    filesize = doInThread(getFileSize,filename)
    while True:
      if not md5.isFinished():
        time.sleep(0.5)
      else:
        self.md5tx.SetValue(md5.getResult())
        break

    while True:
      if not filesize.isFinished():
        time.sleep(0.5)
      else:
        self.filesizetx.SetValue(str(filesize.getResult()))
        break

class Frame(wx.Frame): #Frame 进行初始化
  def __init__(self,title):
    wx.Frame.__init__(self,None,title=title,size = (400,300))
    boxSizer = wx.BoxSizer(wx.VERTICAL)

    self.panel = wx.Panel(self)

    # boxSizer.Add(self.panel,1,wx.EXPAND|wx.ALL) #wx.ALL 周围的距离,EXPAND扩充到全部

    filepath = wx.StaticText(self.panel,-1,"FileDir(请将文件拖到本对话框中)")
    filetext = wx.TextCtrl(self.panel,-1,"",size=(350,20))

    md5st = wx.StaticText(self.panel,-1,"MD5")
    md5tx = wx.TextCtrl(self.panel,-1,size=(250,20))

    filesizest = wx.StaticText(self.panel,-1,'FileSize')
    filesizetx = wx.TextCtrl(self.panel,-1,size=(250,20))

    # hashst = wx.StaticText(self.panel,-1,'Hash')
    # hashtx = wx.TextCtrl(self.panel,-1,size=(250,20))

    boxSizer.Add(filepath,0,wx.EXPAND|wx.LEFT|wx.TOP,border=10)
    boxSizer.Add(filetext,0,wx.LEFT|wx.TOP,border=10)
    boxSizer.Add((-1,20))
    boxSizer.Add(md5st,0,wx.LEFT|wx.TOP,border=10)
    boxSizer.Add(md5tx,0,wx.LEFT|wx.TOP,border=10)
    boxSizer.Add((-1,10))
    boxSizer.Add(filesizest,0,wx.LEFT|wx.TOP,border=10)
    boxSizer.Add(filesizetx,0,wx.LEFT|wx.TOP,border=10)
    # boxSizer.Add((-1,10))
    # boxSizer.Add(hashst,0,wx.LEFT|wx.TOP,border=10)
    # boxSizer.Add(hashtx,0,wx.LEFT|wx.TOP,border=10)

    dropTarget = FileDropTarget(filetext,md5tx,filesizetx)
    self.panel.SetDropTarget( dropTarget )

    self.panel.SetSizer(boxSizer)

class App(wx.App): ##继承wx.App
  def OnInit(self): ##还没有调起来的时候读取初始化
    self.frame = Frame('MD5&size信息')
    self.frame.Centre()
    self.frame.Show(True)
    return True

def killSelf(evt = None):
  os.system('taskkill /F /T /PID %d >NUL 2>NUL' % win32process.GetCurrentProcessId())

if __name__ == '__main__':
  parser = optparse.OptionParser()
  parser.add_option('-x', '--no-update', dest = 'test', action = 'store_true', help = 'start without update')
  parser.add_option('-t', '--no-update-test', dest = 'test2', action = 'store_true', help = 'start without update debug')
  options, args = parser.parse_args()
  if options.test:
    print("-x param")
  if options.test2:
    print("-t param")
  App(redirect = False).MainLoop()
A little explanation:
Class App and App().MainLoop() are fixed writing methods. There is a def OnInit method under class App to initialize the main Frame, center it and Show() it. There is nothing to say. Let’s mainly look at the definition of Frame
This gadget uses boxSizer for layout. For simplicity, I only use one boxSizer and layout all controls inside in a VERTICAL (vertical) manner. If you want to put MD5 and the following text box on the same line, Then you need to add a horizontal boxSizer, and then put this horizontal boxSizer into the main boxSizer
boxSizer = wx.BoxSizer(wx.VERTICAL) #初始化一个垂直的boxSizer,也是整个框架的主Sizer

self.panel = wx.Panel(self) #初始化一个panel,这个panel是放了放之后的控件的

filepath = wx.StaticText(self.panel,-1,"FileDir(请将文件拖到本对话框中)")
filetext = wx.TextCtrl(self.panel,-1,"",size=(350,20))
md5st = wx.StaticText(self.panel,-1,"MD5")
md5tx = wx.TextCtrl(self.panel,-1,size=(250,20))
filesizest = wx.StaticText(self.panel,-1,'FileSize')
filesizetx = wx.TextCtrl(self.panel,-1,size=(250,20))
The above is to initialize the corresponding static text and text box. The first parameter in the method is the parent class window where it is located, which is self.panel. In fact, you can also not use the panel, but put it directly into the boxSizer
boxSizer.Add(filepath,0,wx.EXPAND|wx.LEFT|wx.TOP,border=10)
Add the filepath to the main boxSizer. I was a little confused at first. At first, I always thought that I would put all the controls into the panel first, and then put the panel into the boxSizer, but this is wrong. Instead, you should directly enter the boxSizer, set the parent class of the control to panel, and then there is no need to put the panel into the boxSizer. The parameter wx.LEFT|wx.TOP, border=10 represents the control. There is a distance of 10 pixels from the top and left, and then use wx.EXPAND to fully fill the area where it is located. I once thought about whether it could be set to 10px from the top and 20px from the left, but it seems that it cannot be set like this. In the Add function There can only be one border parameter. In other words, the same value can only be set. I will see if it can be implemented later.
boxSizer.Add((-1,20)) #这个是添加一个空距离,距离上20px

dropTarget = FileDropTarget(filetext,md5tx,filesizetx)
self.panel.SetDropTarget( dropTarget )
This is to add a drag and drop method to the window class, which is also a relatively fixed way of writing
The __init__ and OnDropFiles methods in class FileDropTarget above are also fixed methods, but the processing functions inside are different.
Some style and flag parameters in wxPython require some experience to be used in layout, as well as many of its controls and methods of binding them. It takes some effort to master them proficiently. The following two websites provide a more detailed introduction. , please read more

Hot AI Tools

Undresser.AI Undress
AI-powered app for creating realistic nude photos

AI Clothes Remover
Online AI tool for removing clothes from photos.

Undress AI Tool
Undress images for free

Clothoff.io
AI clothes remover

Video Face Swap
Swap faces in any video effortlessly with our completely free AI face swap tool!

Hot Article
Hot Tools

Notepad++7.3.1
Easy-to-use and free code editor

SublimeText3 Chinese version
Chinese version, very easy to use

Zend Studio 13.0.1
Powerful PHP integrated development environment

Dreamweaver CS6
Visual web development tools

SublimeText3 Mac version
God-level code editing software (SublimeText3)
Hot Topics
 1670
1670
 14
1428
52
1329
25
1274
29
1256
24
14
1428
52
1329
25
1274
29
1256
24

 PHP and Python: Different Paradigms Explained
Apr 18, 2025 am 12:26 AM
PHP and Python: Different Paradigms Explained
Apr 18, 2025 am 12:26 AM
PHP is mainly procedural programming, but also supports object-oriented programming (OOP); Python supports a variety of paradigms, including OOP, functional and procedural programming. PHP is suitable for web development, and Python is suitable for a variety of applications such as data analysis and machine learning.
 Choosing Between PHP and Python: A Guide
Apr 18, 2025 am 12:24 AM
Choosing Between PHP and Python: A Guide
Apr 18, 2025 am 12:24 AM
PHP is suitable for web development and rapid prototyping, and Python is suitable for data science and machine learning. 1.PHP is used for dynamic web development, with simple syntax and suitable for rapid development. 2. Python has concise syntax, is suitable for multiple fields, and has a strong library ecosystem.
 PHP and Python: A Deep Dive into Their History
Apr 18, 2025 am 12:25 AM
PHP and Python: A Deep Dive into Their History
Apr 18, 2025 am 12:25 AM
PHP originated in 1994 and was developed by RasmusLerdorf. It was originally used to track website visitors and gradually evolved into a server-side scripting language and was widely used in web development. Python was developed by Guidovan Rossum in the late 1980s and was first released in 1991. It emphasizes code readability and simplicity, and is suitable for scientific computing, data analysis and other fields.
 Golang vs. Python: Performance and Scalability
Apr 19, 2025 am 12:18 AM
Golang vs. Python: Performance and Scalability
Apr 19, 2025 am 12:18 AM
Golang is better than Python in terms of performance and scalability. 1) Golang's compilation-type characteristics and efficient concurrency model make it perform well in high concurrency scenarios. 2) Python, as an interpreted language, executes slowly, but can optimize performance through tools such as Cython.
 Python vs. C : Learning Curves and Ease of Use
Apr 19, 2025 am 12:20 AM
Python vs. C : Learning Curves and Ease of Use
Apr 19, 2025 am 12:20 AM
Python is easier to learn and use, while C is more powerful but complex. 1. Python syntax is concise and suitable for beginners. Dynamic typing and automatic memory management make it easy to use, but may cause runtime errors. 2.C provides low-level control and advanced features, suitable for high-performance applications, but has a high learning threshold and requires manual memory and type safety management.
 How to solve complex BelongsToThrough relationship problem in Laravel? Use Composer!
Apr 17, 2025 pm 09:54 PM
How to solve complex BelongsToThrough relationship problem in Laravel? Use Composer!
Apr 17, 2025 pm 09:54 PM
In Laravel development, dealing with complex model relationships has always been a challenge, especially when it comes to multi-level BelongsToThrough relationships. Recently, I encountered this problem in a project dealing with a multi-level model relationship, where traditional HasManyThrough relationships fail to meet the needs, resulting in data queries becoming complex and inefficient. After some exploration, I found the library staudenmeir/belongs-to-through, which easily installed and solved my troubles through Composer.
 Python vs. C : Exploring Performance and Efficiency
Apr 18, 2025 am 12:20 AM
Python vs. C : Exploring Performance and Efficiency
Apr 18, 2025 am 12:20 AM
Python is better than C in development efficiency, but C is higher in execution performance. 1. Python's concise syntax and rich libraries improve development efficiency. 2.C's compilation-type characteristics and hardware control improve execution performance. When making a choice, you need to weigh the development speed and execution efficiency based on project needs.
 laravel installation code
Apr 18, 2025 pm 12:30 PM
laravel installation code
Apr 18, 2025 pm 12:30 PM
To install Laravel, follow these steps in sequence: Install Composer (for macOS/Linux and Windows) Install Laravel Installer Create a new project Start Service Access Application (URL: http://127.0.0.1:8000) Set up the database connection (if required)
