

Outlook categories: how to add, use, change and search

This article explores Outlook's color categories, demonstrating how to create, modify, utilize, and remove them. Many users underutilize this powerful organizational tool. Let's delve into adding, customizing, and leveraging color-coded categories for efficient email, task, and calendar management.
- What are Outlook Categories?
- Viewing Categories
- Adding Categories
- Applying Categories to Emails, Tasks, and Calendar Events
- Setting a Default Category
- Renaming a Category
- Creating Category Shortcuts
- Editing Categories
- Searching by Category
- Sorting by Category
- Filtering by Category
- Clearing Categories
- Deleting Categories
- Troubleshooting: Categories Not Showing
- Troubleshooting: Categories Not Working with IMAP Accounts
Note: This guide focuses on classic Outlook. For the new app or Outlook online, consult the separate tutorial on color categories in the new Outlook and web versions.
What are Outlook Categories?
Outlook categories visually organize items (emails, contacts, appointments, tasks) using color codes. This enhances overview and information retrieval. While six default categories exist, you can create custom categories with unique names and colors. Multiple categories can be assigned to a single item. Category colors appear in item lists and within each item for quick identification. Searching and filtering by category is also supported.

Categories are account-specific; settings for one account don't affect others.
Viewing Categories
- In classic Outlook, open any folder with items.
- On the Home tab, in the Tags group, click Categorize (four colored squares icon).
- A dropdown shows recently used categories.
- Select All Categories for a complete list.

An inactive Categories button usually indicates an empty folder or insufficient permissions (shared mailbox).
Creating Custom Categories
- In any message folder, go to Home > Tags > Categorize > All Categories.
- Click New….
- Name the category, choose a color, and optionally assign a shortcut key.
- Click OK.


Using Categories
Categories are applied via context menu (right-click > Categorize) or the ribbon (Message tab > Tags > Categorize). Category shortcuts enable rapid application to multiple items.
Assigning a Category from the Message List
- Right-click an email (or multiple emails).
- Hover over Categorize and select a category.

Adding a Category to an Open Message
- In the open email, go to the Message tab.
- Click Categorize and choose a category (or All Categories…).

Multiple categories can be assigned to a single item. First-time category use prompts for renaming.

Categorizing Tasks, Calendar Events, and Contacts
The process is similar to categorizing emails; use the Categorize button on the relevant tab (Appointment, Meeting, Home, Contact, or Task).

Applying the Default Category with a Click
The Set Quick Click feature allows quick category application.
- Tags > Categorize > Set Quick Click.
- Choose a default category.
- Click OK.


Clicking the Categories column applies/removes the default category. Ctrl Z undoes accidental categorizations.

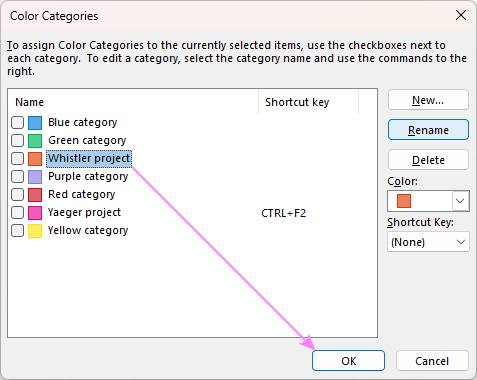
Renaming a Category
- Tags > Categorize > All Categories.
- Select the category and click Rename.
- Enter the new name.
- Click OK.

Renaming updates all assigned items. Check the box to automatically apply the new name to selected items.
Creating Category Shortcuts
- Tags > Categorize > All Categories.
- Select a category and choose a shortcut key.
- Click OK.

Editing Categories
- Open the Color Categories dialog box.
- Select a category and rename, change color, or modify shortcut keys.
- Click OK.

Searching by Category
Create a Search Folder: Folder tab > New Search Folder > Categorized Mail. Choose the category (or all categories).


Sorting by Category
Click the Categories column header in table view. The first click sorts alphabetically; the second reverses the order. Items with multiple categories appear multiple times.


Filtering by Category
- Select the folder.
- View > View Settings.
- Advanced View Settings > Filter….
- More Choices > Categories….
- Select the category.
- Click OK three times.

Clearing Categories
Clear all categories from selected items: right-click > Clear all categories. Clear a specific category from an open item: right-click the category > Clear.


Deleting Categories
- Open the Color Categories dialog box.
- Select the category and click Delete.
- Confirm deletion.
- Click OK.


Deleting a category doesn't remove it from items; only the color indicator disappears.
Troubleshooting: Categories Not Showing
If the Categorize button is missing, customize the ribbon (Customize the Ribbon…) and add it. Update Outlook, repair the installation, or create a new Outlook profile if necessary.


Troubleshooting: Categories Not Working with IMAP Accounts
Categories aren't directly supported for IMAP accounts. A workaround is to create category shortcuts in a supported account and use those shortcuts in the IMAP account.
In summary, Outlook categories significantly improve organization. Mastering these features enhances productivity for both personal and professional email management.
The above is the detailed content of Outlook categories: how to add, use, change and search. For more information, please follow other related articles on the PHP Chinese website!

Hot AI Tools

Undresser.AI Undress
AI-powered app for creating realistic nude photos

AI Clothes Remover
Online AI tool for removing clothes from photos.

Undress AI Tool
Undress images for free

Clothoff.io
AI clothes remover

Video Face Swap
Swap faces in any video effortlessly with our completely free AI face swap tool!

Hot Article
Hot Tools

Notepad++7.3.1
Easy-to-use and free code editor

SublimeText3 Chinese version
Chinese version, very easy to use

Zend Studio 13.0.1
Powerful PHP integrated development environment

Dreamweaver CS6
Visual web development tools

SublimeText3 Mac version
God-level code editing software (SublimeText3)
Hot Topics
 1670
1670
 14
1428
52
1329
25
1274
29
1256
24
14
1428
52
1329
25
1274
29
1256
24