

Fixed: Windows 10 User Account Not Appearing on Login Screen

''Over the past few weeks, my Windows 10 computer has had problems. Each time Windows 10 starts, the user account does not appear on the Windows 10 login screen, and only three buttons ( Internet, Ease of access and Power ) display in the lower right corner. Even though many different user accounts have been set up before, these user accounts are not listed on the login screen, resulting in no access to the desktop. I tried the Ctrl+Alt+Delete method and restarted the computer several times, but the same problem still occurred. In my case, this is an awfully annoying problem. Can someone help me?''

Recently, someone reported that Windows 10 login screen doesn't show user account when they start the Windows 10 system, and therefore there is no way to access the desktop. It is a pity that the root of the problem is not yet clear, and it is one of the worst things people have ever seen. If you're also a victim of this problem and you don't want to reinstall Windows 10 system or factory reset your computer on Windows 10, this article might help you.
So in this article, we've detailed all the ways so that you can easily fix the problem Windows 10 user account not appearing on the login screen. Let's get started now.
- Fixed 1: Execute command prompt line
- Fixed 2: Using Registry Editor
- Fixed 3: Set automatic login using netplwiz
- Fixed 4: by removing Windows 10 password
Behoben 1: Eingabeaufforderungszeile ausführen
Wenn Sie sich nicht bei Windows 10 anmelden können, weil kein Benutzerkonto angezeigt wird und das Kennwortfeld auch nicht auf dem Anmeldebildschirm angezeigt wird, sollten Sie eine Eingabeaufforderungszeile ausführen, um das Problem zu beheben.
Schritt 1: Klicken Sie auf die Schaltfläche Power in der unteren rechten Ecke des Anmeldebildschirms und wählen Sie Neustart, während Sie die Shift-Taste gedrückt halten.

Schritt 2: Nachdem Sie den Bildschirm „Option auswählen“ gestartet haben, klicken Sie auf „Fehlerbehebung“ > „Erweiterte Optionen“ > „Eingabeaufforderung“. Schritt 3: Geben Sie im Eingabeaufforderungsfenster den Befehl net useradministrator /active:yes ein und drücken Sie die
Eingabetaste.
Schritt 4: Verlassen Sie das Eingabeaufforderungsfenster und klicken Sie auf Weiter unter Wählen Sie eine Option, um Ihren Computer am Ende neu zu starten.

Schritt 5: Nach dem Neustart wird Ihr Benutzerkonto angezeigt und Windows 10 meldet sich automatisch beim integrierten Administratorkonto an.
Behoben 2: Verwendung des Registrierungseditors
 Wenn auf dem Begrüßungsbildschirm eine Eingabeaufforderung für ein fehlendes Benutzerkonto und Passwort angezeigt wird, sollten Sie dies mithilfe des Registrierungseditors beheben.
Schritt 1: Befolgen Sie die obigen Schritte
Schritt 1 und  Schritt 2
Schritt 2: Wenn die Eingabeaufforderung geöffnet wird, geben Sie „regedit“ ein und drücken Sie die Eingabetaste, um den Registrierungseditor zu starten.
Schritt 5: Stellen Sie im DWORD-Fenster die Wertdaten von 0 auf 1 ein. Klicken Sie auf
OK, um die Änderungen zu speichern.
 Schritt 6: Schließen Sie das Fenster „Eingabeaufforderung und Registrierungseditor“. Klicken Sie auf
, um Ihren Computer neu zu starten. Nach dem Neustart erscheint das Benutzerkonto auf dem Anmeldebildschirm und die Anmeldung erfolgt automatisch. Behoben 3: Automatische Anmeldung mit netplwiz festlegen Sie können dieses Problem auch vorübergehend beheben, indem Sie mit netplwiz die automatische Anmeldung festlegen. Nachdem Sie die automatische Anmeldung aktiviert haben, wird Ihr Benutzerkonto auf dem Anmeldebildschirm angezeigt. Da es sich jedoch nicht um eine dauerhafte Lösung handelt, müssen Sie eine der folgenden Lösungen durchführen: Schritt 1: Klicken Sie auf das
Power-Symbol und wählen Sie die Option  Neustart
Umschalttaste gedrückt halten. In diesem Moment wird der Bildschirm „Option auswählen“ angezeigt Schritt 2: Klicken Sie im Bildschirm „Option auswählen“ auf
Fehlerbehebung>
Erweiterte Optionen>
Starteinstellungen. Schritt 3: Klicken Sie im Bildschirm „Starteinstellungen“ auf die Schaltfläche „Neustart“ Schritt 4: Drücken Sie nach dem Neustart die Taste F4
oder4, um in den abgesicherten Modus zu starten. Schritt 5: Bevor Sie in den abgesicherten Modus wechseln, werden Sie zur Eingabe eines Passworts aufgefordert. Geben Sie einfach Ihr korrektes Passwort ein.
Schritt 6: Öffnen Sie im abgesicherten Modus das Dialogfeld „Ausführen“, geben Sie „netplwiz“ ein und drücken Sie die Eingabetaste

Step 7: The User Accounts dialog box will be displayed, uncheck ''Users must enter a username and password to use this computer'' option. Click the Apply button.

Step 8: When the Automatically sign in window shows up, type and confirm the password in the password input box, click OK to save the changes.

Step 9: Click the Start button on the lower-left of the taskbar and choose the Restart option to reboot the Windows 10.

Notice: If you shut down the computer and then turn it on, the user account still doesn't appear on the login screen.
Step 10: After Windows 10 restarts, your user account appears on the login screen and automatically log on.
Fixed 4: by removing Windows 10 password
After performing the above three methods, if you find that the user account still does not appear on Windows 10 login screen, don't worry, there is an advanced utility that can help you log in to Windows 10 system - iSumsoft Windows Password Refixer software, which is highly recommended by thousands of users. With this software, what you need to do is create a Windows password reset disk on any accessible computer, and boot your computer from the disk to remove Windows 10 password. Now, we will illustrate the specific steps below.
Special instructions: iSumsoft Windows Password Refixer software has three versions, including for Windows, for Mac, and for Android. It is worth mentioning that the user can install the software on a Windows computer, on a Mac, or on an Android phone to create a password reset disk for any Windows computer that does not show user account.
Step 1: Create a Windows password reset disk
1. Install and launch iSumsoft Windows Password Refixer on an accessible computer.
2. Get a writable USB flash drive and insert it into the available computer.
3. Choose the USB device, note your USB drive name, and click Begin burning button. At this point, you will be asked whether you want to format the USB drive or not. Just click Yes button to burn this iSumsoft Windows Password Refixer tool into your USB flash drive.

4. In a few seconds, you will receive a ''Burning Successfully'' notification, which proves that you have successfully created a Windows password reset disk.

Step 2: Boot the computer from the USB reset disk
Plug the Windows password reset disk to the computer that doesn't appear the user account, and boot your the computer from the USB reset disk you have created.
Step 3: Remove Windows 10 password by setting its password to blank
After your computer successfully booting from the USB reset disk, select your user account (local or Microsoft account). Next, tap on Reset Password, and click Yes button to set its password to blank. The Windows 10 user password will be removed ultimately as per your expectation.

Step 4: Restart Windows 10 system
Lastly, tap on Reboot button and exit USB reset disk drive so that your Windows 10 system restarts. After Windows 10 restarts, your user account will appear and automatically sign in.

The above is the detailed content of Fixed: Windows 10 User Account Not Appearing on Login Screen. For more information, please follow other related articles on the PHP Chinese website!

Hot AI Tools

Undresser.AI Undress
AI-powered app for creating realistic nude photos

AI Clothes Remover
Online AI tool for removing clothes from photos.

Undress AI Tool
Undress images for free

Clothoff.io
AI clothes remover

Video Face Swap
Swap faces in any video effortlessly with our completely free AI face swap tool!

Hot Article
Hot Tools

Notepad++7.3.1
Easy-to-use and free code editor

SublimeText3 Chinese version
Chinese version, very easy to use

Zend Studio 13.0.1
Powerful PHP integrated development environment

Dreamweaver CS6
Visual web development tools

SublimeText3 Mac version
God-level code editing software (SublimeText3)
Hot Topics
 1670
1670
 14
1428
52
1329
25
1274
29
1256
24
14
1428
52
1329
25
1274
29
1256
24

 Windows kb5054979 update information Update content list
Apr 15, 2025 pm 05:36 PM
Windows kb5054979 update information Update content list
Apr 15, 2025 pm 05:36 PM
KB5054979 is a cumulative security update released on March 27, 2025, for Windows 11 version 24H2. It targets .NET Framework versions 3.5 and 4.8.1, enhancing security and overall stability. Notably, the update addresses an issue with file and directory operations on UNC shares using System.IO APIs. Two installation methods are provided: one through Windows Settings by checking for updates under Windows Update, and the other via a manual download from the Microsoft Update Catalog.
 Nanoleaf Wants to Change How You Charge Your Tech
Apr 17, 2025 am 01:03 AM
Nanoleaf Wants to Change How You Charge Your Tech
Apr 17, 2025 am 01:03 AM
Nanoleaf's Pegboard Desk Dock: A Stylish and Functional Desk Organizer Tired of the same old charging setup? Nanoleaf's new Pegboard Desk Dock offers a stylish and functional alternative. This multifunctional desk accessory boasts 32 full-color RGB
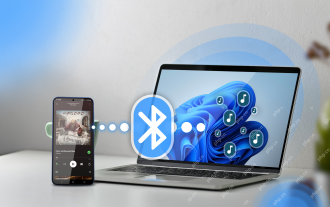 How to Use Windows 11 as a Bluetooth Audio Receiver
Apr 15, 2025 am 03:01 AM
How to Use Windows 11 as a Bluetooth Audio Receiver
Apr 15, 2025 am 03:01 AM
Turn your Windows 11 PC into a Bluetooth speaker and enjoy your favorite music from your phone! This guide shows you how to easily connect your iPhone or Android device to your computer for audio playback. Step 1: Pair Your Bluetooth Device First, pa
 ASUS' ROG Zephyrus G14 OLED Gaming Laptop Is $300 Off
Apr 16, 2025 am 03:01 AM
ASUS' ROG Zephyrus G14 OLED Gaming Laptop Is $300 Off
Apr 16, 2025 am 03:01 AM
ASUS ROG Zephyrus G14 Esports Laptop Special Offer! Buy ASUS ROG Zephyrus G14 Esports Laptop now and enjoy a $300 offer! Original price is $1999, current price is only $1699! Enjoy immersive gaming experience anytime, anywhere, or use it as a reliable portable workstation. Best Buy currently offers offers on this 2024 14-inch ASUS ROG Zephyrus G14 e-sports laptop. Its powerful configuration and performance are impressive. This ASUS ROG Zephyrus G14 e-sports laptop costs 16 on Best Buy
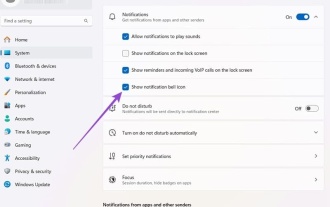 How to Customize Your Windows 11 Notifications
Apr 14, 2025 am 04:05 AM
How to Customize Your Windows 11 Notifications
Apr 14, 2025 am 04:05 AM
Detailed explanation of Windows 11 notification settings: Create a personalized notification experience Windows 11 integrates the Notification Center into the calendar, and although it takes some time to adapt, the frequency of notifications has not changed. If you are tired of the constantly popping up system updates and useless application notifications, this article will guide you to customize Windows 11 notifications and optimize your workflow. Global notification settings Almost all notification-related options are located in Settings in Windows 11. Step 1: Click the "Start" menu and select "Settings" (or press "Windows I"). Step 2: Select System in the left sidebar. Step 3: Click "Notification" to access all notification options.
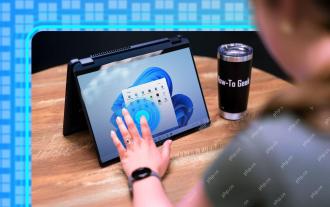 5 Hidden Windows Features You Should Be Using
Apr 16, 2025 am 12:57 AM
5 Hidden Windows Features You Should Be Using
Apr 16, 2025 am 12:57 AM
Unlock Hidden Windows Features for a Smoother Experience! Discover surprisingly useful Windows functionalities that can significantly enhance your computing experience. Even seasoned Windows users might find some new tricks here. Dynamic Lock: Auto
 How (and Why) to Turn Off Mouse Acceleration on Windows 11
Apr 15, 2025 am 06:06 AM
How (and Why) to Turn Off Mouse Acceleration on Windows 11
Apr 15, 2025 am 06:06 AM
Improve mouse accuracy: Disable Windows 11 mouse acceleration function The mouse cursor moves too fast on the screen, even if you only move the mouse a few centimeters? This is what the mouse acceleration function is. This article will guide you on how to disable this feature to better control mouse movement. Is it wise to disable mouse acceleration? There is no direct "Mouse Acceleration" option in Windows systems. Instead, it is the "Enhanced Pointer Precision" setting, which Microsoft sees as a mouse acceleration feature. When this feature is enabled, the mouse's DPI (dots per inch) setting takes effect. It controls the relationship between the physical movement speed of the mouse and the distance the cursor moves on the screen. Move the mouse slowly, Windows will reduce the effective DPI and the cursor moves shorter
 Your Keyboard Needs a Big Ol' Volume Knob
Apr 18, 2025 am 03:04 AM
Your Keyboard Needs a Big Ol' Volume Knob
Apr 18, 2025 am 03:04 AM
In today's touchscreen world, the satisfying tactile feedback of physical controls is a welcome change. That's why a keyboard with a large volume knob is surprisingly appealing. I recently experienced this firsthand, and it's been a revelation. For
