

Bedingte Formatierung in neuen Outlook und Web, um E -Mails hervorzuheben

Master the art of email organization with Outlook's conditional formatting! This guide shows you how to color-code your emails in the new Outlook app and Outlook on the web, ensuring important messages stand out.
Classic Outlook users have long enjoyed conditional formatting; now, this powerful feature is available in the new Outlook and web versions, bringing enhanced organization and personalization.
Key Features Covered:
- Conditional formatting in new Outlook and web
- Highlighting emails using conditional formats
- Editing conditional formatting rules
- Deleting conditional formatting rules
- Enabling/disabling conditional formatting rules
- Reordering rules for priority control
- Practical conditional formatting examples
- Understanding limitations and differences
(Note: This tutorial focuses on the new Outlook app and web version. For classic Outlook, please refer to [link to classic Outlook guide]. )
Conditional Formatting: Highlighting What Matters
Conditional formatting helps you prioritize emails based on user-defined criteria (sender, subject, presence of your name, etc.). Different colors instantly flag important messages, reducing time spent sifting through less urgent emails.

Setting Up Conditional Formatting Rules
The process is similar for both the new Outlook app and the web version. Minor interface differences may exist, but the core steps remain consistent:
- Access Settings: Click the settings gear icon (top-right), then navigate to Mail > Conditional Formatting.
- Select Account (if necessary): If you have multiple accounts, choose the correct one. Single-account users or web users can skip this step.
- Add a New Rule: Click "+ Create new conditional formatting rule".
- Name Your Rule: Give your rule a descriptive name.
- Define Conditions: Use the Condition dropdown to select criteria (e.g., "From specific people," "Your name is on the To or Cc line," "Subject includes certain text"). Add multiple conditions using "+ Add another condition".

- Choose Formatting: Select a font color using the Choose Color button. The Preview section shows the effect.
- Save the Rule: Click Save to apply and save your new rule.

Editing, Deleting, and Toggling Rules
Modifying or removing rules is simple:
- Editing: Access settings, select the rule, make changes (name, conditions, formatting), and save. Discard changes to cancel.

- Deleting: Access settings, locate the rule, and click "Delete rule," confirming the deletion.

- Enabling/Disabling: Use the toggle switch in the settings to quickly turn rules on or off without deleting them.

Rule Order and Priority
Rules are applied sequentially; higher rules override lower ones. Use the "Move Up" and "Move Down" buttons to adjust the order and control priority.

Conditional Formatting Examples
- Highlight VIP client emails in red.
- Highlight emails with specific keywords (e.g., project names) in the subject.
- Color-code emails from your manager or team members.
- Mark emails with deadlines or events.

Limitations
- Available only for Microsoft 365 work/school accounts in the new Outlook and web versions.
- Applies to read and unread emails in all folders (except Drafts).
- Fewer conditions than classic Outlook.
- Currently only for emails (not calendar or tasks).
- Only font color formatting is supported.
This guide empowers you to effectively manage your inbox, ensuring important emails never get overlooked.
Das obige ist der detaillierte Inhalt vonBedingte Formatierung in neuen Outlook und Web, um E -Mails hervorzuheben. Für weitere Informationen folgen Sie bitte anderen verwandten Artikeln auf der PHP chinesischen Website!

Heiße KI -Werkzeuge

Undresser.AI Undress
KI-gestützte App zum Erstellen realistischer Aktfotos

AI Clothes Remover
Online-KI-Tool zum Entfernen von Kleidung aus Fotos.

Undress AI Tool
Ausziehbilder kostenlos

Clothoff.io
KI-Kleiderentferner

Video Face Swap
Tauschen Sie Gesichter in jedem Video mühelos mit unserem völlig kostenlosen KI-Gesichtstausch-Tool aus!

Heißer Artikel
Heiße Werkzeuge

Notepad++7.3.1
Einfach zu bedienender und kostenloser Code-Editor

SublimeText3 chinesische Version
Chinesische Version, sehr einfach zu bedienen

Senden Sie Studio 13.0.1
Leistungsstarke integrierte PHP-Entwicklungsumgebung

Dreamweaver CS6
Visuelle Webentwicklungstools

SublimeText3 Mac-Version
Codebearbeitungssoftware auf Gottesniveau (SublimeText3)
Heiße Themen
 1664
1664
 14
1421
52
1315
25
1266
29
1239
24
14
1421
52
1315
25
1266
29
1239
24

 Medianformel in Excel - Praktische Beispiele
Apr 11, 2025 pm 12:08 PM
Medianformel in Excel - Praktische Beispiele
Apr 11, 2025 pm 12:08 PM
In diesem Tutorial wird erläutert, wie der Median der numerischen Daten in Excel mithilfe der Medianfunktion berechnet wird. Der Median, ein wesentliches Maß für die zentrale Tendenz, identifiziert den mittleren Wert in einem Datensatz und bietet eine robustere Darstellung der zentralen Tendene
 Excel Shared Workbook: So teilen Sie die Excel -Datei für mehrere Benutzer
Apr 11, 2025 am 11:58 AM
Excel Shared Workbook: So teilen Sie die Excel -Datei für mehrere Benutzer
Apr 11, 2025 am 11:58 AM
Dieses Tutorial bietet einen umfassenden Leitfaden zum Austausch von Excel -Arbeitsbüchern, der Abdeckung verschiedener Methoden, der Zugangskontrolle und der Konfliktlösung. Moderne Excel -Versionen (2010, 2013, 2016 und später) vereinfachen die kollaborative Bearbeitung und beseitigen die Notwendigkeit von m
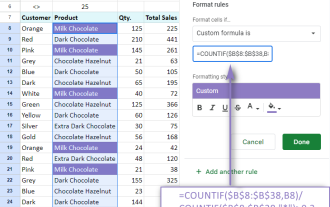 Google -Tabelle Countif -Funktion mit Formel Beispielen
Apr 11, 2025 pm 12:03 PM
Google -Tabelle Countif -Funktion mit Formel Beispielen
Apr 11, 2025 pm 12:03 PM
Master Google Sheets Countif: Ein umfassender Leitfaden In diesem Handbuch wird die vielseitige Countif -Funktion in Google -Blättern untersucht und seine Anwendungen über die einfache Zellzählung hinaus demonstriert. Wir werden verschiedene Szenarien abdecken, von genauen und teilweisen Übereinstimmungen bis Han
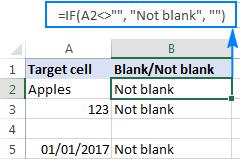 Excel: Wenn die Zelle Formel Beispiele enthält
Apr 09, 2025 am 09:04 AM
Excel: Wenn die Zelle Formel Beispiele enthält
Apr 09, 2025 am 09:04 AM
Dieses Tutorial zeigt verschiedene Excel -Formeln, um zu überprüfen, ob eine Zelle spezifische Werte enthält, einschließlich Text, Zahlen oder Teilen von Zeichenfolgen. Es deckt Szenarien mit der Verwendung von ISText, IsNumber, Such, Find, Countif, Exact, Sumproduct, Vlookup und Neste ab
 So konvertieren Sie Excel in JPG - Speichern Sie .xls oder .xlsx als Bilddatei
Apr 11, 2025 am 11:31 AM
So konvertieren Sie Excel in JPG - Speichern Sie .xls oder .xlsx als Bilddatei
Apr 11, 2025 am 11:31 AM
In diesem Tutorial werden verschiedene Methoden zum Konvertieren von .xls-Dateien in .JPG-Bilder untersucht, wobei sowohl integrierte Windows-Tools als auch kostenlose Online-Konverter umfasst. Müssen Sie eine Präsentation erstellen, Tabellenkalkulationsdaten sicher teilen oder ein Dokument entwerfen? Yo konvertieren
 Google Sheets -Diagramm -Tutorial: So erstellen Sie Diagramme in Google Sheets
Apr 11, 2025 am 09:06 AM
Google Sheets -Diagramm -Tutorial: So erstellen Sie Diagramme in Google Sheets
Apr 11, 2025 am 09:06 AM
In diesem Tutorial werden Sie angezeigt, wie Sie verschiedene Diagramme in Google Sheets erstellen und den richtigen Diagrammtyp für verschiedene Datenszenarien auswählen. Sie lernen auch, wie Sie 3D- und Gantt -Diagramme erstellen und Charts bearbeiten, kopieren und löschen. Visualisierung von Daten ist Cru
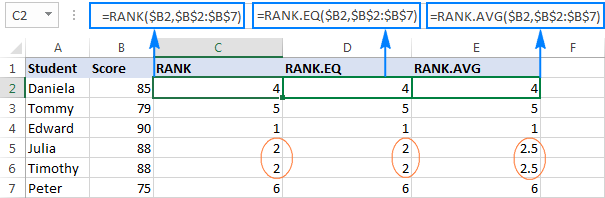 Excel -Rangfunktion und andere Möglichkeiten zur Berechnung des Ranges
Apr 09, 2025 am 11:35 AM
Excel -Rangfunktion und andere Möglichkeiten zur Berechnung des Ranges
Apr 09, 2025 am 11:35 AM
Dieses Excel -Tutorial beschreibt die Nuancen der Rangfunktionen und zeigt, wie Daten in Excel basierend auf mehreren Kriterien, Gruppendaten, den Perzentilrang und mehr berechnet werden. Die Bestimmung der relativen Position einer Zahl innerhalb einer Liste ist EASI
 So sprengen Sie Daten in Excel -Spalten und Zeilen (vertikal und horizontal)
Apr 11, 2025 am 09:05 AM
So sprengen Sie Daten in Excel -Spalten und Zeilen (vertikal und horizontal)
Apr 11, 2025 am 09:05 AM
Dieses Tutorial zeigt mehrere effiziente Methoden für vertikal und horizontal umdrehte Tabellen in Excel, wodurch die ursprüngliche Formatierung und Formeln erhalten bleibt. Während Excel eine direkte "Flip" -Funktion fehlt, gibt es mehrere Problemumgehungen. Dat umdrehen
