
bitmap是android中一种重要的图片处理机制,它可以用来获取图片的相关信息,同时可以对图片进行裁剪、缩放等操作,也可以指定图片格式进行保存。相信对于oom再熟悉不过了,oom的产生是一个非常头疼的事情,如果在加载图片的时候未对大图进行处理,它将会占用非常大的内存,这样就非常容易产生oom。所以我们必须要有意识的对大图进行压缩加载,这样才能更好的保证app的正常运行与性能的稳定。
那么如果计算一张图片加载过程中所占的内存大小呢?在这之前,我们先来了解一下关于Bitmap两个主要配置。
这是用来指定Bitmap的图片的压缩格式,在Bitmap中是一个Enum结构,主要表现为以下三种格式。
    public enum CompressFormat {
        JPEG    (0),
        PNG     (1),
        WEBP    (2);

        CompressFormat(int nativeInt) {
            this.nativeInt = nativeInt;
        }
        final int nativeInt;
}JPEG: 以JPEG算法进行压缩,压缩后的图片格式可以为.jpeg或者.jpg,这是一种有损压缩,没有透明度。
PNG:以PNG算法进行压缩,压缩后的图片格式是.png,这是一种无损压缩,可以有透明度。
WEBP:以WEBP算法进行压缩,压缩后的图片格式是.webp,这是一种有损压缩。相同质量下,webp比jpeg图像小40%,但webp图片的编码时间比jpeg长8倍。
这是关于Bitmap像素存储的方式配置,不同的像素存储,对图片的质量也会有不同的影响。在Bitmap中是一个Enum结构,主要表现于以下四种格式。
ALPHA_8:每一个像素都只储存单一的透明度,即只有透明度,总共占8位,1字节。
ARGB_4444:每一个像素都以A(透明度)R(Red)G(Green)B(Blue)四部分组成,每部分占4位,总共占16位,2字节。由于这种格式的图片质量太差,所以中API 13就已经废弃了,推荐使用ARGB_8888。
ARGB_8888:每一个像素都以A(透明度)R(Red)G(Green)B(Blue)四部分组成,每部分占8位,总共32位,4字节。
RGB_565:每一个像素都以R(Red)G(Green)B(Blue)三部分组成,各个部分分别占5位,6位,5位,总共16位,2字节。
所以如果为了防止OOM对图片进行压缩,一般会使用RGB_565格式,因为ALPHA_8只有透明度,对于正常图片未意义;ARGB_4444显示的图片质量太差;ARGB_8888占用的内存最多。
如果加载的图片的宽度为1080、高度为675、Config为ARGB_8888。那么它占的内存为:1080 x 675 x 4 = 2916000.折算成M为2916000 / 1024 / 1024 = 2.78M。一种图片就近3M,如果加载10张或者100张,所占的内存可想而知。这样的话会很容易将内存消耗殆尽,同时对于Android App来说根本就不需要这么高清的图片,所以我们在加载图片的时候可以对其进行相应的处理,例如:对宽高进行缩放,亦或者将Config改我RGB_565。这样不仅有效的减小了内存的占用,同时也不影响图片的清晰度的展示。
下面我们来看下如何通过Bitmap与BitmapFactory来对图片进行处理
对于使用Bitmap进行图片的压缩处理,它主要提供了以下有效方法。
| status return | method name |
|---|---|
| boolean | compress(Bitmap.CompressFormat format, int quality, OutputStream stream) |
| static Bitmap | createBitmap(DisplayMetrics display, int[] colors, int width, int height, Bitmap.Config config) |
| static Bitmap | createBitmap(DisplayMetrics display, int[] colors, int offset, int stride, int width, int height, Bitmap.Config config) |
| static Bitmap | createBitmap(Bitmap source, int x, int y, int width, int height) |
| static Bitmap | createBitmap(Bitmap src) |
| static Bitmap | createBitmap(DisplayMetrics display, int width, int height, Bitmap.Config config) |
| static Bitmap | createBitmap(Bitmap source, int x, int y, int width, int height, Matrix m, boolean filter) |
| static Bitmap | createBitmap(int width, int height, Bitmap.Config config) |
| static Bitmap | createBitmap(int[] colors, int offset, int stride, int width, int height, Bitmap.Config config) |
| static Bitamp | createBitmap(int[] colors, int width, int height, Bitmap.Config config) |
| static Bitmap | createScaledBitmap(Bitmap src, int dstWidth, int dstHeight, boolean filter) |
compress方法通过指定图片的CompressFormat格式与压缩百分比来对图片进行压缩处理,同时将压缩的图片保存到指定的outputStream中。我们来看下具体用法
val fs = FileOutputStream(path)
val out = ByteArrayOutputStream()
scaleBitmap.compress(Bitmap.CompressFormat.JPEG, 30, out)
LogUtils.d("compressBitmap jpeg of byteCount %d.", out.toByteArray().size)
fs.write(out.toByteArray())
fs.close()在这里要注意quality代表百分比,值为0~100,值越小压缩的后的大小就越小。例如上面的示例,quality为30,则代表对原图进行压缩70%,保留30%。同时Bitmap.CompressFormat在前面已经详细介绍了,要注意不同的格式图片的展示效果也不同,例如JPEG的格式图片是没有透明度的。
特别注意的:对于Bitmap.CompressFormat.PNG类型的格式,quality将失去效果,因为其格式是无损的压缩;再者,使用compress方法并不是对显示处理的图片进行了压缩,它只是对原图进行压缩后保存到本地磁盘中,并不改变显示的图片。主要用途作用于保存图片到本地,以便下次加载,减小图片在本地磁盘所占的磁盘大小。
对于createBitmap方法,Bitmap中提供了9种不同数据源的压缩处理方法。分别有通过colors数组、Bitmap与DisplayMetrics等来决定。
例如使用colors数组
val colors = intArrayOf(Color.RED, Color.GREEN, Color.BLUE,
                        Color.GREEN, Color.BLUE, Color.RED,
                        Color.BLUE, Color.RED, Color.GREEN)
val displayMetricsBitmap = Bitmap.createBitmap(DisplayMetrics(),colors,3, 3,Bitmap.Config.ARGB_8888)
LogUtils.d("displayMetricsBitmap of byteCount %d and rowBytes %d", displayMetricsBitmap.byteCount, displayMetricsBitmap.rowBytes)这里创建了一个3 x 3的图片,Config为ARGB_8888,所以最终图片在内存中的大小为3 x 3 x 4 = 36字节。而图片的展示效果是通过colors数组中的颜色也实现的,3 x 3 = 9 分别对应colors中的9个像素点的色值。所以colors的大小最小必须大于等于9,即宽*高的大小。为何说最小,因为Bitmap还提供了offset与stride参数的重载方法。这两个参数分别代表在colors中的开始点的偏移量与取值的步伐,即每个取值点间的跨度。
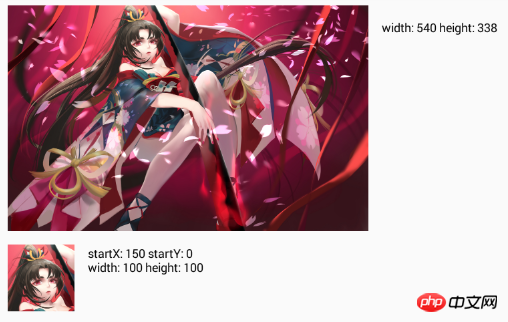
在实际是使用createBitmap最多的还是用它的Bitmap重载方法,主要用来对原图片进行裁剪。我们直接看它的使用方式:
//bitmap
val bitmapBitmap = Bitmap.createBitmap(scaleBitmap, 150, 0, 100, 100)
image_view?.setImageBitmap(scaleBitmap)
image_view_text.text = "width: " + scaleBitmap.width + " height: " + scaleBitmap.height
sub_image_view.setImageBitmap(bitmapBitmap)
sub_image_view_text.text = "startX: 150 startY: 0\n" + "width: " + bitmapBitmap.width + " height: " + bitmapBitmap.height
主要参数是原Bitmap,我们所有的操作都是在原Bitmap中进行的。其中x = 150、y = 0代表从原Bitmap中的坐标(150,0)开始进行裁剪;width = 100、height = 100,裁剪后返回新的的Bitmap,且大小为100 x 100。
if (!source.isMutable() && x == 0 && y == 0 && width == source.getWidth() &&
        height == source.getHeight() && (m == null || m.isIdentity())) {
    return source;
}注意,如果原Bitmap是不可变的,同时需要的图参数与原图片相同,那么它会直接返回原Bitmap。是否可变可以通过Bitmap.isMutable判断。
看下上面的代码所展示的效果图:
最后通过传递Bitmap参数还有一个可选参数Matrix,它主要用于对Bitmap进行矩阵变换。
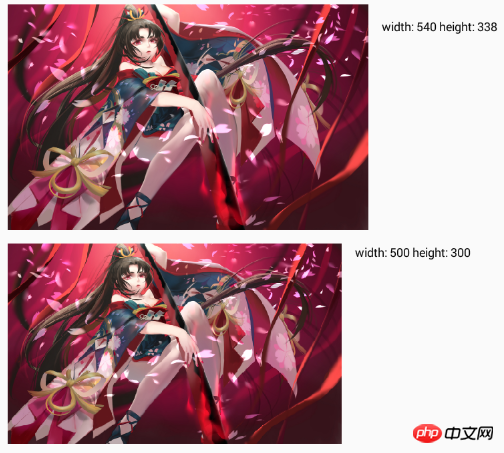
该方法相对上面两种就简单多了,它目的是对原Bitmap进行指定的宽高进行缩放,最终返回新的Bitmap。
注意:如果传入的宽高与原Bitmap相同,它将返回原Bitmap对象。
//createScaledBitmap
val createScaledBitmap = Bitmap.createScaledBitmap(scaleBitmap, 500, 300, false)
image_view?.setImageBitmap(scaleBitmap)
image_view_text.text = "width: " + scaleBitmap.width + " height: " + scaleBitmap.height
sub_image_view.setImageBitmap(createScaledBitmap)
sub_image_view_text.text = "width: " + createScaledBitmap.width + " height: " + createScaledBitmap.height
再来看下其实现源码
    public static Bitmap createScaledBitmap(@NonNull Bitmap src, int dstWidth, int dstHeight,
            boolean filter) {
        Matrix m = new Matrix();

        final int width = src.getWidth();
        final int height = src.getHeight();
        if (width != dstWidth || height != dstHeight) {
            final float sx = dstWidth / (float) width;
            final float sy = dstHeight / (float) height;
            m.setScale(sx, sy);
        }
        return Bitmap.createBitmap(src, 0, 0, width, height, m, filter);
}一目了然,内部就是使用到了Matrix,运用Matrix的知识进行宽高缩放;最后再调用前面所分析的createBitmap方法。只不过这里指定了初始点(0,0)而已,再传入原Bitmap的宽高与生成的Matrix。因此createBitmap方法中的注意点也是应用到createScaledBitmap中。
BitmapFactory主要用来解码Bitmap,通过不同的资源类型,例如:files、streams与byte-arrays。既然是继续资源的解码,自然可以在解码的过程中进行一些图片压缩处理。来看下它提供的主要解码方法。
| status return | method name |
|---|---|
| static Bitmap | decodeByteArray(byte[] data, int offset, int length, BitmapFactory.Options opts) |
| static Bitmap | decodeByteArray(byte[] data, int offset, int length) |
| static Bitmap | decodeFile(String pathName) |
| static Bitmap | decodeFile(String pathName, BitmapFactory.Options opts) |
| static Bitmap | decodeFileDescriptor(FileDescriptor fd) |
| static Bitmap | decodeFileDescriptor(FileDescriptor fd, Rect outPadding, BitmapFactory.Options opts) |
| static Bitmap | decodeResource(Resources res, int id, BitmapFactory.Options opts) |
| static Bitmap | decodeResource(Resources res, int id) |
| static Bitmap | decodeResourceStream(Resources res, TypedValue value, InputStream is, Rect pad, BitmapFactory.Options opts) |
| static Bitmap | decodeStream(InputStream is) |
| static Bitmap | decodeStream(InputStream is, Rect outPadding, BitmapFactory.Options opts) |
直接通过方法名就能很方便的分辨出使用哪种资源类型进行图片解码操作。例如:decodeByteArray方法是通过byte数组作为解析源,同时在解码过程中可以通过设置offset与length来控制解码的起始点与解码的大小。因此如果能够精确控制offset与length也就能够做到图片的裁剪效果。decodeFileDescriptor方法是通过文件描述符进行解码Bitmap。一般用不到,下面详细分析几种常用的方法。
该方法是通过文件路径来解码出Bitmap
//decodeFile
val decodeFileOptions = BitmapFactory.Options()
val decodeFileBitmap = BitmapFactory.decodeFile(mRootPath +"bitmap", decodeFileOptions)
decodeFileOptions.inSampleSize = 2
val decodeFileScaleBitmap = BitmapFactory.decodeFile(mRootPath + "bitmap", decodeFileOptions)
image_view?.setImageBitmap(decodeFileBitmap)
image_view_text.text = "width: " + decodeFileBitmap.width + " height: " + decodeFileBitmap.height
sub_image_view.setImageBitmap(decodeFileScaleBitmap)
sub_image_view_text.text = "width: " + decodeFileScaleBitmap.width + " height: " + decodeFileScaleBitmap.height
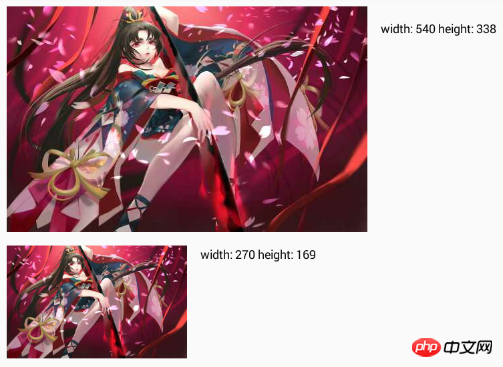
下面的图片比上面的图片宽高都缩小了一半,对图片进行了压缩操作。通过代码发现,下面的图片解码时设置了
decodeFileOptions.inSampleSize = 2
这里就涉及到了静态内部类BitmapFactory.Options,可以看上面的表发现大多数方法都有这个参数,它是一个可选项。主要用途是在图片解码过程中对图片的原有属性进行修改。它的参数配置大多数以in前缀开头,下面列举一些常用的配置设置属性。
| type | name | description | |
|---|---|---|---|
| boolean | inJustDecodeBounds | 如果为true,解码后不会返回Bitmap对象,但Bitmap宽高将返回到options.outWidth与options.outHeight中;反之返回。主要用于只需获取解码后的Bitmap的大小。 | |
| boolean | inMutable | 为true,代表返回可变属性的Bitmap,反之不可变 | |
| boolean | inPreferQualityOverSpeed | 为true,将在解码过程中牺牲解码的速度来获取更高质量的Bitmap | |
| Bitmap.Config | inPreferredConfig | 根据指定的Config来进行解码,例如:Bitmap.Config.RGB_565等 | |
| int | inSampleSize | 如果值大于1,在解码过程中将按比例返回占更小内存的Bitmap。例如值为2,则对宽高进行缩放一半。 | |
| boolean | inScaled | 如果为true,且inDesity与inTargetDensity都不为0,那么在加载过程中将会根据inTargetDensityl来缩放,在drawn中不依靠于图片自身的缩放属性。 | |
| int | inDensity | Bitmap自身的密度 | |
| int | inTargetDensity | Bitmap drawn过程中使用的密度 |
我们在来看下decodeFile的源码
    public static Bitmap decodeFile(String pathName, Options opts) {
        validate(opts);
        Bitmap bm = null;
        InputStream stream = null;
        try {
            stream = new FileInputStream(pathName);
            bm = decodeStream(stream, null, opts);
        } catch (Exception e) {
            /*  do nothing.
                If the exception happened on open, bm will be null.
            */
            Log.e("BitmapFactory", "Unable to decode stream: " + e);
        } finally {
            if (stream != null) {
                try {
                    stream.close();
                } catch (IOException e) {
                    // do nothing here
                }
            }
        }
        return bm;
}内部根据文件路径创建FileInputStream,最终调用decodeStream方法进解码图片。
至于decodeStream内部则是根据不同的InputStream类型调用不同的native方法。如果为AssetManager.AssetInputStrea类型则调用
nativeDecodeAsset(asset, outPadding, opts);
否则调用
nativeDecodeStream(is, tempStorage, outPadding, opts);
还有对应的decodeResourceStream方法内部也是调用了decodeStream.
    public static Bitmap decodeResourceStream(Resources res, TypedValue value,
            InputStream is, Rect pad, Options opts) {
        validate(opts);
        if (opts == null) {
            opts = new Options();
        }

        if (opts.inDensity == 0 && value != null) {
            final int density = value.density;
            if (density == TypedValue.DENSITY_DEFAULT) {
                opts.inDensity = DisplayMetrics.DENSITY_DEFAULT;
            } else if (density != TypedValue.DENSITY_NONE) {
                opts.inDensity = density;
            }
        }

        if (opts.inTargetDensity == 0 && res != null) {
            opts.inTargetDensity = res.getDisplayMetrics().densityDpi;
        }

        return decodeStream(is, pad, opts);
}decodeResourceStream内部做了对Bitmap的密度适配,最后再调用decodeStream,这样decodeStream也分析完毕。
decodeResource用法也很简单,传入相应本地的资源文件即可,需要缩放的话配置options参数。
val options = BitmapFactory.Options()
val bitmap = BitmapFactory.decodeResource(resources, R.drawable.yaodaoji, options)
随便看下它的源码
    public static Bitmap decodeResource(Resources res, int id, Options opts) {
        validate(opts);
        Bitmap bm = null;
        InputStream is = null;

        try {
            final TypedValue value = new TypedValue();
            is = res.openRawResource(id, value);

            bm = decodeResourceStream(res, value, is, null, opts);
        } catch (Exception e) {
            /*  do nothing.
                If the exception happened on open, bm will be null.
                If it happened on close, bm is still valid.
            */
        } finally {
            try {
                if (is != null) is.close();
            } catch (IOException e) {
                // Ignore
            }
        }

        if (bm == null && opts != null && opts.inBitmap != null) {
            throw new IllegalArgumentException("Problem decoding into existing bitmap");
        }

        return bm;
}通过res.openRawResource(id, value)来获取InputStream,最后再调用decodeResourceStream(res, value, is, null, opts)方法。这样就简单了,又回到了上面分析的方法中去了。
下面来做个总结,对于图片压缩主要使用到Bitmap与BitmapFactory这两个类,同时在使用这两个类之前也要对Bitmap中的CompressFormat与Config;BitmapFactory中的BitmapFactory.Options有所了解。然后再结合他们中的方法进行相应的压缩、裁剪操作。其实只要掌握几个常用的方法在日常的使用中就足够了。
最后如有有不足之处,希望指出!
tensorflow-梯度下降,有这一篇就足够了
Android共享动画兼容实现
Kotlin最佳实践
RecyclerView下拉刷新与上拉更多
七大排序算法总结
相关推荐:
mysql创建Bitmap_Join_Indexes中的约束与索引
以上就是Bitmap的图片压缩汇总 - Android成长之路 的详细内容,更多请关注php中文网其它相关文章!


Copyright 2014-2024 https://www.php.cn/ All Rights Reserved | php.cn | 湘ICP备2023035733号


 0
0 46
46


![ThinkPHP5实战之[教学管理系统]](https://img.php.cn/upload/course/000/000/068/6253d87459486427.png)


