jQuery webuploader uploads large files in parts
Generally when uploading files, the files to be uploaded are uploaded to the server through the client. At this time, the uploaded files are all in the server memory. If large files such as videos are uploaded, the server memory will be very tight, and Generally, we use flash or HTML5 for asynchronous upload. If the file is relatively large, even if the client shows that the file has been uploaded 100%, there will still be a long wait, and the current page's request to the server will also be blocked. block.
Under normal circumstances, it is usually saved directly on the server after the long transfer is completed.
1 2 3 4 5 6 7 |
|
In recent projects, Baidu’s open source upload component webuploader has been used. Officially, webuploader supports multi-part uploading.
1 2 3 4 5 6 7 8 9 10 11 12 |
|
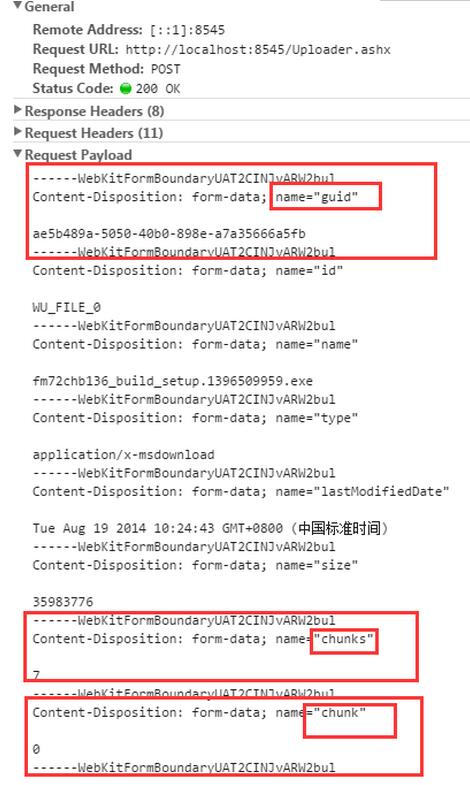
webuploader's multi-part upload is to divide the file into several parts, and then post the data to the file receiving end you define. If the uploaded file is larger than the fragment size, it will be divided into parts, and then it will be posted Add two form elements chunk and chunks to the data. The former indicates the order of the current fragment in the uploaded fragment (starting from 0), and the latter represents the total number of fragments.
After selecting a file, it was divided into 7 shards, so the process of posting data to Uploader.ashx was performed 7 times.
The form elements chunk and chunks in each request and the GUID to indicate that they are fragments of the same file
After receiving the data on the server side, it can be processed according to these parameters.
1. Press the GUID to create a temporary file
2. Append the received fragment data to the file corresponding to the GUID.
3. Rename the temporary file according to the uploaded file name
4. If there is no sharding, save it directly
1 2 3 4 5 6 7 8 9 10 11 12 13 14 15 16 17 18 19 20 21 22 23 24 25 26 27 28 29 30 31 32 33 34 35 36 37 38 39 40 41 42 43 44 45 |
|
There are still some unresolved problems, although the needs are temporarily met:
1. If the upload concurrency exceeds 1 At this time, there will be a split upload server that has not finished processing, and the second split will arrive at the same time, so there will be an error that the file is occupied.
2. If locking solves the first problem, then locking will definitely affect the efficiency (at the same time, only one process can access the code that saves the file).
3. There is a problem with the order of files. It is possible that the second fragment arrives first, and then the first one arrives. Then you cannot append the stream to the temporary file at once. You can only create multiple temporary files and wait for all fragments to be processed. After the upload is completed, it is spliced into one file.
It’s just a demo, I hope someone can help solve the existing problems.

Hot AI Tools

Undresser.AI Undress
AI-powered app for creating realistic nude photos

AI Clothes Remover
Online AI tool for removing clothes from photos.

Undress AI Tool
Undress images for free

Clothoff.io
AI clothes remover

Video Face Swap
Swap faces in any video effortlessly with our completely free AI face swap tool!

Hot Article

Hot Tools

Notepad++7.3.1
Easy-to-use and free code editor

SublimeText3 Chinese version
Chinese version, very easy to use

Zend Studio 13.0.1
Powerful PHP integrated development environment

Dreamweaver CS6
Visual web development tools

SublimeText3 Mac version
God-level code editing software (SublimeText3)

Hot Topics


Detailed explanation of jQuery reference method: Quick start guide jQuery is a popular JavaScript library that is widely used in website development. It simplifies JavaScript programming and provides developers with rich functions and features. This article will introduce jQuery's reference method in detail and provide specific code examples to help readers get started quickly. Introducing jQuery First, we need to introduce the jQuery library into the HTML file. It can be introduced through a CDN link or downloaded

How to use PUT request method in jQuery? In jQuery, the method of sending a PUT request is similar to sending other types of requests, but you need to pay attention to some details and parameter settings. PUT requests are typically used to update resources, such as updating data in a database or updating files on the server. The following is a specific code example using the PUT request method in jQuery. First, make sure you include the jQuery library file, then you can send a PUT request via: $.ajax({u

jQuery is a fast, small, feature-rich JavaScript library widely used in front-end development. Since its release in 2006, jQuery has become one of the tools of choice for many developers, but in practical applications, it also has some advantages and disadvantages. This article will deeply analyze the advantages and disadvantages of jQuery and illustrate it with specific code examples. Advantages: 1. Concise syntax jQuery's syntax design is concise and clear, which can greatly improve the readability and writing efficiency of the code. for example,

Title: jQuery Tips: Quickly modify the text of all a tags on the page In web development, we often need to modify and operate elements on the page. When using jQuery, sometimes you need to modify the text content of all a tags in the page at once, which can save time and energy. The following will introduce how to use jQuery to quickly modify the text of all a tags on the page, and give specific code examples. First, we need to introduce the jQuery library file and ensure that the following code is introduced into the page: <

Title: Use jQuery to modify the text content of all a tags. jQuery is a popular JavaScript library that is widely used to handle DOM operations. In web development, we often encounter the need to modify the text content of the link tag (a tag) on the page. This article will explain how to use jQuery to achieve this goal, and provide specific code examples. First, we need to introduce the jQuery library into the page. Add the following code in the HTML file:

How to remove the height attribute of an element with jQuery? In front-end development, we often encounter the need to manipulate the height attributes of elements. Sometimes, we may need to dynamically change the height of an element, and sometimes we need to remove the height attribute of an element. This article will introduce how to use jQuery to remove the height attribute of an element and provide specific code examples. Before using jQuery to operate the height attribute, we first need to understand the height attribute in CSS. The height attribute is used to set the height of an element

jQuery is a popular JavaScript library that is widely used to handle DOM manipulation and event handling in web pages. In jQuery, the eq() method is used to select elements at a specified index position. The specific usage and application scenarios are as follows. In jQuery, the eq() method selects the element at a specified index position. Index positions start counting from 0, i.e. the index of the first element is 0, the index of the second element is 1, and so on. The syntax of the eq() method is as follows: $("s

How to tell if a jQuery element has a specific attribute? When using jQuery to operate DOM elements, you often encounter situations where you need to determine whether an element has a specific attribute. In this case, we can easily implement this function with the help of the methods provided by jQuery. The following will introduce two commonly used methods to determine whether a jQuery element has specific attributes, and attach specific code examples. Method 1: Use the attr() method and typeof operator // to determine whether the element has a specific attribute