本篇文章给大家讲解html中用canvas函数配合js画出一个圆锥形的图形实例,canvas是html5中新增加的新属性,对html5中的canvas感兴趣的朋友学习测试下吧。
以下是我们给大家分享是实例代码:
<html>
<head>
<title>我的第一个 HTML 页面</title>
</head>
<body>
<canvas id='cvs' width='1000' height="800">
</canvas>
<script>
const cvs =document.getElementById('cvs');
// 计算画布的宽度
const width = cvs.offsetWidth;
// 计算画布的高度
const height = cvs.offsetHeight;
const ctx = cvs.getContext('2d');
// 设置宽高
cvs.width = width;
cvs.height = height;
/**
ctx:context
x,y:偏移 纵横坐标
w:度
h:高
color:颜色 数组,可以把颜色提取出来方便自定义
*/
var Cone = function(ctx,x,y,w,h,d,color){
ctx.save();
ctx.translate(x, y);
var blockHeight=h;
// 中点
var x2 = 0;
var y2 = 20;
var k2 = 10;
var w2 = w;
var h2 = h;
// 递减度
var decrease = d;
ctx.beginPath();
ctx.moveTo(x2+w2,y2);
// 椭圆加了边框,所以加1减1
ctx.bezierCurveTo(x2+w2, y2+k2, x2-w2, y2+k2, x2-w2-1, y2);
ctx.lineTo(x2-w2+decrease,y2+blockHeight);
ctx.bezierCurveTo(x2-w2+decrease, y2+blockHeight+k2, x2+w2-decrease, y2+blockHeight+k2, x2+w2-decrease, y2+blockHeight);
ctx.lineTo(x2+w2+1,y2);
var linear = ctx.createLinearGradient(x2-w2, y2,x2+w2-decrease, y2+blockHeight);
linear.addColorStop(0,color[0]);
linear.addColorStop(1,color[1]);
ctx.fillStyle = linear ;
ctx.strokeStyle=linear
ctx.fill();
//ctx.stroke();
ctx.closePath();
//画椭圆
ctx.beginPath();
ctx.moveTo(x2-w2, y2);
ctx.bezierCurveTo(x2-w2, y2-k2, x2+w2, y2-k2, x2+w2, y2);
ctx.bezierCurveTo(x2+w2, y2+k2, x2-w2, y2+k2, x2-w2, y2);
var linear = ctx.createLinearGradient(x2-w2, y2,x2+w2-decrease, y2+blockHeight);
linear.addColorStop(1,color[0]);
linear.addColorStop(0,color[1]);
ctx.fillStyle = linear ;
ctx.strokeStyle=linear
ctx.closePath();
ctx.fill();
ctx.stroke();
ctx.restore();
};
function dr(m){
const colorList =[
{
color:['#76e3ff','#2895ea'],
height:60
},
{
color:['#17ead9','#5d7ce9'],
height:30
},
{
color:['#1ca5e5','#d381ff'],
height:40
},
{
color:['#ffa867','#ff599e'],
height:70
},
{
color:['#ffa6e3','#ec6a70'],
height:50
},
{
color:['#f9c298','#d9436a'],
height:30
},
{
color:['#eb767b','#9971dc'],
height:30
},
{
color:['#f06af9','#5983ff'],
height:100
},
];
const space = 20;
let coneHeight = 0;
// 间隔
const gap = 20;
const x = 380;
const y = 20;
const angle = 30;
let coneWidth=0;
colorList.forEach((item)=>{
coneHeight += item.height +space;
});
// 最下面的先画(层级)
colorList.reverse().forEach((item,index)=>{
const decrease =Math.tan(Math.PI*angle/180)*(item.height+space);
coneWidth=coneWidth + decrease;
coneHeight = coneHeight-item.height - space;
//圆锥
Cone(ctx,x,coneHeight ,coneWidth ,item.height,decrease,item.color);
// 中点
const cX =parseInt(x)+0.5;
const cY = parseInt(coneHeight + space+ item.height/2)+0.5;
//文字
ctx.save();
ctx.translate(cX , cY );
ctx.textBaseline='top';
ctx.textAlign='center';
const fontSize = item.height/2>=40?40:item.height/2;
ctx.font = fontSize + 'px serif';
//const textMetrics = ctx.measureText('Hello World');
ctx.fillStyle = '#ffffff';
ctx.fillText('5000',0,-fontSize/3);
ctx.restore();
const xLineA =parseInt(coneWidth-decrease/2)+10;
const xLine =parseInt(m+xLineA )>=x?x:m+xLineA ;
//线
ctx.save();
ctx.translate(cX , cY );
ctx.setLineDash([3,2]);
ctx.strokeStyle = '#a4a4a4';
ctx.beginPath();
ctx.moveTo(xLineA , 0);
ctx.lineTo(xLine +20, 0);
ctx.stroke();
ctx.restore();
//描述文字
ctx.save();
ctx.translate(cX , cY );
ctx.textBaseline='middle';
ctx.textAlign='left';
ctx.font = '22px serif';
//const textMetrics = ctx.measureText('Hello World');
ctx.fillStyle = '#4a4a4a';
ctx.fillText('进入收件列表2',xLine+gap ,0);
ctx.restore();
//转化率文字
ctx.save();
ctx.translate(cX , cY );
ctx.textBaseline='middle';
ctx.textAlign='left';
ctx.font = '28px bold serif ';
ctx.fillStyle = '#007dfd';
ctx.fillText('20%',xLine+gap ,(item.height+gap)/2 );
ctx.restore();
});
}
let m=0;
let gravity =10;
(function drawFrame(){
window.requestAnimationFrame(drawFrame,cvs);
ctx.clearRect(0,0,cvs.width,cvs.height);
m += gravity;
dr(m);
})();
</script>
</body>
</html>这是脚本之家测试后的完成图:
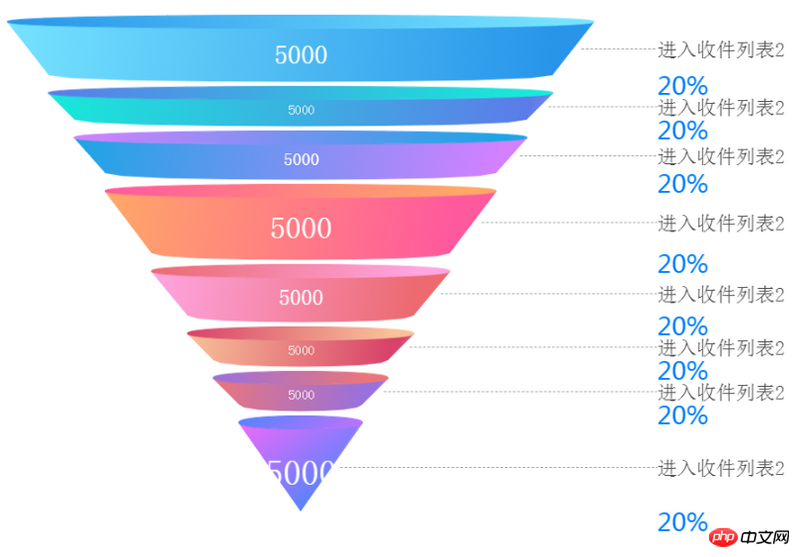
以上就是本文的所有内容了,希望会给大家带来帮助!!
相关推荐:
JavaScript html5 canvas实现图片上画超链接
以上就是JS+canvas画一个圆锥实例代码_javascript技巧的详细内容,更多请关注php中文网其它相关文章!


Copyright 2014-2024 https://www.php.cn/ All Rights Reserved | php.cn | 湘ICP备2023035733号


 0
0 35
35


![ThinkPHP5实战之[教学管理系统]](https://img.php.cn/upload/course/000/000/068/6253d87459486427.png)