本示例使用html5 canvas,简单的编写了上传头像的裁剪效果,移动端支持拖拽后裁剪, 虽然样式不好看,但是功能还算全:
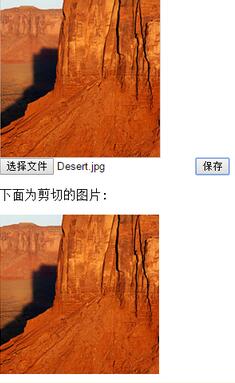
下图为裁剪后的效果:
html部分:
XML/HTML Code复制内容到剪贴板
- nbsp;html>
-
html lang="en">
-
head>
-
meta charset="UTF-8">
-
title>上传头像title>
-
meta name="renderer" content="webkit">
-
meta name="viewport" content="width=device-width, initial-scale=1.0">
-
head>
-
body>
-
div id="imgCrop" style="width:200px;height:200px;border:1px solid #ccc;overflow:hidden;">
-
img src="img/test.jpg" alt="">
-
div>
-
input type="file" accept="image/*" />
-
button id="save">保存button>
-
p>下面为剪切的图片:p>
-
div id="imgShow">div>
-
body>
-
html>
JavaScript部分:
JavaScript Code复制内容到剪贴板
- var $imgCrop = $("#imgCrop");
-
var $img = $imgCrop.find("img");
-
var img = $img[0];
-
var width = parseInt($imgCrop.css("width"));
-
var height = parseInt($imgCrop.css("height"));
-
var startX,startY,scale = 1;
-
var x = 0,y = 0;
-
$("input").on("change",function(){
-
var fr = new FileReader();
-
var file = this.files[0]
-
-
if(!/image\/\w+/.test(file.type)){
-
alert(file.name + "不是图片文件!");
-
return;
- }
- console.log(file);
-
$img.removeAttr("height width");
- fr.readAsDataURL(file);
-
-
fr.onload = function(){
- img.src = fr.result;
-
var widthInit = img.width;
-
if(img.width>img.height){
- img.height = height;
- x = (width - img.width)/2;
- y = 0;
-
}else{
- img.width = width;
- x = 0;
- y = (height - img.height)/2;
- }
- scale = widthInit/img.width;
- move($img, x, y);
-
- };
-
- });
-
-
img.addEventListener("touchstart",function(e){
- startX = e.targetTouches[0].pageX;
- startY = e.targetTouches[0].pageY;
-
-
return;
-
- });
-
img.addEventListener("touchmove",function(e){
- e.preventDefault();
- e.stopPropagation();
-
-
var changeX = e.changedTouches[0].pageX - startX + x;
-
var changeY = e.changedTouches[0].pageY - startY + y;
-
-
move($(this), changeX, changeY);
-
return;
-
- });
-
img.addEventListener("touchend",function(e){
-
var changeX = e.changedTouches[0].pageX - startX + x;
-
var changeY = e.changedTouches[0].pageY - startY + y;
-
- x = x + e.changedTouches[0].pageX - startX;
- y = y + e.changedTouches[0].pageY - startY;
-
-
move($(this), changeX, changeY);
-
return;
-
- });
-
-
function move(ele, x, y){
- ele.css({
-
'-webkit-transform' : 'translate3d(' + x + 'px, ' + y + 'px, 0)',
-
'transform' : 'translate3d(' + x + 'px, ' + y + 'px, 0)'
- });
- }
-
-
$("#save").on("click",function(){
-
var url = imageData($img);
- console.log(url);
-
-
$("#imgShow").html("
![HTML5 canvas实现移动端上传头像拖拽裁剪效果_html5教程技巧]() +url+" />");;
+url+" />");;
- });
-
-
function imageData($img) {
-
var canvas = document.createElement('canvas');
-
var ctx = canvas.getContext('2d');
- canvas.width = width ;
- canvas.height = height;
- ctx.drawImage(img, -x*scale, -y*scale, width*scale, height*scale, 0, 0, width, height);
-
return canvas.toDataURL();
- }
-
以上就是本文的全部内容,希望对大家的学习有所帮助。
原文:http://www.cnblogs.com/yifengBlog/p/5265598.html


 0
0 24
24


![ThinkPHP5实战之[教学管理系统]](https://img.php.cn/upload/course/000/000/068/6253d87459486427.png)