

今天是第五天上课,朱老师讲解了HTML中重要的盒子模型,涉及到了几种元素对齐的场景以及相对定位于绝对定位的应用,
1、盒子模型
代码:
<!DOCTYPE html>
<html>
<head>
	<title>盒模型padding + border + margin</title>
	<style type="text/css">
		.box1{
			width:200px;
			height:200px;
			background-color: lightpink;
			/*padding-top:10px;
			padding-right:10px;
			padding-bottom: 10px;
			padding-left: 10px;*/

			/*padding:10px 20px;/*上下  左右*/

			/*padding:10px 20px 30px ;/*上 左右 下	*/

			/*只要是第二个参数,都是代表左右*/

			padding:10px 20px 30px 40px;/*上 右 下 左*/

			border-top-width:10px;
			border-top-style: solid;;
			border-top-color: #000000;

			border-right:10px;
			border-right: solid;;
			border-right: red;

			border:5px solid cyan;/*border简写,像素 样式 颜色*/
			box-shadow:5px 5px 5px 5px grey;

			margin-top:10px;
			margin-right:10px;
			margin-bottom: 10px;
			margin-left: 10px;

			/*盒子宽高:content + padding + border + margin */
			margin-bottom:70px;

		}
		.box2{
			width:200px;
			height:200px;
			background-color: blue;
			margin-top:100px;/*与上面的margin-bottom重叠,造成坍塌,最后只有100px的margin*/
		}
	</style>
</head>
<body>
<div class="box1">
</div>
<div class="box2">

</div>
</body>
</html>点击 "运行实例" 按钮查看在线实例
总结:1. padding与margin的参数顺序不论是二个三个还是四个,第二个参数都是指左右的内外边距。
(参数是两个时:上下 左右;三个时:上 左右 下; 四个时:上 右 下 左 ;)
2. padding 会将盒子模型撑大,margin在垂直方向会造成塌陷,这两点需要注意。
2、元素对齐
代码:
<!DOCTYPE html>
<html>
<head>
	<meta charset="utf-8">
	<title>元素对齐方式</title>
</head>
<body>
1.子元素是行内元素:a,span等
a:水平居中:在父元素应用:text-align:center;
b:垂直居中:在行内子元素上设置行高与父元素等高:line-height:200px;

<style type="text/css">
	.box1{
		width:200px;
		height:200px;
		background-color:cyan;
		text-align:center;/*水平居中*/
		line-height: 200px;/*因为是单行元素,所以可以通过设置行高和父元素的高相同来实现垂直居中*/
	 }
</style>
<div class="box1">
	<a href="">php中文网</a>
</div>

2.子元素是多行的内联文本
a:水平居中:在父元素应用:text-align:center;
b:垂直居中:在父元素设置:display:table-cell;vertical-align:middle;
<style type="text/css">
	.box2{
		width:200px;
		height:200px;
		background-color:lightgreen;
		text-align:center;/*水平居中*/
		display:table-cell;/*变成表格的单元格,垂直居中时这个属性设置很重要*/
		vertical-align: middle;/*垂直居中*/
	 }
</style>
<div class="box2">
	<span>php中文网</span>
	<span>www.php.cn</span>
</div>

3.子元素是块元素
a: 水平居中: 子元素设置左右外边距自动适应容器margin: auto;
b:垂直居中: 在父元素: display:table-cell;vertical-align: middle;
<style type="text/css">
	.box3{
		width:200px;
		height:200px;
		background-color:yellow;
		display:table-cell;
		vertical-align: middle;
	 }
	 .box3 .child{
	 	width:100px;
	 	height: 100px;
	 	background-color: green;
	 	margin: auto;/*水平居中*/
	 }

</style>

<div class="box3">
	<div class="child"></div>
</div>

4. 子元素是不定宽的块元素
a: 水平居中: 子元素转为行内元素:display:inline,父级加: text-align:center
b: 垂直居中: 在父元素: display:table-cell;

<style type="text/css">
	.box4{
		width:200px;
		height:200px;
		background-color:lightgrey;
		text-align:center;
		display: table-cell;
		vertical-align: middle;
	 }
	 .box4 ul{
	 	margin: 0;
	 	padding: 0;
	 	border:1px solid lightgreen;
	 }
	 .box4 li{
	 	list-style: none;
	 	display:inline;
	 	color: lightpink;
	 	/*line-height: 200px;用line-height也行*/

	 }

</style>

<div class="box4">
	<ul>
        <li><a href="">1</a></li>
        <li><a href="">2</a></li><!-- 类型:display:list-item -->
        <li><a href="">3</a></li>
        <li><a href="">4</a></li>
        <li><a href="">5</a></li>
    </ul>
</div>

</body>
</html>点击 "运行实例" 按钮查看在线实例
总结:元素对齐关键是看父子元素是什么类型的元素;水平居中的设置大部分在于父级元素的text-align: center属性的设置;垂直居中的设置大部分在于父级元素的display: table-cell与vertical-align: middle 属性设置。
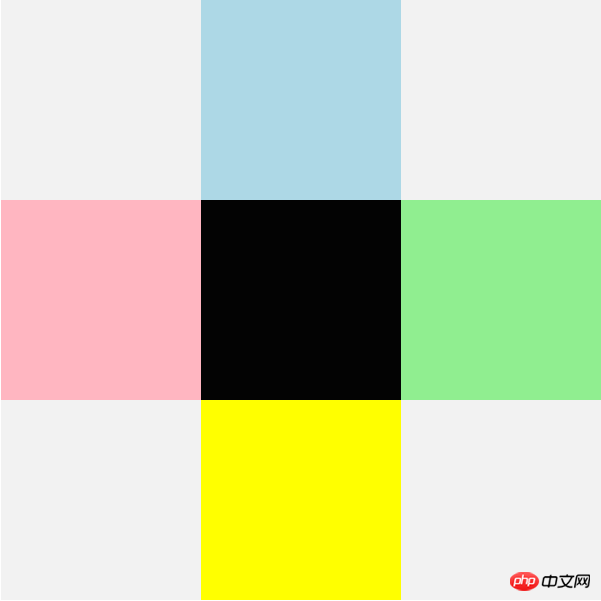
3、利用定位完成十字架效果
代码:
<!DOCTYPE html>
<html>
<head>
	<title></title>
	<style type="text/css">
		.box{
			width: 600px;
			height: 600px;
			background-color:#F2F2F2;
			position: relative;
		 }
		.box1{
		 	width: 200px;
		 	height: 200px;
		 	background-color: lightblue;
		 	position: absolute;
		 	top:0;
		 	left:200px;
		 }
		.box2{
		 	width: 200px;
		 	height: 200px;
		 	background-color: lightpink;
		 	position: absolute;
		 	top:200px;
		 	left:0;
		 }

		.box3{
		 	width: 200px;
		 	height: 200px;
		 	background-color: yellow;
		 	position: absolute;
		 	top:400px;
		 	left:200px;
		 }

		.box4{
		 	width: 200px;
		 	height: 200px;
		 	background-color: lightgreen;
		 	position: absolute;
		 	top:200px;
		 	left:400px;
		 }

		.box5{
		 	width: 200px;
		 	height: 200px;
		 	background-color: #030303;
		 	position: absolute;
		 	top:200px;
		 	left:200px;
		 }

	</style>
</head>
<body>
<div class="box">
	<div class="box1"></div>
	<div class="box2"></div>
	<div class="box3"></div>
	<div class="box4"></div>
	<div class="box5"></div>
</div>
</body>
</html>点击 "运行实例" 按钮查看在线实例
效果图:

总结:相对定位:相对于自身定位。
绝对定位:绝对定位的元素会脱离文档流,后面元素会占据其位置。
课堂总结:此次朱老师讲解的盒子模型、元素对齐与定位都是与页面布局相关,这个知识一定要反复巩固。

Copyright 2014-2024 https://www.php.cn/ All Rights Reserved | php.cn | 湘ICP备2023035733号